
Many homeowners are surprised when they hear about the air gap requirement for dishwashers. You might wonder why it matters, how it works, and why plumbing codes insist on it. Installing an air gap isn’t just a technical step—it’s a key part of keeping your dishwasher and water supply safe. Done correctly, it stops dirty water from flowing back into your clean dishes and protects your family’s health. Whether you’re a DIY enthusiast or just want to understand the process before calling a plumber, this guide will walk you through everything you need to know, from what an air gap does to the exact steps for installing one. You’ll get practical advice, expert tips, and answers to common questions, all in simple, clear English.
What Is A Dishwasher Air Gap And Why Does It Matter?
A dishwasher air gap is a small device, usually metal or plastic, that sits above your kitchen sink. It connects your dishwasher to the sink drain. Its main job is to stop dirty water from the sink or garbage disposal from flowing back into your dishwasher.
Why is this important? If dirty water goes back into your dishwasher, it can contaminate your dishes, glasses, and even the inside of the machine. Worse, it could allow bacteria or food particles to enter your home’s water supply. This is called backflow, and it’s a serious health risk.
Most building codes in the United States require an air gap for all dishwashers. Even if your local code doesn’t, many experts still recommend it for safety. You’ll often see the air gap as a little cylinder with a cap, usually next to your kitchen faucet.
How Does An Air Gap Work?
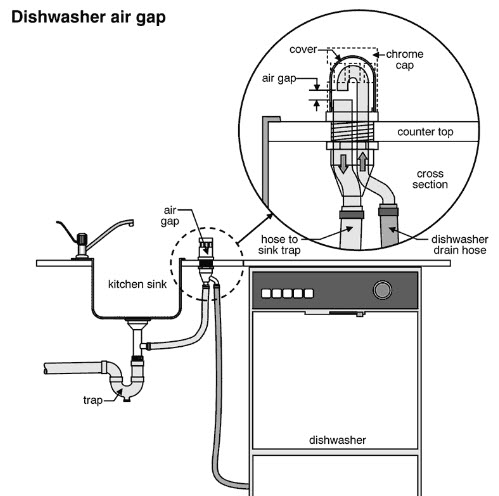
The air gap is a simple but clever device. It works by creating a physical space—a gap of air—between the dishwasher’s drain hose and the sink’s drain. Here’s how the process happens:
- The dishwasher pumps dirty water out through a hose.
- The water enters the air gap, which is mounted above the sink.
- Inside the air gap, the water flows through a chamber, then down another hose into the sink drain or garbage disposal.
- If the drain is blocked, water will spill out of the air gap cap onto the sink, not back into the dishwasher.
This air gap makes it impossible for contaminated water to flow back into the dishwasher, even if the sink drain is clogged.
Tools And Materials You’ll Need
Before you start, gather all the tools and parts. Having everything ready will make the job much easier and faster. Here’s what you need:
- Dishwasher air gap kit (includes the air gap body and cap)
- Flexible drain hose (usually comes with the dishwasher)
- Discharge hose (to connect air gap to drain or disposal)
- Hose clamps (at least two)
- Drill (if your sink doesn’t already have an air gap hole)
- Hole saw or step bit (if drilling is needed)
- Screwdriver
- Adjustable wrench
- Plumber’s putty or silicone sealant
- Measuring tape
- Bucket or towels (for possible spills)
- Utility knife (to trim hoses if needed)
Having a helper can also make the process easier, especially if you’re working in a tight space.
Choosing The Right Air Gap
Not all air gaps are the same. They come in different shapes, finishes, and sizes. Here are some factors to consider:
- Material and Finish: Most air gaps are made from plastic or metal. Choose a finish that matches your kitchen fixtures (stainless steel, chrome, brushed nickel, etc. ).
- Compatibility: Make sure the air gap fits the hole in your sink or countertop. Standard diameter is 1-3/8 inches.
- Local Codes: Some areas have specific requirements for air gaps. Check your local plumbing code before buying.
- Design: Some air gaps have decorative covers or low-profile designs. This is mostly about appearance, not function.
Pro Tip: Always double-check that the air gap you buy fits the hoses for your specific dishwasher model. Some European dishwashers may need adapters.
Where To Install The Air Gap
The air gap should be mounted on your sink or countertop, right next to the kitchen faucet. Most sinks have a small “knockout” hole for this purpose. If your sink doesn’t have one, you’ll need to drill a hole (see the next section).
Why is location important? The air gap must be higher than the sink rim and dishwasher. This ensures gravity helps keep dirty water from flowing backward.
Preparing For Installation
Check For An Existing Hole
Most modern sinks come with a pre-drilled hole for an air gap or soap dispenser. If there’s a hole covered by a small metal cap, that’s perfect.
- Remove any cover plates or soap dispensers from the hole.
- Clean the area to make sure it’s free from debris or old sealant.
Drilling A New Hole (if Needed)
If your sink or countertop doesn’t have a hole, you’ll need to create one. Here’s how:
- Mark the Location: Choose a spot next to the faucet but not too close to the sink edge.
- Drill the Pilot Hole: Use a smaller drill bit to make a guide hole.
- Enlarge the Hole: Use a hole saw or step bit to widen the opening to 1-3/8 inches.
- Clean Up: Remove any sharp edges and wipe away metal or countertop shavings.
Caution: Wear safety glasses and gloves when drilling. If you have a granite or stone countertop, consider hiring a professional to avoid cracks.
Step-by-step: How To Install Air Gap For Dishwasher
Now let’s get to the main part: installing the air gap. Follow each step carefully. Don’t rush. If you make a mistake, you could end up with leaks or poor drainage.
Step 1: Place The Air Gap In The Sink Hole
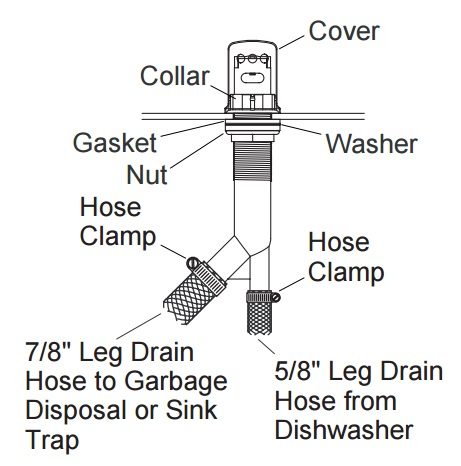

- Remove the air gap cover and set it aside.
- Insert the body of the air gap through the hole in your sink or countertop.
- If required, add a thin ring of plumber’s putty or silicone around the bottom to seal it.
Step 2: Secure The Air Gap
- From underneath the sink, slide the mounting washer and nut onto the air gap body.
- Tighten the nut until the air gap is snug but don’t overtighten—it could crack the sink or countertop.
- Make sure the air gap stands upright and is not tilted.
Step 3: Connect The Dishwasher Drain Hose
- Attach the smaller inlet on the air gap to the dishwasher drain hose.
- Secure the hose with a clamp. Use a screwdriver to tighten it, but don’t crush the hose.
- Make sure the hose isn’t kinked or twisted.
Step 4: Connect The Air Gap To The Drain Or Garbage Disposal
- Attach a discharge hose to the larger outlet on the air gap. This hose will lead to the sink drain or garbage disposal.
- If connecting to a garbage disposal, find the small inlet near the top. Remove the knock-out plug inside the inlet first (new disposals come with this plug).
- Secure the discharge hose with a clamp.
- Double-check that both hoses have a smooth downward path and no sharp bends.
Step 5: Install The Air Gap Cover
- Place the decorative cap over the air gap.
- Make sure it snaps or screws into place.
Step 6: Test The Installation
- Run your dishwasher through a short cycle.
- Watch the air gap during the drain cycle. Water should flow smoothly into the drain without leaking onto the countertop.
- Check under the sink for leaks at all connections.
- If water spills out of the air gap, there may be a clog or kink in the discharge hose.
Common Mistakes To Avoid
Many homeowners make small errors when installing an air gap. These can lead to leaks, odors, or poor dishwasher performance. Here are some mistakes and how to avoid them:
- Reversing the Hoses: Each air gap has an inlet and an outlet. Mixing them up means the air gap won’t work.
- Kinked or Bent Hoses: Hoses must have a smooth, gentle curve. Kinks reduce water flow and can cause backups.
- Loose Clamps: If clamps aren’t tight, hoses can pop off or leak under pressure.
- Not Removing the Knock-Out Plug: If you connect to a garbage disposal and forget this step, water will flood your cabinet.
- Covering the Air Gap Cap: Never block or seal the cap. It must vent air and water if the drain is blocked.
- Not Testing: Always test the system after installation. Catch leaks or problems before they cause damage.
Maintenance And Troubleshooting
Once the air gap is installed, it’s mostly maintenance-free. However, problems can still happen:
Regular Cleaning
Food particles, grease, or debris can block the air gap. If you notice water spilling onto the sink, it’s time to clean.
- Remove the air gap cap.
- Use a stiff brush or pipe cleaner to clear any buildup.
- Pour a cup of hot water down each hose to flush out debris.
Dealing With Odors
Sometimes, a blocked air gap or hose can cause bad smells. Cleaning as above usually solves the problem. If not, check the hoses for standing water or clogs.
What If Water Comes Out Of The Air Gap?
If water sprays or leaks from the air gap during dishwasher cycles, it means the discharge hose is blocked or kinked. Fix the hose and clean the air gap.
When To Call A Professional
If you can’t fix leaks, clogs, or other problems, don’t be afraid to call a licensed plumber. Some issues, like broken air gaps or complicated plumbing layouts, need expert help.
Comparing Air Gap Installation Methods
Some people ask if they can use a high loop (where the drain hose is fastened high up under the sink) instead of an air gap. Here’s how the two methods compare:
| Method | Backflow Protection | Meets Most Codes? | Installation Difficulty |
|---|---|---|---|
| Air Gap | Excellent | Yes | Moderate |
| High Loop | Good, not perfect | No (in many places) | Easy |
Insight: While a high loop is simpler, only an air gap offers full protection and meets plumbing codes in most US states.
Dishwasher Brands And Air Gap Compatibility
Not all dishwashers are created equal. Some brands have different hose sizes or adapters. Here’s a quick look at compatibility for popular brands:
| Brand | Standard Hose Size | Adapter Needed? | Notes |
|---|---|---|---|
| Bosch | 5/8 inch | Often | European threads; check your kit |
| GE | 5/8 inch | No | Standard US connections |
| Whirlpool | 5/8 inch | No | Works with most air gaps |
| Samsung | 5/8 inch | Sometimes | Check for special fittings |
| LG | 5/8 inch | Sometimes | Double-check included hose |
Tip: Always bring your dishwasher’s manual or hose to the hardware store when buying an air gap.
Local Plumbing Codes And Air Gaps
Most US states and cities require a dishwasher air gap by law. Here’s why:
- Health Codes: Air gaps prevent contaminated water from entering drinking water.
- Home Inspections: Missing or faulty air gaps can fail inspections, especially if you plan to sell your home.
- Insurance: Some insurance policies may deny water damage claims if plumbing wasn’t installed to code.
There are a few places where a high loop is still allowed, but these are rare. Always check your local code before skipping the air gap.
Installing Air Gap In Different Sink Types
Stainless Steel Sinks
Easiest for air gap installation. Most have pre-drilled holes. If not, stainless steel drills easily with a hole saw. Use rubber washers to prevent metal-on-metal noise.
Granite Or Composite Sinks
Much harder to drill. Always use a diamond-tipped hole saw. Take your time—rushing can crack the sink. Consider hiring a pro if you’re unsure.
Countertop Installation
If your sink doesn’t have space, you can install the air gap on the countertop. The process is the same, but you may need a longer body or extension kit.
Practical Tips For A Smooth Installation
- Measure Twice, Cut Once: Before drilling or cutting hoses, double-check lengths and placements.
- Keep Hoses Short: The shorter the hoses, the better the flow. Don’t leave extra loops.
- Label Connections: If you’re nervous about mixing up hoses, use masking tape to label the inlet and outlet.
- Use Quality Clamps: Cheap clamps can rust or fail. Stainless steel is best.
- Don’t Overtighten: Tight enough to hold, but not so tight you damage hoses or threads.
- Plan for Spills: Have towels ready in case water is left in the dishwasher or hoses.
Credit: structuretech.com
Non-obvious Insights Most Beginners Miss
- Air Gap Noise is Normal: During operation, you may hear water rushing or gurgling from the air gap. This is not a leak or problem—it means the system is working.
- Caps Can Be Swapped: If you don’t like the look of your air gap, you can buy decorative caps in different colors or finishes.
- Winterizing: In cold climates, make sure hoses and the air gap are not exposed to freezing air. Frozen water can crack plastic parts.
- Water Pressure Effects: Low water pressure can sometimes make the dishwasher struggle to drain. Make sure your home’s pressure is within the dishwasher’s recommended range.
Air Gap Alternatives: Are They Safe?
Some modern dishwashers claim to have built-in anti-backflow valves. While this helps, most plumbing codes still require a physical air gap. Electronic or mechanical valves can fail or clog, but a basic air gap rarely does.
For full details on plumbing codes and air gap requirements, see this official Wikipedia article.
Cost Breakdown: Air Gap Installation
Let’s look at the average costs for a DIY air gap installation:
- Air gap kit: $10–$35
- Hoses and clamps: $8–$20
- Sealant or putty: $2–$6
- Tools (if not owned): $20–$40
If you hire a plumber, expect to pay $75–$200 for installation, depending on your region and sink type.
Tip: Most homeowners can install an air gap in 1–2 hours with basic tools.
When Should You Replace An Air Gap?
Air gaps rarely fail, but you should replace yours if:
- The plastic body cracks or leaks
- The metal cover rusts or comes loose
- Cleaning no longer solves water backup issues
- You notice persistent odors even after cleaning
Replacement is just like initial installation—no need to change hoses unless they are damaged.
Credit: www.subzero-wolf.com
Environmental Impact
Some people worry about water waste from air gaps. In reality, the system only diverts water onto the sink if there’s a clog, not during normal use. This is a tiny amount compared to the water used for a full dishwasher cycle.
The safety and health benefits far outweigh any minor water loss.
Frequently Asked Questions
Why Does My Dishwasher Need An Air Gap?
An air gap is required to protect your dishwasher and home’s water supply from backflow—dirty water returning from the sink or drain. It’s a safety feature that helps keep your dishes and water clean.
Can I Install A High Loop Instead Of An Air Gap?
A high loop is better than nothing but doesn’t offer the same protection. Most plumbing codes require a physical air gap, not just a high loop. Check your local codes before skipping the air gap.
What Should I Do If Water Comes Out Of The Air Gap?
This usually means there’s a blockage in the drain hose between the air gap and the sink or garbage disposal. Remove the air gap cap and clean inside, then check and clear the discharge hose.
Do All Dishwashers Need An Air Gap?
In most US states and cities, yes. Some newer dishwashers have built-in backflow prevention, but codes still require a separate air gap. Always check your appliance manual and local laws.
How Often Should I Clean My Air Gap?
Check your air gap every 6 months, or sooner if you notice leaks, slow draining, or odors. Cleaning takes only a few minutes and prevents bigger problems.
Installing an air gap for your dishwasher might seem like a small detail, but it has a big impact on safety and health. With the right tools and steps, you can do it yourself and enjoy worry-free dishwashing. Take your time, follow the guide, and don’t hesitate to call an expert if you run into problems you can’t solve.
A little effort now protects your kitchen and your family for years to come.
Credit: www.aresheng.com.tw