
Keeping your oven clean is not just about appearance—it’s important for safety, cooking performance, and even the taste of your food. Modern ovens often come with a self-clean function, a powerful feature that burns off baked-on food and grease with high heat. But before you start this process, you need to lock the oven door. This step is critical for safety, as the oven will reach temperatures much higher than normal cooking. If the door is not locked, you risk burns, smoke escaping, or even damaging your oven.
Many people feel confused when trying to activate the self-clean cycle, especially about how to properly lock the oven door. Every oven brand and model can be a little different. Some have automatic locks, while others require you to do it by hand.
Some doors refuse to lock at all, leaving you frustrated and worried.
This guide will give you practical, clear steps to lock your oven door for self-cleaning. You will learn how different oven types handle the locking process, what to do if your door won’t lock, and how to avoid common mistakes that can damage your appliance.
Whether you are using a newer digital oven or an older manual one, you’ll find the help you need here.
Understanding Self-cleaning Oven Functions
Before you start locking the oven door, it’s helpful to understand how self-clean ovens work. Self-cleaning is a special cycle where the oven heats up to around 900°F (480°C), burning away food spills and grease. The result is ash, which you can easily wipe away after the cycle ends.
There are two main types of self-cleaning ovens:
- Pyrolytic ovens: These use very high heat to burn off residue. Most modern ovens use this method.
- Catalytic ovens: These have special liners that absorb grease and are cleaned at normal cooking temperatures.
The self-cleaning cycle can last from 2 to 6 hours, depending on your oven model and the level of dirt inside. During this time, the oven door must be locked to prevent anyone from opening it and getting hurt.
Why Door Locking Matters
High heat is dangerous. The oven can reach temperatures that will burn skin in seconds. That’s why manufacturers design ovens to lock automatically or provide a manual lock for the self-clean process. Without a locked door, the oven may refuse to start the cycle or could stop mid-way.
This safety feature also protects children and pets from accidents.
Types Of Oven Door Locks
Different ovens use different types of door locks. Understanding your oven’s lock system is the first step to using the self-clean safely.
Automatic Door Locks
Many newer ovens have automatic locks. When you start the self-clean cycle, the door locks by itself. You will often hear a motor sound or see a “door locked” message on the display. The oven will not unlock until the temperature drops to a safe level after cleaning.
Manual Door Locks
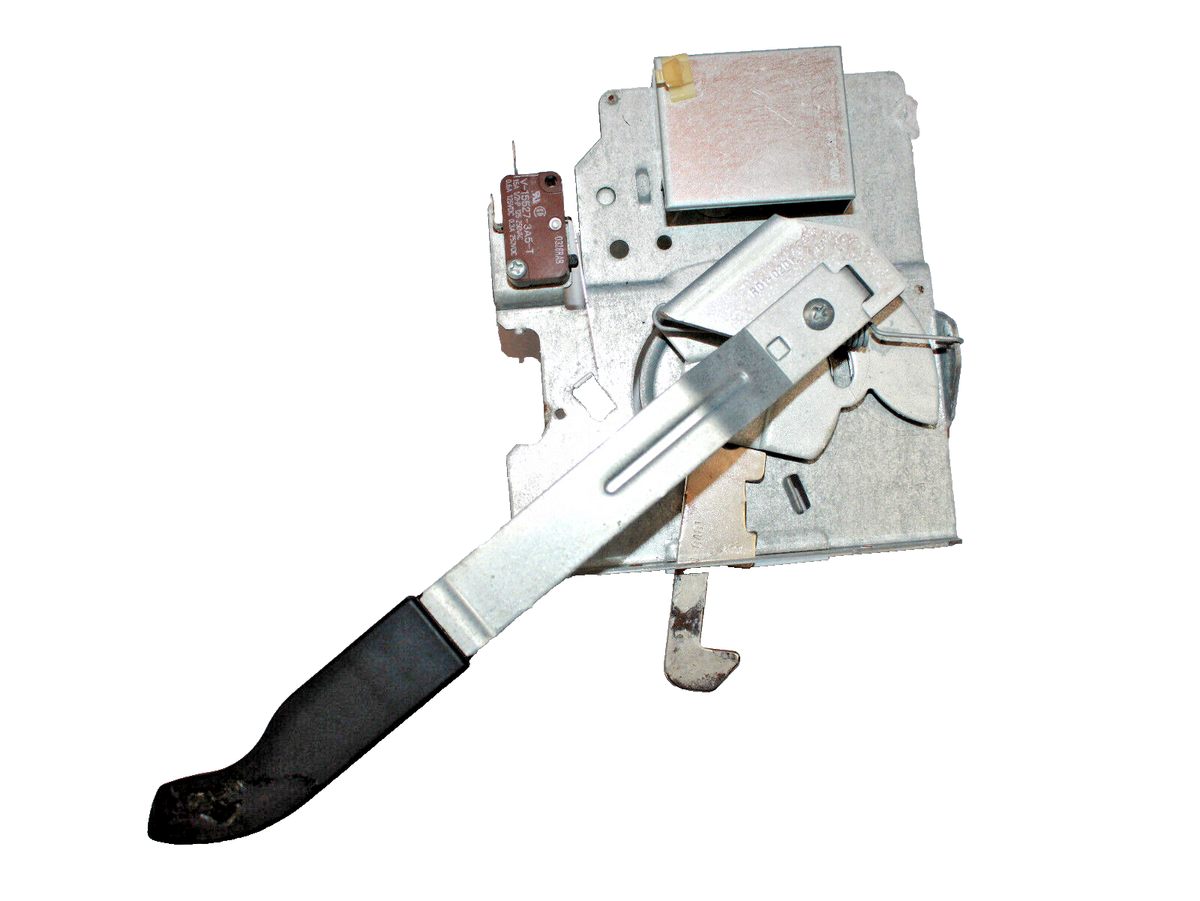
Older ovens or some basic models use a manual locking lever. Usually, this is a handle or switch near the oven door. You must slide or turn this lever to lock the door before starting self-clean.
Electronic Controls
Some ovens with digital displays use electronic controls to lock the door. You may need to press and hold certain buttons or follow a sequence on the control panel.
Child Safety Locks
A few ovens have child safety locks that can prevent the oven from being opened at all, but these are separate from the self-clean lock mechanism.
| Lock Type | How It Works | Common In |
|---|---|---|
| Automatic | Locks when self-clean starts | Modern ovens |
| Manual | User slides a lever to lock | Older ovens |
| Electronic | Press buttons to lock | Digital control ovens |
Preparing Your Oven For Self-cleaning
Proper preparation is important before you lock the oven door and start the self-clean cycle. Skipping these steps can lead to smoke, bad smells, or even damage.
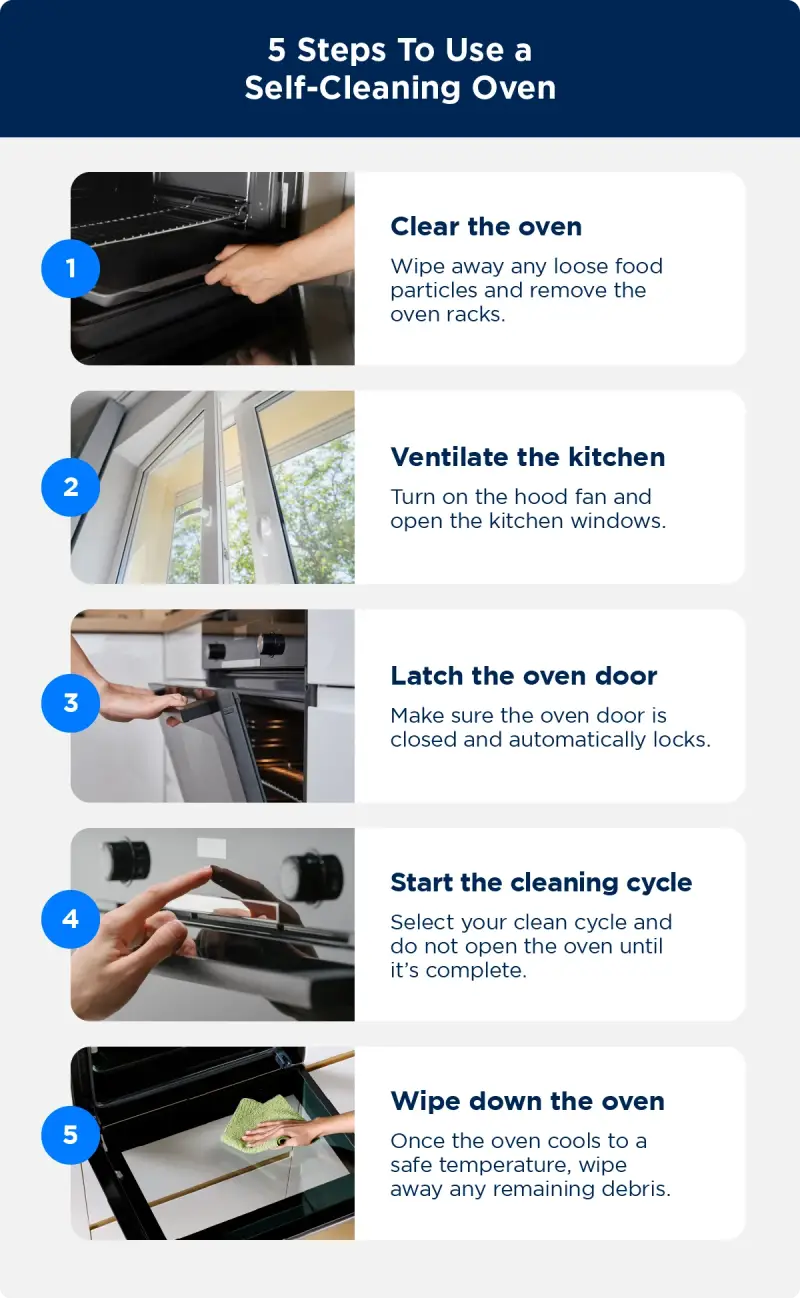
- Remove everything inside: Take out all racks, pans, baking stones, and any aluminum foil. Most racks are not designed for self-clean heat and can discolor or warp.
- Wipe loose debris: Use a damp cloth to wipe away large food pieces or spills. This reduces smoke and bad odors during cleaning.
- Check the door seal: Make sure the rubber gasket around the door is clean and free from food bits. The gasket helps the oven lock tightly and keeps heat inside.
- Ventilate the kitchen: Open a window or turn on your exhaust fan. Some smoke or odor is normal, especially if your oven is very dirty.
Common Mistakes When Preparing
- Leaving racks inside: Many people think racks will get cleaned too, but this can damage them.
- Using oven cleaner spray: Never use chemical cleaners before starting the self-clean cycle—residue can burn and cause dangerous fumes.
- Forgetting to remove foil: Foil can melt and damage the oven floor or walls.
How To Lock Your Oven Door For Self-clean (step-by-step)
Now let’s get practical. Here are step-by-step instructions based on different oven types.
For Automatic Lock Ovens
- Close the oven door fully: Make sure the door is shut tight.
- Select the self-clean cycle: Press the “Self Clean” button on your control panel.
- Set the cleaning time (if needed): Some ovens let you choose between light, medium, or heavy cleaning.
- Press Start: Once you start the cycle, the oven will automatically lock the door. Wait for the “Door Locked” light or display message.
- Do not try to open the door: The lock will not release until the oven cools down at the end of cleaning.
For Manual Lock Ovens
- Close the oven door
- Find the locking lever: This is usually above the handle or at the upper left corner of the door.
- Slide or turn the lever: Move the lever to the “Lock” position. You may hear a click.
- Confirm the door is locked: Try opening the door gently; it should not open.
- Select and start the self-clean cycle: The oven will now begin cleaning.
For Electronic Control Ovens
- Close the oven door
- Find the lock button or key sequence: This may be a button labeled “Lock” or a combination, such as holding “Self Clean” for 3 seconds.
- Engage the lock: Press the required buttons until you see a “Door Locked” message or icon.
- Start the self-clean cycle: The oven should begin heating once locked.
Example: Locking A Ge Self-cleaning Oven
- Close the door and press “Self Clean.”
- Use the arrows to set the cleaning time.
- Press “Start.” The door will lock automatically and a light will show.
- The oven will unlock itself when cool.
Example: Locking A Whirlpool Self-cleaning Oven
- Remove racks and close the door.
- Press “Clean” and choose the cleaning level.
- Press “Start.” The oven displays “Locked.”
- Wait for the oven to cool before opening.
Troubleshooting: When The Door Won’t Lock
It can be frustrating if your oven door refuses to lock, stopping you from starting self-clean. There are several reasons this might happen, and most can be fixed at home.
Common Reasons The Door Won’t Lock
- Obstruction: Food, debris, or a pan handle is blocking the door or latch.
- Misaligned latch: The lock mechanism is bent or not aligned with the door.
- Faulty door sensor: The oven cannot detect if the door is closed.
- Electrical problem: Power loss or a blown fuse is affecting the lock motor.
What To Do If Your Oven Door Won’t Lock
- Check for obstructions: Open the door fully and inspect the seal, latch, and hinges. Remove any food or debris.
- Try resetting the oven: Turn off the oven at the circuit breaker for 1 minute, then turn it back on.
- Realign the door: If the door seems loose or crooked, gently lift and align it before closing.
- Consult the manual: Look for troubleshooting tips in your oven’s guide.
- Call for service: If the lock is still stuck, you may need a professional repair.
Advanced Tip
If your oven lock is stuck after a power outage, sometimes running a short bake cycle (5 minutes) then stopping it will reset the lock.
Safety Precautions When Locking Your Oven Door
Using the self-clean feature safely means more than just locking the door. Here are important precautions to follow.
- Never force the lock: If the lock feels stuck, don’t use excessive force. This can break the locking mechanism.
- Keep children and pets away: The outside of the oven may get very hot during cleaning. Lock the kitchen if possible.
- Do not leave home during self-clean: Fires are rare, but possible if there is lots of grease in the oven.
- Do not use oven cleaner chemicals: These can release toxic fumes at high temperatures.
- Wait for the oven to cool: Even after the cycle ends, the oven stays hot. Wait for the “lock” indicator to turn off before trying to open the door.
Credit: www.mrappliance.com
What Happens During Self-clean And Door Locking
Once the oven door is locked and the self-clean cycle starts, the oven heats up to a much higher temperature than normal baking or broiling. This intense heat turns food residue into white ash. During this process:
- The oven door remains locked for the whole cycle and the cooling period after.
- You may hear clicking noises as the lock engages or disengages.
- The oven may release some smoke or smell, especially if it’s very dirty.
- The control panel often shows a countdown timer.
Unlocking The Door After Self-clean
Once the self-clean cycle is over, the oven will start cooling down. The door will stay locked until the internal temperature is safe, usually below 500°F (260°C). The “lock” light or message will turn off when it’s okay to open the door.
If your oven stays locked longer than expected (more than 1 hour after cleaning), try resetting the oven at the circuit breaker.
Comparing Self-cleaning Oven Lock Features
Not all ovens have the same safety features or locking systems. Here’s a comparison to help you understand the differences:
| Brand | Lock Type | Self-Clean Options | Unlock Time (approx.) |
|---|---|---|---|
| GE | Automatic | 2, 3, 4 hrs | 30-60 min |
| Whirlpool | Automatic/Electronic | 2, 3, 5 hrs | 45-90 min |
| Frigidaire | Manual/Automatic | 2, 3, 4 hrs | 30-60 min |
| Samsung | Electronic | 2, 3 hrs | 30-50 min |
How To Know If Your Oven Is Properly Locked
It’s important to confirm that your oven is locked before starting self-clean. Signs include:
- A “Door Locked” light or message on the display.
- The door does not open when pulled gently.
- A clicking sound as the lock engages.
- The self-clean cycle starts and does not stop with an error.
If your oven shows an error code, check your manual for its meaning.
Cleaning Up After The Self-clean Cycle
When your oven is cool and the door unlocks, the inside will look ashy and dusty. Here’s what to do next:
- Wipe with a damp cloth: Remove all ash from the oven floor and walls.
- Clean the door glass: Use a soft cloth to wipe away any streaks.
- Replace racks and pans: Make sure they are clean and dry before putting them back.
- Check the lock and gasket: Make sure the lock works smoothly for next time.
Advanced Tip
If you notice white spots or streaks on the glass after self-clean, a mixture of baking soda and water can help remove them without scratching.
Credit: www.ebay.com
How Often Should You Use Self-clean And Lock The Oven Door?
Most experts recommend using self-clean only every few months or after major spills. Running the cycle too often can wear out the door lock or gasket. If you bake a lot, consider cleaning every 2-3 months. For light use, once or twice a year is enough.
Some signs you need to self-clean:
- Burnt smells when using the oven
- Visible grease or black spots inside
- Smoke when baking at high temperatures
Special Cases: Double Ovens And Wall Ovens
If you have a double oven or a wall-mounted oven, the locking process may be slightly different.
- For double ovens, usually only one oven can self-clean at a time. Lock and clean each section separately.
- Wall ovens often have electronic locks; follow the control panel instructions carefully.
Always check your manual for model-specific steps.

Credit: www.bobvila.com
What To Do If The Oven Door Is Stuck Locked
Sometimes, the oven door stays locked even after self-clean is finished and the oven is cool. Here’s what you can do:
- Wait longer: Some ovens take extra time to cool and unlock.
- Reset the oven: Turn off power at the breaker for 1 minute, then turn it back on.
- Try the manual lever: On manual lock ovens, gently move the lever to “Unlock.”
- Use the control panel: Some electronic ovens have a “Cancel” or “Clear” button that will unlock the door.
- Call for service: If the door is still stuck, you may need a technician.
Advanced Troubleshooting For Door Lock Problems
For those comfortable with DIY, here are advanced steps for stubborn locks:
- Check the lock motor: If you hear the motor run but the door doesn’t lock, the linkage may be broken.
- Inspect the control board: If there’s no sound, the control board or fuse may be faulty.
- Look for error codes: Ovens often show codes like F9 or F5 for lock problems. Search your manual or online for what these mean.
If you are not sure, it’s best to call a professional to avoid damaging your oven.
Oven Door Lock Maintenance Tips
Keeping the lock in good condition helps your oven last longer and self-clean safely.
- Clean the latch regularly: Wipe away grease or debris from the lock area.
- Lubricate if needed: Some locks may need a tiny drop of food-safe lubricant—check your manual first.
- Do not slam the door: This can bend the lock or damage the gasket.
- Test the lock: Before starting self-clean, check that the lock moves smoothly.
Comparing Oven Door Lock And Self-clean Features By Price
Some ovens offer more advanced locks or self-clean options. Here’s a comparison:
| Oven Price Range | Lock Type | Self-Clean Features |
|---|---|---|
| Low ($400-$700) | Manual/Basic Automatic | 1-2 cycle choices, basic lock |
| Mid ($700-$1200) | Automatic/Electronic | Multiple cycles, better lock safety |
| High ($1200+) | Advanced Electronic | Custom cycles, smart lock, app control |
Non-obvious Insights Most Beginners Miss
- Self-cleaning is hard on oven parts: The high heat can wear out the door gasket and lock motor over time. Don’t use self-clean for light messes—wipe them up instead.
- Power outages interrupt the lock: If the power goes out during self-clean, the oven may stay locked or unlock too soon. Always check that the oven is cool before trying to open the door after a power outage.
Environmental And Health Considerations
Some people worry about fumes from self-cleaning ovens. The process can release a burnt smell, especially if there is a lot of grease. While most modern ovens are safe, it’s a good idea to ventilate your kitchen and keep pets or birds out during cleaning.
If you have respiratory problems, consider cleaning the oven by hand or using the self-clean feature less often.
For more on oven safety and self-cleaning, see this resource from the Consumer Reports.
Frequently Asked Questions
How Long Does It Take For The Oven Door To Unlock After Self-cleaning?
Most ovens unlock the door 30 to 90 minutes after the self-clean cycle ends. The time depends on how quickly the oven cools down. If your door stays locked longer, try resetting the oven by turning off the power for a minute.
Can I Stop The Self-clean Cycle Early And Unlock The Door?
You can usually stop the cycle by pressing “Cancel” or “Clear,” but the door will stay locked until the oven cools to a safe temperature. Never force the door open; wait for the lock indicator to turn off.
Is It Safe To Leave Oven Racks Inside During Self-cleaning?
No. Most oven racks can discolor, warp, or get stuck if left inside during self-clean. Always remove racks and any other items before starting the self-clean cycle.
What Should I Do If The Oven Door Lock Is Stuck After Cleaning?
First, wait an extra hour to see if the oven cools down enough to unlock. If it’s still locked, try resetting the power. If the lock remains stuck, consult your manual or call a professional for help.
Do All Ovens Have The Same Door Lock For Self-cleaning?
No. Oven door locks can be manual, automatic, or electronic, and the locking process can vary by brand and model. Always check your oven’s manual for specific instructions.
Locking your oven door for self-cleaning is a simple step, but it’s essential for safe and effective cleaning. With the right preparation and knowledge, you can keep your oven working well for years—without stress or surprises.