Building a corner cabinet is one of the best ways to use the hidden space in your kitchen, bedroom, or living room. Many people ignore corners, thinking they are hard to use or too small. But with the right design and tools, you can create a corner cabinet that adds both storage and style to your home. If you’ve ever struggled with clutter or wanted more organized storage, this project is for you.
Making a corner cabinet may sound difficult, but with clear steps and simple tools, even beginners can succeed. You don’t need to be a master carpenter. Patience, planning, and accuracy matter more than fancy equipment. You’ll learn how to measure your space, choose the right materials, cut wood safely, and assemble a strong, beautiful cabinet that fits perfectly into any corner.
As you read, you’ll discover not just the “how,” but also practical tips and warnings to avoid common mistakes—details most guides skip.
This article will take you from start to finish. We’ll cover planning, design, cutting, assembly, finishing, and installation. You’ll also find answers to common questions and advice to make your project easier. Let’s turn that empty corner into something special.
Why Build A Corner Cabinet?
Corners are often wasted spaces. Standard cabinets rarely fit well into corners, leaving gaps or awkward angles. A custom corner cabinet solves these problems. It makes your room look complete and gives you extra storage without taking up much space.
- Maximize space: Corner cabinets use areas that are usually empty.
- Custom fit: You can design the cabinet to match your exact needs.
- Cost-effective: Building your own cabinet is usually cheaper than buying a custom one.
- Personal satisfaction: There’s a real joy in building something useful with your own hands.
Many homeowners build corner cabinets for kitchens to store pots and pans or in bedrooms for books and clothes. They are also popular in offices, bathrooms, and living rooms.
Planning Your Corner Cabinet
Before you touch any tools, planning is key. Rushing into building without a clear plan can lead to wasted materials and frustration.
1. Decide The Cabinet’s Purpose
Think carefully about what you want to store. Will this cabinet hold heavy kitchen items, light bathroom towels, or electronics? Your answer affects the size, materials, and shelf strength.
2. Measure Your Space
Use a tape measure to get the width, depth, and height of your corner. Write these down. Be accurate—mistakes here cause problems later.
- Measure both walls forming the corner.
- Decide how far out the cabinet should come.
- Check for obstacles: Power outlets, vents, window sills, or baseboards.
3. Sketch Your Design
Draw a simple sketch, even if it’s just on paper. Mark the shelves, doors, and any special features (like lighting or glass). Decide if you want a closed cabinet with doors, an open shelf, or a combination.
4. Choose A Cabinet Shape
The most common corner cabinet shapes:
- L-shape: Fits into a right-angle corner, with two sides meeting at 90 degrees.
- Diagonal front: The cabinet face is cut across the corner at an angle.
- Curved front: Rounded or angled doors for a softer look.
Each type has pros and cons. L-shape gives more room, but diagonal front is easier for doors and access.
5. Pick Materials
For most home projects, use plywood or MDF for the main body and solid wood for doors and trim. Plywood is strong, stable, and easy to work with. Avoid particle board—it sags under weight.
- 3/4-inch (18mm) plywood is standard for shelves and sides.
- Solid wood strips for face frames or doors.
- Choose quality screws and strong wood glue.
6. Plan Your Budget
List everything you need: wood, fasteners, hinges, handles, paint or stain, and finishing supplies. Add 10% extra for mistakes or changes.
7. Safety First
Get safety glasses, ear protection, and a dust mask. Plan to work in a well-ventilated area.
Tools And Materials You Need
Having the right tools makes everything easier. Here’s a clear list of what you’ll need for a basic corner cabinet.
Tools
- Tape measure
- Pencil and eraser
- Carpenter’s square
- Level
- Circular saw or table saw
- Drill and drill bits
- Screwdriver (or power driver)
- Clamps (at least 4)
- Hammer or mallet
- Sander (or sandpaper)
- Paintbrush or roller (for finishing)
Materials
- 3/4-inch plywood (usually one or two 4×8 ft sheets)
- 1×2-inch solid wood strips (for face frame and trim)
- Wood screws (1-1/4” and 2”)
- Wood glue
- Cabinet hinges
- Door handles or knobs
- Paint, stain, or varnish
- Sandpaper (120, 180, 220 grit)
Optional:
- Shelf pins or brackets (if you want adjustable shelves)
- Glass for doors
- Cabinet feet or baseboard trim
Pro tip: Rent or borrow expensive tools like a table saw if you don’t have one. Many hardware stores offer rentals.
Step-by-step Guide: How To Make A Corner Cabinet
Let’s break the process into clear steps. Each step builds on the last, so don’t rush ahead.
1. Draw Your Cut List
From your sketch and measurements, make a cut list. This tells you exactly what pieces to cut from your plywood and wood strips.
A basic diagonal-front corner cabinet (for a 36” wide x 36” deep x 30” high cabinet):
- 2 side panels: 30” high x 24” deep
- 1 bottom panel: Triangle or trapezoid shape, 36” wide at the front
- 1 top panel: Same as bottom
- 2-3 shelves: Same shape as top/bottom
- Face frame: Strips to cover front edges
- Back panel: Thin plywood or hardboard
Non-obvious tip: Draw your pieces on the plywood with a pencil before cutting. This helps you fit pieces efficiently and avoid waste.
2. Cut The Panels
Lay your plywood flat. Cut each piece using a circular saw or table saw. Use a straight edge to guide your saw for straight lines.
- Cut slowly to avoid splinters.
- Label each piece with pencil (“side,” “shelf,” etc. ).
- Sand edges lightly after each cut.
Beginner mistake: Forgetting to allow for saw blade thickness (kerf). Always measure and cut carefully.
3. Dry Fit The Pieces
Before you glue or screw anything, set the pieces together on the floor to check fit. Make sure corners are square and everything aligns.
- Adjust if needed.
- Check that shelves fit and doors will have enough room to open.
4. Assemble The Cabinet Box
Start by attaching the sides to the bottom panel.
- Apply wood glue to edges.
- Use clamps to hold pieces together.
- Drill pilot holes and drive screws to secure.
Attach the top panel the same way. For extra strength, add corner blocks inside. Install the shelves at your chosen heights.
Advanced tip: For adjustable shelves, drill evenly spaced holes for shelf pins before assembly.
5. Add Face Frame And Trim
Face frames cover the rough plywood edges and add strength.
- Cut 1×2 wood strips to fit the front edges.
- Attach with wood glue and finish nails or screws.
- Sand smooth after attaching.
If you want baseboard or crown molding, cut and attach now.
6. Build And Attach Doors
If your cabinet has doors, measure the opening carefully.
- Cut doors from plywood or solid wood.
- Sand all edges.
- Attach hinges to the door, then mount on the cabinet.
- Check that doors swing freely and line up.
Install handles or knobs.
Pro tip: For a more professional look, use “concealed” European hinges.
7. Install The Back Panel
Cut thin plywood or hardboard to fit the back of the cabinet. Attach with small nails or screws.
- This keeps the cabinet square and adds strength.
8. Sand And Finish
Smooth all surfaces with sandpaper, starting with 120 grit and finishing with 220 grit.
- Remove all dust with a damp cloth.
- Apply paint, stain, or varnish. Let dry completely.
- Add a second coat for durability.
Beginner mistake: Skipping sanding between coats. Always sand lightly for a smooth finish.
9. Install The Cabinet
Move the cabinet into place. Use a level to check it sits straight.
- If installing in a kitchen, screw through the back into wall studs.
- For freestanding cabinets, add felt pads under the feet to protect floors.
Insight: Walls are rarely perfectly square. Leave a small gap at the back if needed, then cover with trim.
Types Of Corner Cabinets And Their Uses
Not all corner cabinets are the same. Choosing the right type for your space is important.
| Cabinet Type | Best For | Main Advantage | Main Challenge |
|---|---|---|---|
| L-shape | Kitchens, offices | Max storage space | Tricky to build doors |
| Diagonal front | Living rooms, bathrooms | Easy access, simple doors | Less deep storage |
| Curved front | Modern rooms | Stylish look | Harder to build |
| Open shelf | Bedrooms, displays | Easy to build, light look | Not for heavy items |
Tip: Diagonal front cabinets are the most beginner-friendly.
Common Mistakes When Building A Corner Cabinet
Even experienced DIYers make mistakes. Here are the most common, and how to avoid them.
- Bad measurements: Always measure at least twice. Mark out your cabinet on the wall with painter’s tape before cutting any wood.
- Skipping dry fit: Assembling without testing fit first leads to errors.
- Poor material choice: Cheap plywood or particle board can sag or split. Choose quality plywood.
- Weak joints: Relying only on screws or nails. Always use wood glue for strength.
- Rushing the finish: Not sanding between coats or using low-quality paint makes cabinets look rough.
- Ignoring wall angles: Most corners are not exactly 90 degrees. Check with a square and adjust cuts.
- Wrong hardware: Using weak hinges or handles that do not match the cabinet’s weight or style.
- Overloading shelves: Do not place heavy items on thin or unsupported shelves.
Advanced insight: When cutting for a wall corner, subtract 1/8” from the total width to allow for wall irregularities and ease of installation.
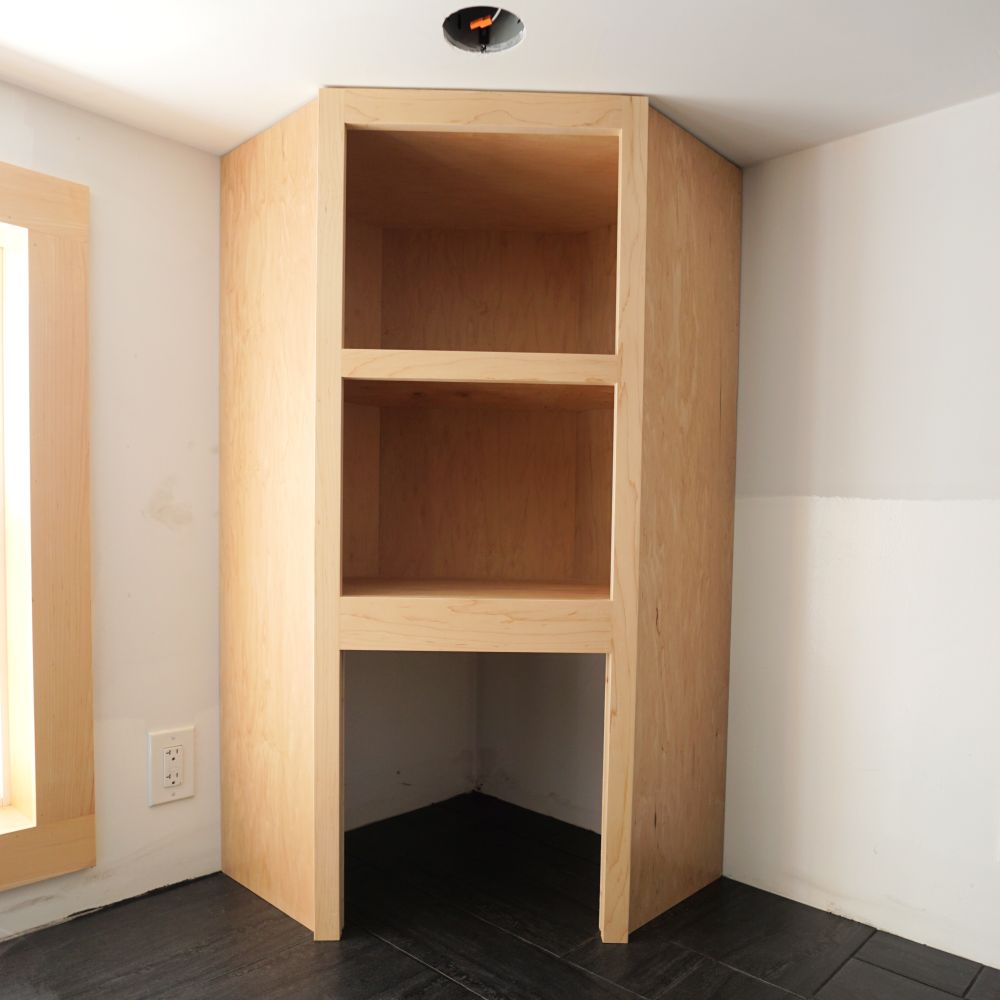
Credit: ibuildit.ca
How To Customize Your Corner Cabinet
Building your own cabinet means you can add useful or stylish features.
Lighting
Add LED strip lights inside for a modern look and better visibility. Stick-on battery-powered lights are easy for beginners.
Glass Doors
Install glass panels instead of wood for the doors. This makes the cabinet feel lighter and lets you display items.
Pull-out Trays Or Lazy Susan
For kitchen cabinets, a pull-out tray or Lazy Susan (rotating shelf) makes items easy to reach.
Open Shelves
Skip the doors and use thick, floating shelves for books, plants, or decorations.
Decorative Moldings
Add crown molding at the top or baseboard trim for a classic look.
Tip: Small upgrades like soft-close hinges or hidden handles can make your cabinet feel high-end.
Cost Breakdown: How Much Will It Cost?
The price of building a corner cabinet can vary based on size, materials, and finish. Here’s a rough estimate for a simple, 36-inch cabinet.
| Item | Average Cost (USD) |
|---|---|
| Plywood (2 sheets) | $80 |
| Solid wood (1×2 strips) | $20 |
| Hardware (hinges, screws, handles) | $25 |
| Paint, stain, or varnish | $15 |
| Sandpaper, glue, nails | $10 |
| Total | $150 |
Renting or borrowing tools can save money. If you use premium wood or custom hardware, costs go up.
Non-obvious tip: Buying wood at a local lumberyard is often cheaper than big-box stores, and they may cut your pieces for free.
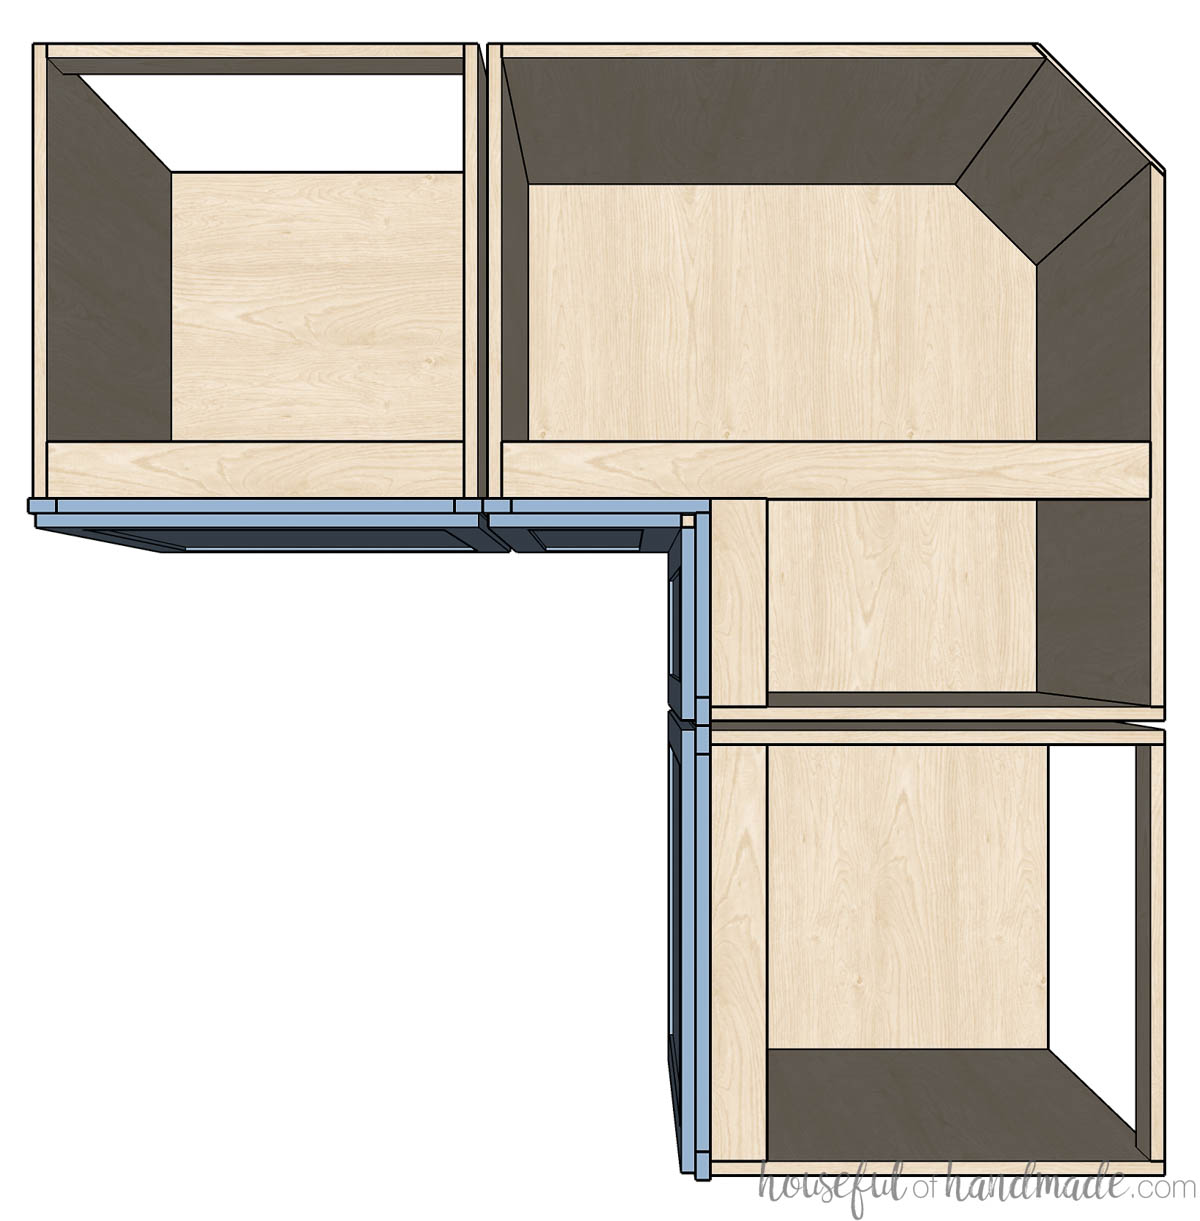
Credit: housefulofhandmade.com
Safety Tips For Building A Corner Cabinet
Woodworking is fun, but safety comes first.
- Always wear safety glasses when cutting or sanding wood.
- Use ear protection with power tools.
- Work in a well-ventilated area, especially when painting or staining.
- Keep tools sharp and clean for safer, better results.
- Never rush—most accidents happen when people hurry.
Reminder: Read and follow the instructions for every tool you use.
Installing Your Corner Cabinet: What To Watch For
After building your cabinet, installing it correctly is essential. Here are some tips to get a professional result:
- Use a stud finder to locate wall studs. Screwing into studs provides maximum support.
- Level the cabinet before attaching. Shim under the cabinet if the floor is uneven.
- For heavy cabinets, get help lifting and positioning.
- If mounting over a countertop, leave a small gap for expansion.
- Seal around the edges with caulk or trim for a finished look.
Pro tip: For kitchen cabinets, pre-drill holes through the back panel to avoid splitting the wood.

Credit: www.youtube.com
Maintaining Your Corner Cabinet
To keep your cabinet looking and working its best:
- Clean with a soft, damp cloth. Avoid harsh chemicals.
- Check and tighten hinges or handles yearly.
- Touch up scratches with matching paint or stain.
- Avoid overloading shelves to prevent sagging.
Insight: Adding felt pads to doors and shelves reduces noise and protects surfaces.
Real-life Example: A Beginner’s Success Story
Maria, a first-time DIYer, wanted a corner cabinet for her small kitchen. She measured her space carefully and chose a diagonal-front design for easy access. Maria used basic tools—a circular saw, drill, and clamps—and bought plywood from her local lumberyard.
She made a simple sketch, drew her cut list, and asked the store to cut the largest pieces for her. After dry-fitting the pieces, Maria assembled the box with wood glue and screws. She finished the cabinet with white paint and added a Lazy Susan tray inside.
Maria’s main challenge was getting the door to hang straight. She fixed this by adjusting the hinges and sanding the edge slightly. Now, her cabinet holds pots and pans, and she says it’s the most useful space in her kitchen.
Lesson: Careful measuring, patience, and not being afraid to ask for help make all the difference.
Where To Find More Ideas And Plans
Many websites offer free or paid corner cabinet plans. Look for plans with detailed diagrams and step-by-step instructions. One trusted resource is Family Handyman, which provides clear plans and photos.
Visiting a local woodworking club or store can also give you ideas and expert tips.
Frequently Asked Questions
What Is The Best Wood For Making A Corner Cabinet?
For most projects, plywood is the best choice because it’s strong, stable, and holds screws well. Use 3/4-inch plywood for the main cabinet and solid wood for the face frame or doors. Avoid particle board; it’s weak and can absorb moisture.
How Do I Make Sure My Corner Cabinet Fits In An Uneven Corner?
Most walls are not perfectly square. Measure both walls and the angle carefully. Subtract 1/8-inch from your total width to allow for adjustment. Use a level and shims during installation to get a perfect fit. If needed, add trim to cover small gaps.
Can I Build A Corner Cabinet Without Power Tools?
It’s possible, but power tools make the job much easier and faster. At minimum, you’ll need a saw and drill. Many hardware stores rent tools by the hour or day. If you must use hand tools, choose simple designs with straight cuts.
How Long Does It Take To Build A Corner Cabinet?
For beginners, plan on 2–3 days: one day for cutting and assembly, one for sanding and finishing, and another for installation. Allow extra drying time for paint or stain. Rushing leads to mistakes, so take your time.
How Much Weight Can My Corner Cabinet Hold?
This depends on the materials and shelf thickness. A 3/4-inch plywood shelf, properly supported, can hold 50–100 pounds. Add extra supports for heavy items. Avoid overloading, and check for sagging over time.
Building a corner cabinet is a rewarding project that solves real storage problems. With careful planning, patience, and these expert tips, you can create a beautiful, strong cabinet that fits your home and style. Don’t let corners go to waste—turn them into your favorite spot in the room.