
If you love the look of granite countertops but your budget says otherwise, you are not alone. Many people dream of the sophisticated, natural stone look, but real granite can be expensive, heavy, and tricky to install. The good news? With the right techniques, you can transform simple concrete countertops into stunning granite look-alikes. Whether you are updating your kitchen, bathroom, or outdoor bar, creating faux granite with concrete offers both beauty and durability—often at a fraction of the cost.
In this guide, you’ll learn everything needed to make your concrete countertops look like granite, from surface prep and color selection to painting, sealing, and expert finishing tips. Even if you’re new to DIY projects, you’ll find the process approachable, rewarding, and fun.
Get ready to impress friends and family with countertops that look like real stone—without the high price tag.
Why Choose Concrete For Granite Look Countertops?
Concrete is more than just a construction material. When used for countertops, it offers flexibility, strength, and customization options that few other materials provide. Here’s why concrete is a smart starting point if you want the granite look:
- Cost-effective: Concrete is usually cheaper than granite. Even after adding colorants and sealers, you’ll still save money.
- Custom shapes and sizes: Unlike stone slabs, concrete can be poured and molded to fit any space or design.
- Durability: When properly sealed, concrete is highly resistant to scratches, heat, and stains—similar to real granite.
- Personalization: You can control the color, finish, and edge style, allowing for total design freedom.
Concrete’s porous nature means it will need careful sealing, but this also makes it the perfect canvas for faux finishes. With a little patience and the right supplies, the results can be stunning.
Understanding The Granite Look
Before you start, it’s important to know what makes granite unique. Granite is a natural stone with a speckled, varied appearance caused by the mix of minerals inside it. The colors, patterns, and shine come from nature, and no two slabs are exactly alike. To successfully mimic granite, you’ll want to create these three key effects:
- Color variation: Granite is rarely one solid color. It mixes shades, flecks, and veins.
- Subtle shine: Granite has a glossy, polished surface that reflects light.
- Depth: Good faux granite has layers that add dimension, not just a flat painted look.
Keep these features in mind as you plan your project. Study photos of real granite or visit a stone showroom to see patterns up close. This will help you choose colors and application techniques that look authentic, not artificial.
Tools And Materials Needed
Getting the right tools and materials at the start will save you time and frustration. Here’s a detailed list of what you’ll need to make your concrete countertops look like granite:
- Concrete countertop (cured and ready)
- Orbital sander (with 120, 220, and 400 grit pads)
- Painter’s tape and plastic sheeting
- Concrete patch or filler (for repairs)
- Degreaser or concrete cleaner
- High-quality primer (bonding type)
- Acrylic paints or concrete stains (various granite-like colors)
- Sea sponges and artist’s brushes
- Fine spray bottles (for misting paints)
- Feather or small artist’s brush (for veining)
- Clear epoxy or polyurethane sealer
- Polishing pads or buffer (optional, for extra shine)
- Protective gloves and mask
Pro tip: Consider adding small amounts of mica powder to your paints or sealer for a subtle sparkle that mimics real granite.
Preparing The Concrete Surface
Preparation is the foundation of a great faux granite finish. Skipping steps or hurrying through prep can ruin the final result. Here’s how to do it right:
1. Clean Thoroughly
Remove all items from the countertop. Scrub the surface with a degreaser or strong concrete cleaner to eliminate grease, stains, or dust. Rinse well and let dry completely.
2. Repair Any Flaws
Check for cracks, chips, or holes. Use a concrete patch or filler to repair these areas. Let the patch dry, then sand smooth with 120-grit sandpaper.
3. Sand Smooth
A smooth surface is essential for a realistic granite look. Use an orbital sander with 220-grit paper to sand the entire countertop. Focus on rough spots or patched areas. Wipe away all dust with a damp cloth.
4. Mask Off Surroundings
Use painter’s tape and plastic sheeting to protect walls, cabinets, and sinks. This will prevent accidental paint or sealer splatters.
5. Prime The Surface
Apply a high-quality bonding primer designed for concrete. Use a roller for large areas and a brush for edges. Let the primer dry fully according to the manufacturer’s instructions. This step helps paint and stains stick evenly.
Beginner insight: Many people skip priming, but it’s crucial. Primer prevents paints from soaking in unevenly, which can ruin the granite effect.
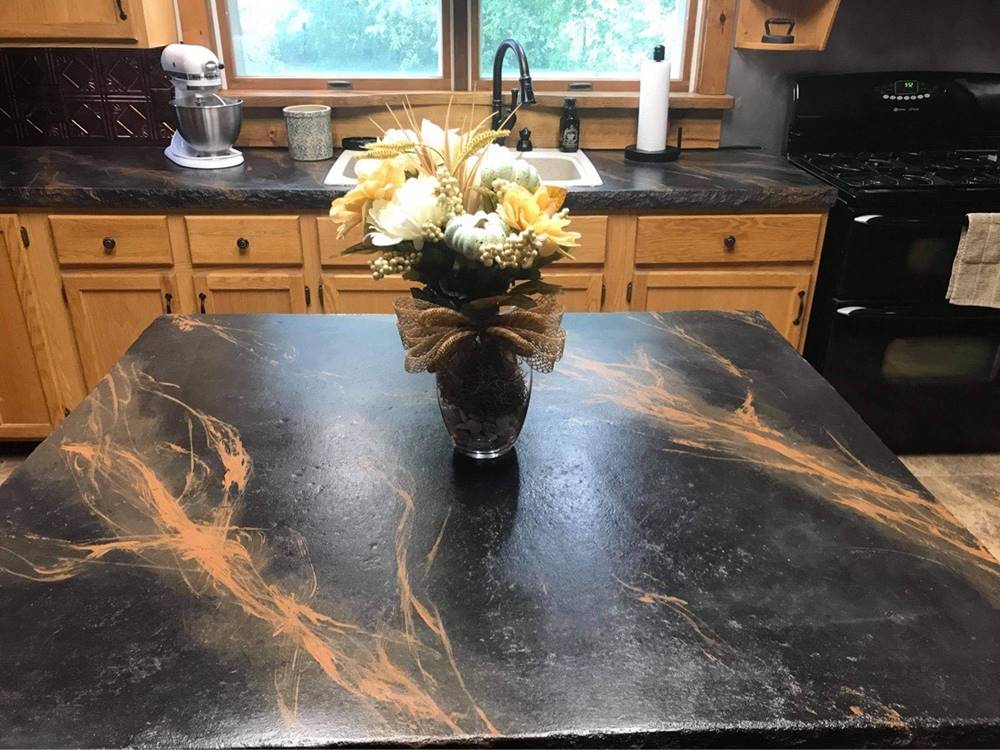
Credit: www.concretedecor.net
Choosing The Right Colors For Granite Effect
Selecting the right color palette is one of the most important steps in faking a granite look. Real granite comes in hundreds of shades, but some of the most popular include:
- Black with white and gray flecks
- White with black, gray, or tan veins
- Brown and gold mixtures
- Green, blue, or burgundy accents
For the most realistic results, look at real granite samples. Choose 3–4 main colors: one base color (usually lighter), one or two mid-tones, and one accent color for veins or spots.
Useful tip: Use a sample board or a piece of cardboard to test your color combination before starting on the actual countertop. Adjust until you like the effect.
Painting Techniques For Faux Granite
With your surface ready and colors chosen, it’s time to create the granite effect. Painting faux granite is more about layering and blending than about drawing perfect lines. Here’s how to do it step-by-step:
1. Apply The Base Color
Start by painting the entire countertop with your base color. Use a roller for even coverage. Let it dry completely. This layer sets the tone for your granite and fills in any tiny surface pores.
2. Sponge On Secondary Colors
Dampen a sea sponge and dip it into your second color (a mid-tone). Dab lightly over the surface, creating random patches and flecks. Rotate the sponge so patterns do not repeat. Repeat with a third color if desired. Let each layer dry for a few minutes before adding the next.
3. Add Accents And Depth
Use a smaller sponge, feather, or fine brush to add small spots, dots, or veins in your accent color. These can be black, white, gold, or even metallic. Mist lightly with water to soften harsh lines and encourage blending.
4. Create Veining
To mimic the natural veins found in granite, use a thin artist’s brush or feather. Dip it in your chosen veining color and drag gently across the surface in wavy lines. Real granite veins are rarely straight or evenly spaced.
Soften the veins by dabbing with a damp sponge or misting lightly with water.
5. Blend And Layer
Repeat the sponging and veining process as needed, layering until you achieve the depth and variation you want. Step back often to view the effect from different angles.
6. Let Dry Thoroughly
Allow all paint layers to dry completely—overnight is best. Do not rush this step, as trapped moisture can cause problems with the sealer.
Expert insight: Less is more. Avoid overworking the surface; real granite is random, not uniform. Layer lightly and stop when you like the look.
Adding Realistic Granite Details
To truly sell the granite illusion, focus on these advanced details:
- Metallic flakes: Sprinkle a small amount of silver, gold, or bronze mica powder over the wet paint for a subtle sparkle.
- Multiple layers: Granite has depth. Build up 3–5 thin layers of color, letting each dry before adding the next.
- Edge patterns: Don’t forget the sides and edges of your countertop. Continue the granite pattern over these areas for a professional finish.
- Natural imperfections: Real granite has tiny flaws, specks, and changes in color. Add a few irregularities for authenticity.
Sealing And Polishing: The Granite Shine
A high-gloss, durable finish is what makes concrete really look like granite. Sealing protects your design and adds the final touch of realism.
1. Choose The Right Sealer
There are two main options:
- Epoxy resin: Ultra-glossy, tough, and water-resistant. Best for high-use areas but requires careful mixing and pouring.
- Polyurethane: Easier to apply, available in gloss or semi-gloss. Slightly less shiny but more forgiving for beginners.
2. Apply The Sealer
Follow the manufacturer’s instructions. For epoxy, pour and spread evenly with a brush or roller. For polyurethane, use a foam roller or brush. Work in thin layers to avoid drips and bubbles.
Allow each coat to dry as directed. For best results, apply 2–3 coats, sanding lightly with 400-grit sandpaper between coats if needed.
3. Polish For Extra Shine
After the final coat is fully cured, polish the surface with a buffing pad or soft cloth. This step enhances the gloss and gives your faux granite the deep, reflective shine of real stone.
Non-obvious tip: Let the countertop cure for several days before heavy use. Early use can damage the finish, especially with epoxy.

Credit: u-cart.ca
Maintenance Tips For Faux Granite Concrete Countertops
Your new countertop will be durable, but it still needs care to stay beautiful:
- Wipe spills quickly: Acids, oils, and dyes can stain if left too long.
- Use cutting boards: Like real granite, concrete can scratch if you cut directly on it.
- Avoid harsh cleaners: Use mild soap and water. Strong chemicals can dull the sealer.
- Re-seal every 1–2 years: High-traffic areas may need more frequent resealing to keep the shine and protection.
Regular maintenance will keep your faux granite countertop looking amazing for years.
Comparing Concrete, Faux Granite, And Real Granite
If you’re still unsure whether to go for concrete or save up for real granite, compare the main factors side by side:
| Feature | Concrete (Faux Granite) | Real Granite |
|---|---|---|
| Cost (per sq. foot) | $30–$70 | $80–$250 |
| Customization | Unlimited colors/patterns | Limited by natural stone |
| Weight | Medium | Heavy |
| Installation | DIY possible | Professional needed |
| Maintenance | Needs resealing | Needs resealing |
| Heat resistance | Good (with sealer) | Excellent |

Credit: www.youtube.com
Mistakes To Avoid When Creating Faux Granite Countertops
Many DIYers make the same errors. Avoiding these will help your project succeed:
- Skipping the primer: Paint won’t stick well, and colors may look uneven.
- Rushing the drying process: Each layer must dry completely, or the sealer can trap moisture and cause bubbles.
- Using too few colors: Real granite is complex. At least three shades are needed for depth.
- Applying thick sealer coats: Thick layers of epoxy can trap bubbles and look cloudy.
- Forgetting the edges: Unfinished sides make the whole countertop look fake.
- Using the countertop too soon: Sealer needs time to cure fully for best durability.
Sample Project Timeline
To help you plan, here’s a sample schedule for a standard kitchen countertop:
| Step | Time Needed |
|---|---|
| Surface cleaning & repair | 2–3 hours |
| Sanding & priming | 2–3 hours (plus drying time) |
| Painting base and layers | 3–4 hours |
| Veining & detail work | 1–2 hours |
| Sealing (multiple coats) | 4–8 hours (with drying time) |
| Final curing | 2–3 days |
Total: Plan for at least 3–5 days for the full process, including drying and curing.
Realistic Color And Pattern Ideas
Looking for inspiration? Try one of these popular granite color schemes:
- Classic Black Galaxy: Black base, silver and gold metallic flecks, light gray veining.
- White Marble Granite: White base, light gray sponging, thin black veins.
- Baltic Brown: Warm brown base, tan and black flecks, dark brown veins.
- Blue Pearl: Gray base, blue and black sponging, silver metallic accents.
Mix and match colors to create your own unique design. Remember, no two granite slabs are alike—so your countertop will be one of a kind.
Supplies Cost Breakdown
Budgeting helps you avoid surprises. Here’s what you can expect to spend on materials for an average kitchen countertop (about 30 sq. feet):
| Item | Estimated Cost |
|---|---|
| Concrete (if pouring new) | $100–$200 |
| Primer | $30–$50 |
| Acrylic paints/stains | $40–$80 |
| Sealer (epoxy/polyurethane) | $60–$150 |
| Sponges, brushes, tape | $20–$40 |
| Total | $250–$520 |
This is much cheaper than the $2,500–$7,500 you might pay for real granite in the same area.
Advanced Tips For A Professional Result
If you want your concrete countertops to truly fool the eye, try these advanced tips:
- Layer translucent glazes: Use thinned paints or stains to add transparent color washes between layers. This creates depth and realism.
- Use a feather lightly: For the finest, most natural-looking veins, a feather can outperform brushes.
- Work in daylight: Good lighting helps you see color balance and avoid missed spots.
- Practice on scrap: Before starting on your real countertop, practice your technique on a spare piece of wood or cardboard.
Non-obvious insight: Professional faux finishers often use a mix of acrylic paints and concrete stains. Stains soak in and add depth, while paints give bright colors and surface detail.
When To Call A Professional
DIY can be fun and rewarding, but some situations call for professional help:
- Large or complex shapes: If your countertop has many corners or curves, a pro can ensure even coverage.
- Epoxy application: Epoxy can be tricky to mix and pour, and mistakes are hard to fix.
- Time limitations: If you need the job done quickly or have little DIY experience, a professional may be worth the extra cost.
For more detailed guidance and visuals, check out resources like Family Handyman.
Frequently Asked Questions
What Kind Of Paint Should I Use To Make Concrete Look Like Granite?
Use acrylic craft paints or concrete stains for the best results. Acrylics offer bright, easy-to-blend colors, while stains soak into the surface and add depth. Both can be layered for a realistic look.
How Long Does The Faux Granite Finish Last?
With proper sealing and maintenance, a faux granite finish on concrete can last 5–10 years or more. Resealing every 1–2 years will extend the life and keep the shine.
Can I Put Hot Pots Directly On Faux Granite Concrete Countertops?
While sealed concrete is heat-resistant, it’s still wise to use trivets or hot pads. Extreme heat can damage the sealer, causing discoloration or cracks.
How Can I Fix Mistakes In The Faux Granite Pattern?
If you make a mistake, let the paint dry, then lightly sand the area and repaint. Because the finish is layered, you can touch up spots or add more color until you’re happy with the look.
Is It Safe To Use Faux Granite Countertops For Food Prep?
Yes, as long as you use a food-safe sealer. Always check the product label, especially for kitchen use. Most modern epoxy and polyurethane sealers are food-safe once fully cured.
Making concrete countertops look like granite is a rewarding project that combines creativity with practical skills. The process takes time and patience, but the results can transform any space—giving you the luxury look of granite without the cost. With the right preparation, materials, and a little artistic flair, your countertops will fool even the sharpest eye.
Enjoy your beautiful new surface, and take pride in a job well done!