
Making the most of your kitchen space can be a real challenge, especially when it comes to organizing pots and pans under the cabinet. For many people, this area quickly becomes a mess—lids get lost, pans are stacked in piles, and you end up using the same two pots because they’re easiest to grab. But with the right approach, you can turn that cluttered cabinet into a well-organized, efficient space. This guide will show you practical steps, clever ideas, and expert tips to help you organize your pots and pans under the cabinet, no matter the size of your kitchen.
Smart organization saves you time, reduces stress, and even helps your cookware last longer. Whether you have a small apartment or a large kitchen, the solutions below will help you keep everything neat and easy to reach. You’ll also discover common mistakes people make, and how to avoid them.
Let’s get started and transform your kitchen storage for good.
Understanding Your Cabinet Space
Before you buy organizers or move anything, take a close look at the space under your cabinet. Every kitchen is different, and the size and shape of your cabinet will influence the best solutions.
Start by emptying out the cabinet completely. This lets you see how much room you have, the height between shelves, and any obstacles like plumbing or hinges. Measure the width, depth, and height. Write down these numbers—you’ll need them when shopping for racks or bins.
Look for shelf height adjusters or removable shelves. Many modern cabinets have adjustable shelves, so you can set heights based on your tallest pot or stack pans more efficiently. If your cabinet has pipes or odd angles, consider custom solutions or flexible organizers that can work around these obstacles.
Cabinet Size And Layout
- Standard base cabinets: Usually 24 inches deep and 34.5 inches tall.
- Corner cabinets: Often wider and harder to reach in the back.
- Drawers under cabinets: Some kitchens have deep drawers instead of doors.
If you have limited space, vertical storage or stackable options become even more important. For wider cabinets, you may need dividers to prevent pans from sliding around.
Sorting And Decluttering Pots And Pans
One big reason cabinets get messy is having too many pots and pans. Now is the time to declutter.
Take everything out and group items by type: frying pans, saucepans, stock pots, lids, and specialty items (like woks or grill pans). Ask yourself:
- When did I last use this?
- Do I have duplicates?
- Is it in good condition?
If you haven’t used an item in a year, or it’s damaged, consider donating or recycling it. Most people use only 20% of their cookware regularly. Keeping only the essentials saves space and makes organization easier.
How Many Pots And Pans Do You Really Need?
For most households, these basics are enough:
- 2 frying pans (small and large)
- 2 saucepans (small and medium)
- 1 stock pot
- 1 sauté pan
- 1-2 lids that fit multiple pans
Specialty items can be stored elsewhere if not used often. You’ll be surprised how much space you gain by limiting your collection.
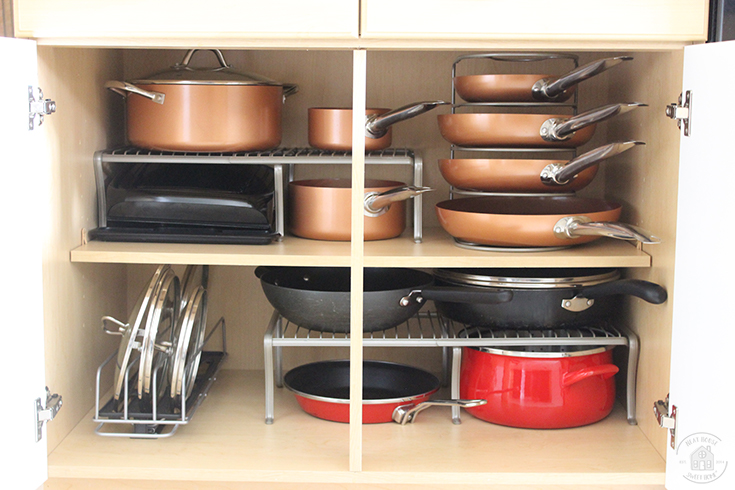
Credit: www.neathousesweethome.com
Cleaning And Preparing The Cabinet
Before placing organizers or cookware back, clean the cabinet thoroughly. Dust, crumbs, and grease often collect at the bottom. Wipe with warm soapy water and dry fully to prevent mold or rust.
Check for cabinet liners—they protect the surface and make cleaning easier. Rubber or plastic liners also prevent pots from sliding and reduce noise. If you don’t have liners, measure and cut one to fit your cabinet before starting to organize.
Choosing The Right Storage Organizers
Not all organizers are created equal. Picking the right tools for your space and cookware is key to lasting organization.
Types Of Organizers
- Stackable racks: Hold pans vertically or horizontally, making it easy to pull out one without moving the rest.
- Pull-out shelves: Slide out for easy access, especially useful for deep cabinets.
- Lid holders: Keep lids upright and easy to find.
- Hooks and rails: Use the inside of cabinet doors for small lids or utensils.
- Dividers: Separate pans or lids and stop them from sliding.
- Lazy Susans: Great for corner cabinets, letting you spin to reach items in the back.
- Bins or baskets: Hold smaller items or lids together.
Here’s a comparison of popular organizers to help you decide:
| Organizer Type | Best For | Pros | Cons |
|---|---|---|---|
| Stackable Racks | Pans, Skillets | Saves space, easy access | May not fit all sizes |
| Pull-out Shelves | All cookware | Full visibility, reduces bending | More expensive, needs installation |
| Lid Holders | Lids | Prevents lost lids | Uses extra space |
| Hooks/Rails | Small pans, lids | Uses door space | Not for heavy items |
Choosing more than one type often gives the best results. For example, a stackable rack for pans and a lid holder on the door.
What To Avoid
- Over-complicated systems that need too many steps to use
- Organizers that don’t match your cabinet size (double-check measurements)
- Weak plastic racks for heavy pots
The Step-by-step Process To Organize Pots And Pans
With your tools ready and cookware sorted, it’s time to organize. Here’s a practical method that works for most kitchens.
1. Group By Use
Keep everyday pots and pans in the easiest-to-reach spot. Place rarely used items (like a lobster pot) in the back or higher up.
2. Store Lids Separately
Piling lids on pans makes everything harder to grab. Use a lid organizer or attach a rail to the cabinet door. If space is tight, try a simple magazine rack as a budget option.
3. Stack Carefully
If you must stack pans, place a soft liner or paper towel between them. This prevents scratches, especially for nonstick pans.
4. Use Vertical Space
Many cabinets have extra height. Use vertical racks or tension rods to stand pans on their sides. This works well for baking sheets and cutting boards, too.
5. Install Pull-out Solutions
For deep cabinets, pull-out shelves or baskets make every pan easy to reach. You can buy these at hardware stores, or hire a handyman for installation.
6. Adjust As Needed
Live with your new system for a week. If something isn’t working, change it. Organization should make cooking easier, not harder.
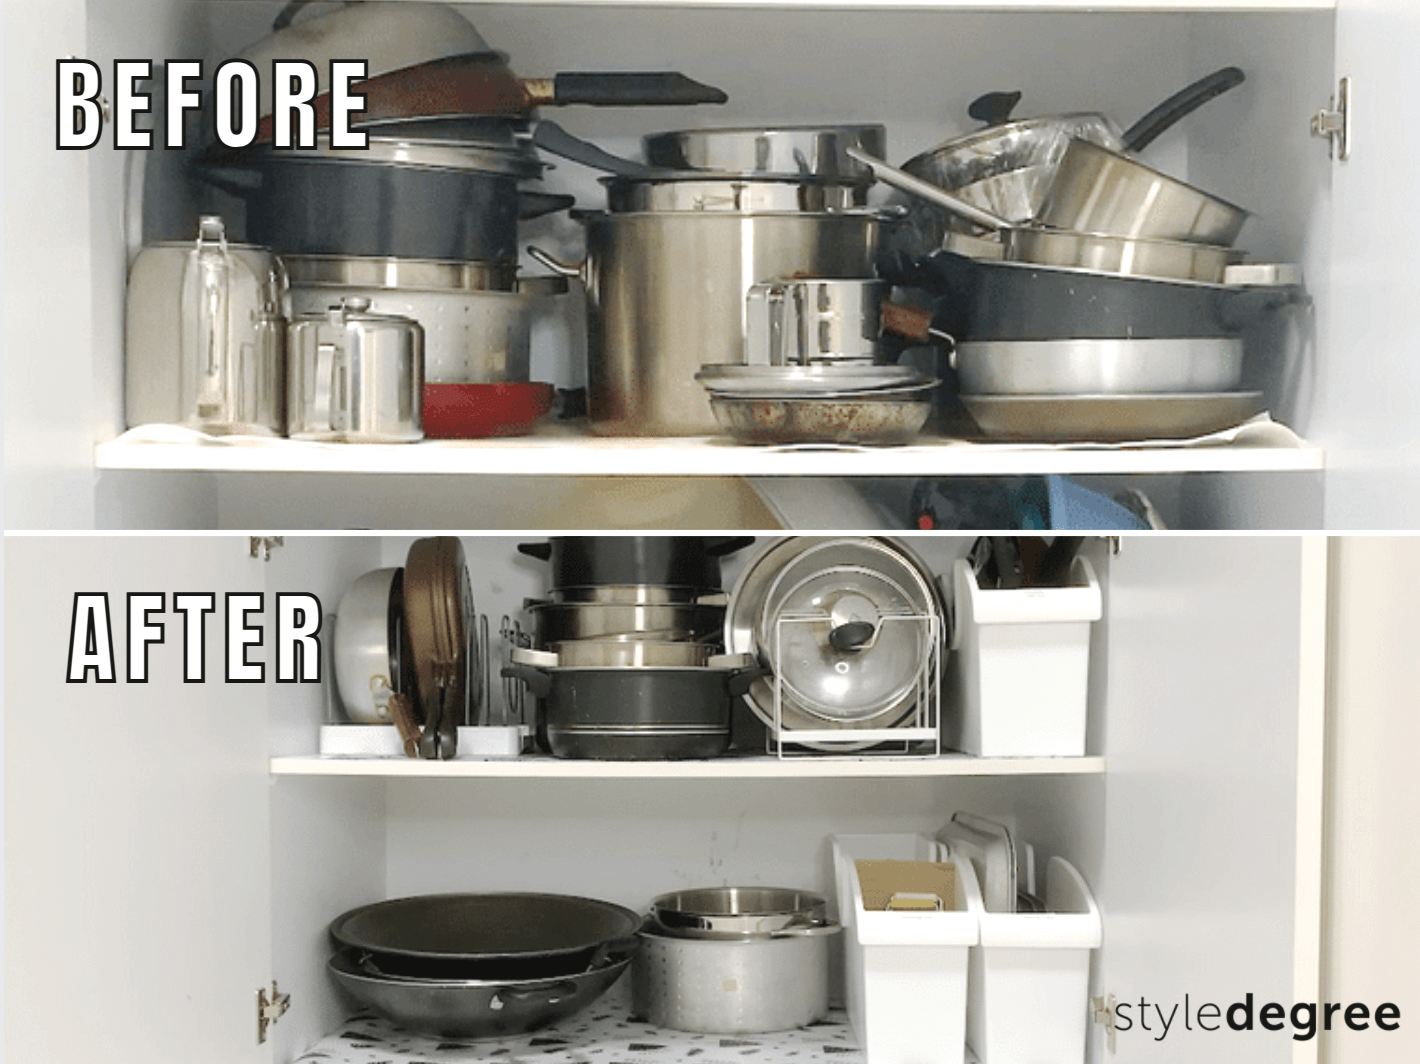
Here’s a sample before-and-after layout for a standard cabinet:
| Before | After |
|---|---|
| Pans stacked in piles Lids loose in back Hard to reach rear items | Pans on vertical rack Lids in holder on door Pull-out shelf for large pots |
Maximizing Small Spaces
Small kitchens need smart solutions. If your cabinet is tiny, you must use every inch wisely.
- Use cabinet doors: Attach hooks or rails for lids, measuring spoons, or small pans.
- Go vertical: Tension rods or file organizers let you store pans upright.
- Nest pans: Keep similar shapes together, but avoid deep stacks.
- Rotate seasonally: Store rarely used items elsewhere (like a high shelf or closet).
- Choose multi-use pans: A deep sauté pan can do the job of a saucepan and a skillet.
A simple over-the-cabinet door organizer can add instant storage for lids or small pans. These require no installation and can be moved easily.
Credit: styledegree.sg
Organizing For Large Families Or Heavy Cooks
If you cook often or have a big family, you may have a lot of cookware. The key is zoning—grouping items by use or size.
- Create a baking zone: Store baking sheets and muffin tins upright with dividers.
- Heavy pots at the bottom: Place Dutch ovens or cast iron on the lowest shelf for safety.
- Stack by size: Largest pans at the bottom, smaller ones nested above.
For frequent cooks, pull-out shelves or deep drawers are almost essential. They make heavy pans easy to reach and reduce bending and lifting.
Organizing Specialty Cookware
Some pans are odd-shaped or used less often. Woks, grill pans, and roasting pans can be difficult to fit.
- Vertical dividers work well for large flat items.
- Hooks are best for oddly shaped pans if there’s room on the door or wall.
- High shelves can store rarely used items, freeing up prime space for daily cookware.
Remember: every pan doesn’t need to be under the cabinet. Store seasonal or holiday pans in less accessible spots.
Lid Organization: Solving The Biggest Headache
Lost lids are a top complaint. There are several good ways to keep them organized.
- Door-mounted racks: Use the inside of the cabinet door for lid storage.
- Lid organizers: Stand lids upright in a rack or bin.
- Simple tension rods: Place rods inside the cabinet to create a “slot” for each lid.
For tight budgets, even a wire dish rack can do the job. The key is storing lids so you can see and grab them without moving pans.
Maintenance: Keeping Your System Working
The best organization system is one you’ll actually use. Here’s how to keep it tidy:
- Return items to their spot every time.
- Wipe spills and crumbs monthly.
- Review cookware twice a year—donate what you don’t use.
- Replace worn liners or organizers as needed.
A well-organized cabinet stays neat with just a little effort. If you share a kitchen, label sections so everyone knows where things go.
Mistakes To Avoid When Organizing Pots And Pans
Even with the best intentions, it’s easy to make mistakes. Here are common ones and how to avoid them:
- Overstacking pans: Leads to scratches and frustration. Use dividers or racks instead.
- Ignoring vertical space: Most people store everything flat. Standing pans up saves space.
- Storing lids with pans: Makes it hard to grab what you need.
- Using cheap organizers for heavy items: Weak racks break or tip over.
- Not measuring: Buy organizers that fit your exact cabinet size.
A well-planned setup saves you money and headaches in the long run.
Advanced Organization Tips
For those who want a professional look, try these advanced tips:
- Label shelves or sections: Use simple labels for pan types or sizes.
- Color code handles or lids for quick matching.
- Install lighting: Small LED lights inside the cabinet make it easier to find things.
- Use drawer organizers: If you have deep drawers, custom organizers keep everything in place.
If you’re a serious cook, invest in quality organizers. They protect your pans and make your kitchen feel more like a chef’s workspace.
Sustainability And Safety Considerations
Many people don’t think about the environmental impact of kitchen storage. When possible, choose organizers made from recycled materials or long-lasting metals. Avoid single-use plastic bins.
For safety, keep heavy pans low and never overload shelves. Check that any hooks or racks are rated for the weight you’ll hang.
If you have children, store sharp or heavy items out of their reach. Use soft-close hinges if possible to prevent pinched fingers.
Real-life Examples: Case Studies
Let’s look at two real kitchens and how they solved common problems.
Small Apartment Kitchen
- Cabinet size: 18” wide, 24” deep
- Problem: Pans stacked, hard to reach, lids always lost
Solution:
- Installed a vertical rack for pans
- Used door-mounted lid holder
- Moved rarely used pans to a closet
Result: More counter space, easier cooking, no missing lids.
Family Kitchen With Lots Of Cookware
- Cabinet size: 36” wide, 24” deep, corner cabinet
- Problem: Deep piles, heavy cast iron, crowded space
Solution:
- Added pull-out shelves for heavy pots
- Used vertical dividers for baking sheets
- Grouped pans by size and use
Result: Safer, more organized, everyone in the family can find what they need.
Cost Breakdown: Organizing On Any Budget
Organizing your pots and pans doesn’t have to be expensive. Here’s a look at what you might spend:
| Organizer Type | Low Budget | Mid-Range | High-End |
|---|---|---|---|
| Stackable Rack | $10 | $25 | $50+ |
| Pull-out Shelf | $30 | $75 | $200+ |
| Lid Organizer | $5 | $15 | $40 |
| Cabinet Liner | $5 | $10 | $30 |
DIY solutions like tension rods or magazine racks can save money, especially in small kitchens. For a full pull-out system, hiring a handyman may cost more, but is worth it for heavy users.
Expert Insights: What Most Beginners Miss
Many people forget to measure their cabinets before buying organizers. Even a small error can mean your new rack doesn’t fit. Always measure width, depth, and height—twice.
Another overlooked tip: organize by how you cook, not just by size or type. If you always use a frying pan and lid together, store them near each other. This approach saves time and frustration.
Finally, don’t forget about cleaning. Organizers with open designs are easier to keep dust-free. Closed bins may hide clutter but can collect crumbs and grease.

Credit: www.ramblingrenovators.ca
When To Upgrade Your Cabinet Storage
Sometimes, no amount of organizing will solve the problem—your cabinet may just be too small or poorly designed. Signs you may need an upgrade:
- Shelves are sagging or broken
- You can’t fit basic cookware even after decluttering
- You have to move everything to reach one pan
In these cases, consider adding pull-out shelves, converting to deep drawers, or even a small kitchen remodel. For more advice on kitchen storage upgrades, check out this This Old House guide.
Frequently Asked Questions
How Do I Keep Pots And Pans From Scratching Each Other?
Use soft liners or pan protectors between stacked pans. Felt, silicone, or even paper towels work well. Vertical storage also reduces scratches.
What Is The Best Way To Store Lids If I Have Very Little Space?
Try a door-mounted lid rack or a simple tension rod inside the cabinet to create lid slots. Even a small magazine holder can keep lids organized and upright.
Can I Hang Pots And Pans Inside The Cabinet?
Yes, if your cabinet is sturdy and deep enough. Install hooks or rails on the inside of the cabinet door or ceiling. Make sure they can support the weight of your cookware.
How Often Should I Clean And Reorganize My Pots And Pans Cabinet?
Clean spills and crumbs at least once a month. Review and reorganize your cookware twice a year, or when you notice clutter building up.
Are Pull-out Shelves Worth The Cost?
For deep or hard-to-reach cabinets, pull-out shelves make a big difference. They reduce bending and searching, and are especially useful for heavy pots. The investment pays off in easier cooking and less frustration.
Transforming your under-cabinet storage for pots and pans might take a little time, but the results are worth it. With the right plan and tools, your kitchen will be more efficient, safer, and more enjoyable to use every day.