
Painting a stone backsplash can completely change the look of your kitchen or bathroom. Stone backsplashes are beautiful, but sometimes their color or texture can feel outdated or simply not match your taste. The good news is, you don’t have to remove the stone to get a fresh look.
With the right approach, you can paint your stone backsplash and make it look modern, clean, and stylish. This guide will show you every step in detail, from preparation to finishing touches, so you get a lasting, professional result—even if you’re new to DIY.
Why Paint A Stone Backsplash?
Many people choose to paint their stone backsplash for different reasons. Maybe the color is too dark, or the stone looks worn out. Some homeowners want a brighter kitchen, while others just want to match new cabinets or appliances. Painting instead of replacing saves money and time.
It also gives you control over the final look. Painted stone can look just as elegant as natural stone if you use the right materials and techniques.
A big advantage is flexibility: if you change your mind later, you can repaint again or even strip the paint with special removers. This is much easier than installing a new backsplash. For renters, painting can be a temporary update, as long as your landlord agrees. If you’re planning to sell your home, a fresh, neutral paint color on the backsplash can help your kitchen appeal to more buyers.
Some stones—like travertine or limestone—are especially easy to paint because they’re porous and take paint well. Even if your stone has a rough or uneven surface, paint can even out the look and hide small flaws, making the whole area feel newer.
Choosing The Right Paint And Materials
Selecting the best products is the first important step. Not all paints work on stone, and using the wrong one can lead to peeling, fading, or stains.
Types Of Paint For Stone
You need masonry paint or acrylic latex paint. These paints stick well to stone and resist moisture. For kitchens and bathrooms, choose a paint labeled as mildew-resistant. If you want a smooth, glossy look, go for enamel paint.
Masonry paint is specially made to handle the rough, porous surface of stone. Acrylic latex paint is flexible and less likely to crack, which is helpful if your home moves slightly with temperature changes. For backsplashes behind stoves, pick a heat-resistant option or check the label for temperature tolerance.
If you want a specific finish, like ultra-matte or high-gloss, check that the paint’s label says it’s suitable for masonry. Specialty paints, like chalk paint, can be used but always need a strong primer to prevent stains and peeling.
Primer
Stone is porous. It absorbs liquids quickly. Use a masonry primer to seal the stone and help the paint stick better. A good primer also keeps stains from showing through the paint.
Some stones, like slate, may have oils or minerals that bleed through paint. A stain-blocking primer (sometimes called “bonding primer”) helps stop discoloration. If your backsplash has been exposed to lots of cooking oil, a stain-blocking primer is a smart extra step.
Tools And Supplies Needed
- Painter’s tape
- Drop cloths or plastic sheeting
- Scrub brush and mild detergent
- Sandpaper (medium and fine grit)
- Masonry primer
- High-quality masonry or acrylic latex paint
- Paintbrushes (angled and straight)
- Small roller (foam or microfiber)
- Paint tray
- Caulk and caulking gun (for filling gaps)
- Respirator or mask (if using spray or oil-based products)
- Gloves and safety goggles
It’s worth investing in brushes made for rough surfaces—these are often labeled “for masonry” or “for textured walls. ” They hold more paint and push color into crevices.
Non-obvious insight: Avoid cheap brushes and rollers. Cheap tools can leave bristles or lint in the paint, ruining the finish on a textured stone surface. Also, poor-quality rollers can create uneven patterns on the stone.
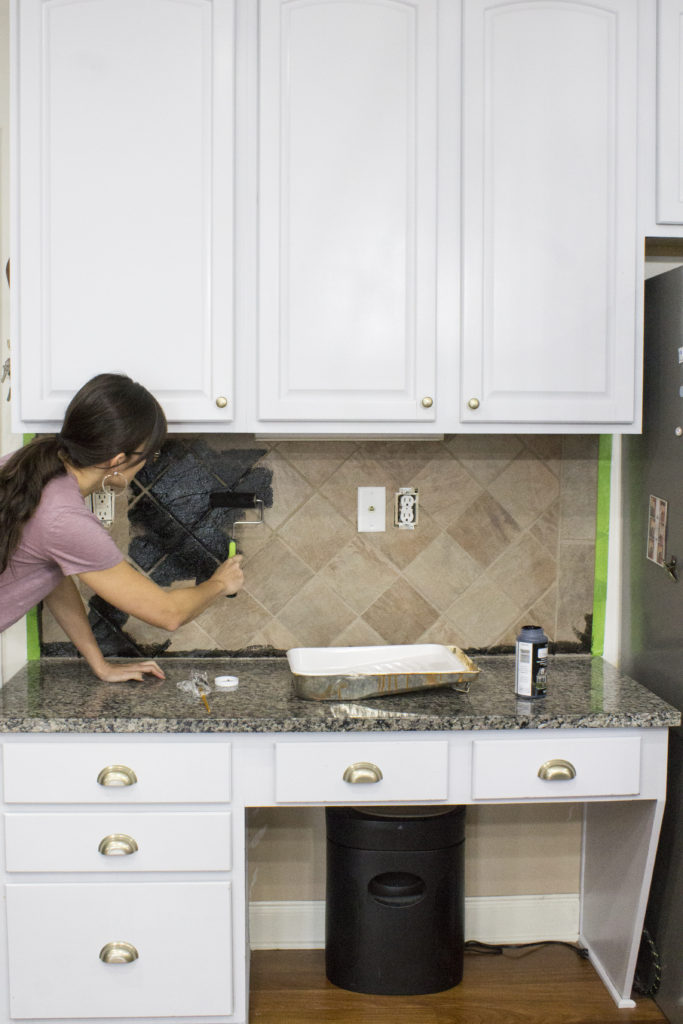
Credit: loveyourabode.com
Preparing The Stone Surface
Preparation is the key to a lasting finish. Many beginners rush this step and regret it later.
Cleaning The Stone
Stone backsplashes collect grease, dust, and soap scum, especially behind stoves and sinks. Painting over dirt will make the paint peel. Use a mild detergent mixed with warm water. Scrub the stone with a stiff brush. Rinse with clean water and let it dry fully—this can take 12–24 hours depending on humidity.
Don’t use harsh chemicals like ammonia or strong degreasers unless absolutely necessary; these can leave residues that stop the primer from sticking. For stubborn stains, a small amount of baking soda on a damp sponge can help remove spots without scratching the stone.
If you find mold or mildew, clean with a mixture of one part bleach to three parts water. Rinse well and let dry. Wear gloves and ensure good ventilation.
After cleaning, check for any white powdery residue (called efflorescence). This is mineral build-up and needs to be scrubbed away. It can keep paint from sticking, so don’t skip this step.
Repairing And Caulking
Check for cracks, chips, or holes in the stone or grout. Fill these with masonry repair caulk. Smooth the caulk with a wet finger or a caulking tool. Allow repairs to dry as directed on the package.
For larger holes, you may need a premixed patching compound. Make sure all repairs are flush with the stone surface; uneven repairs will show through the paint.
Check the grout lines too. If the grout is cracked or missing, repair it before painting. Fresh paint will not hide deep grout damage and water can get behind the stone if you skip this step.
Sanding
Lightly sand the stone surface with medium-grit sandpaper (around 120–150 grit). This removes loose particles and creates a slightly rough surface for the primer. For glossy or sealed stone, sanding helps the primer bond better.
Don’t sand too aggressively—just enough to dull any shine and roughen up the surface. If your stone is very soft (like limestone), use a lighter touch or finer sandpaper.
Vacuum away dust and wipe the surface with a damp cloth. Let dry.
Taping And Protecting Surroundings
Use painter’s tape to protect countertops, cabinets, and walls. Place drop cloths to catch drips. Take your time with taping—paint on stone is hard to remove if you make a mistake.
For outlets and switches, remove the cover plates and tape the edges for a neater finish.
Non-obvious insight: Don’t skip taping electrical outlets and light switches. Even small splashes can be hard to clean off stone. Extra tip: If your backsplash touches an open shelf, tape the underside of the shelf as well.
Priming The Stone Backsplash
Primer is not optional for stone. It creates a smooth, even base and helps the paint last longer.
Applying Masonry Primer
Stir the primer well. Start at the edges and corners with a small, angled brush. For large flat areas, use a roller. Apply a thin, even coat. Work the primer into the stone’s cracks and crevices. Check for drips or thick spots—these can show through the paint.
Go slowly; if you rush, you’ll miss spots or end up with uneven coverage. If your stone is deeply textured, dab the primer in with the tip of your brush to cover all surfaces.
Let the primer dry completely. Drying times vary, but most need 4–6 hours. Check the product label for exact guidance.
If the stone is very porous or stained, apply a second coat. Let the second coat dry overnight before painting.
If you see any stains coming through after priming, spot-prime those areas again. Don’t start painting until the primer is fully dry—sticky primer can make the paint slide and create bubbles.
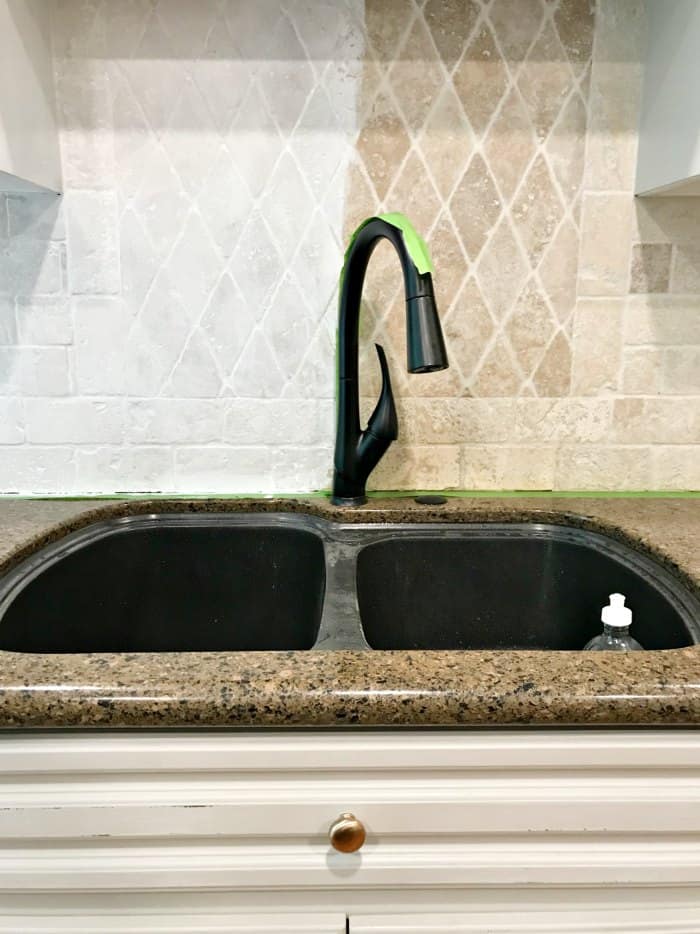
Credit: athomewiththebarkers.com
Choosing Colors And Finishes
Color choice is personal, but some practical tips can help you choose wisely.
Best Colors For Stone Backsplash
- White or off-white: Makes the space feel larger and cleaner.
- Gray: Modern and hides dirt well.
- Soft beige or taupe: Warm and inviting.
- Bold colors: Navy, deep green, or black add drama, but need more care to look even.
If your kitchen is small or doesn’t get much light, lighter colors will make it feel more open. If you want the stone’s texture to stand out, a mid-tone gray or beige works well. For a unique look, try a soft pastel (like sage green or pale blue).
Just remember, bright colors can show brush marks and uneven coverage more than neutrals.
Finish Options
- Satin or eggshell: Most popular for kitchens. Easy to clean, not too shiny.
- Semi-gloss: Extra durable and moisture-resistant, but can show uneven textures.
- Matte: Hides imperfections but harder to clean.
Test your color on a small area first. Stone absorbs paint differently, and the finished color can be lighter or darker than the paint chip.
Bring home a few sample pots and paint a test patch. Look at the color in morning and evening light before deciding. Remember, the color can change a little as the paint dries.
Painting The Stone Backsplash
Painting stone requires patience and a steady hand. The texture of stone means you need to work the paint into all the grooves.
Method 1: Brush And Roller
- Start with a high-quality brush. Cut in along edges, corners, and grout lines.
- Use a small roller for flat areas. Foam rollers work best for smooth stone; microfiber for rough stone.
- Paint in thin layers. Thick coats can drip or pool in crevices.
- Let the first coat dry 4–6 hours, then check for missed spots.
- Apply a second coat for even coverage. Some dark stones may need a third coat.
For best results, brush paint into the grout lines first, then roll the larger stone faces. If you see bubbles or tiny holes, go back over the area with a lightly loaded brush.
Method 2: Spray Painting
Spraying gives a very even finish, especially on heavily textured stone. However, it requires more masking and ventilation.
- Use a paint sprayer designed for masonry or latex paint.
- Mask all nearby surfaces very well.
- Hold the sprayer 10–12 inches from the surface and move in steady strokes.
- Spray in thin layers to avoid drips.
If you’re new to spraying, practice on a piece of cardboard first. Move the sprayer at a steady speed to avoid paint build-up.
Spraying works best for large or open areas. For small kitchens, brushing and rolling is often easier and less messy.
Non-obvious insight: For stones with deep texture, gently “stipple” the surface with a dry brush after rolling to reach hidden spots. Another tip: If you see air bubbles after rolling, wait a minute and lightly tap them with the brush before the paint dries.
Drying And Curing
Painted stone takes time to fully cure, even if it feels dry to the touch.
- Let the final coat dry at least 24 hours before removing tape.
- Avoid scrubbing or placing items against the backsplash for 7–10 days.
- The paint will continue to harden and become more durable over several weeks.
If you want extra protection, apply a clear masonry sealer after the paint dries completely. This helps with cleaning and stain resistance.
Choose a sealer with the same finish (matte, satin, or gloss) as your paint for a consistent look. Apply the sealer with a clean brush or roller, working it into all grooves, and allow it to dry fully before use.
Cleaning Up
- Wash brushes and rollers with soap and water if using latex paint.
- Dispose of paint and primer according to local rules.
- Keep leftover paint for touch-ups.
If you used painter’s tape, remove it slowly at a 45-degree angle. Pull the tape off before the paint is fully hard to avoid peeling.
Store leftover paint in a cool, dry place. Write the date and color on the lid for future touch-ups.
Common Mistakes To Avoid
- Skipping cleaning: Paint won’t stick to greasy or dusty stone.
- Not using primer: Leads to poor adhesion and uneven color.
- Painting too thickly: Causes drips and long drying times.
- Choosing the wrong paint: Wall paint will peel or wash off in a kitchen.
- Not allowing proper drying: Leads to smudges and damage.
Other common mistakes include not checking for loose stones, using old paint (which can clump), and skipping caulking. Always take your time—rushing leads to uneven results.
Maintenance Tips After Painting
A painted stone backsplash can last for years if cared for properly.
- Wipe up spills quickly, especially tomato sauce, oil, or vinegar.
- Clean with a soft cloth and mild detergent.
- Avoid abrasive cleaners or scrub pads.
- Touch up chips or scratches with leftover paint.
For stubborn spots, use a damp sponge with mild soap. Don’t let water sit on the painted surface for long periods. If you notice any paint lifting, touch up immediately to prevent moisture from getting behind the paint.
Comparing Painted Vs. Unpainted Stone Backsplash
Here’s a simple comparison of the main differences:
| Feature | Painted Stone | Unpainted Stone |
|---|---|---|
| Color Options | Any color | Natural stone colors only |
| Maintenance | Easier to clean | Can stain easily |
| Durability | Good (with proper prep) | Very high (unless damaged) |
| Cost | Low (DIY) | Varies by stone |
| Style Update | Quick and easy | Requires replacement |
Painted backsplashes offer more creative freedom but will need touch-ups over time. Natural stone is classic and long-lasting, but once stained or damaged, it’s much harder to restore.
When Not To Paint Stone Backsplash
Some situations call for caution:
- If the stone is a rare or historic material, painting may reduce its value.
- If there are major water leaks behind the backsplash, solve these first.
- If the stone is polished marble or granite, paint may not bond well without special primers.
If your kitchen is very humid or you cook with a lot of steam, paint may wear faster. Always fix any leaks or moisture issues before painting.
Real-life Example: Transforming A Dated Kitchen
One homeowner had a brown stone backsplash that made her kitchen feel dark. After cleaning and priming, she painted it with two coats of light gray masonry paint. The result was a brighter, more modern kitchen. Guests often think it’s a brand-new backsplash, not just painted stone.
She noted that the hardest part was making sure all the grout lines were covered. Using a small artist’s brush for the tightest spots helped. The project took a weekend but made the whole space feel larger and more inviting.
Non-obvious insight: Painting stone can hide old stains or mismatched repairs, making the whole backsplash look uniform and clean. It’s also a great way to cover up a patchwork of different stone types from old repairs.
Cost Breakdown
Painting a stone backsplash is much cheaper than replacement. Here’s an estimate for a typical 20-square-foot area:
| Item | Estimated Cost (USD) |
|---|---|
| Primer (1 quart) | $15–$20 |
| Paint (1 quart) | $18–$30 |
| Brushes & Roller | $12–$25 |
| Painter’s Tape & Drop Cloths | $10–$15 |
| Cleaning Supplies | $8–$12 |
| Caulk (if needed) | $6–$10 |
| Total | $69–$112 |
Compare this to replacing the backsplash, which can cost $400–$1,200 or more.
Remember, most of these supplies will have leftovers, especially paint and primer. You can use them for future touch-ups or small projects.
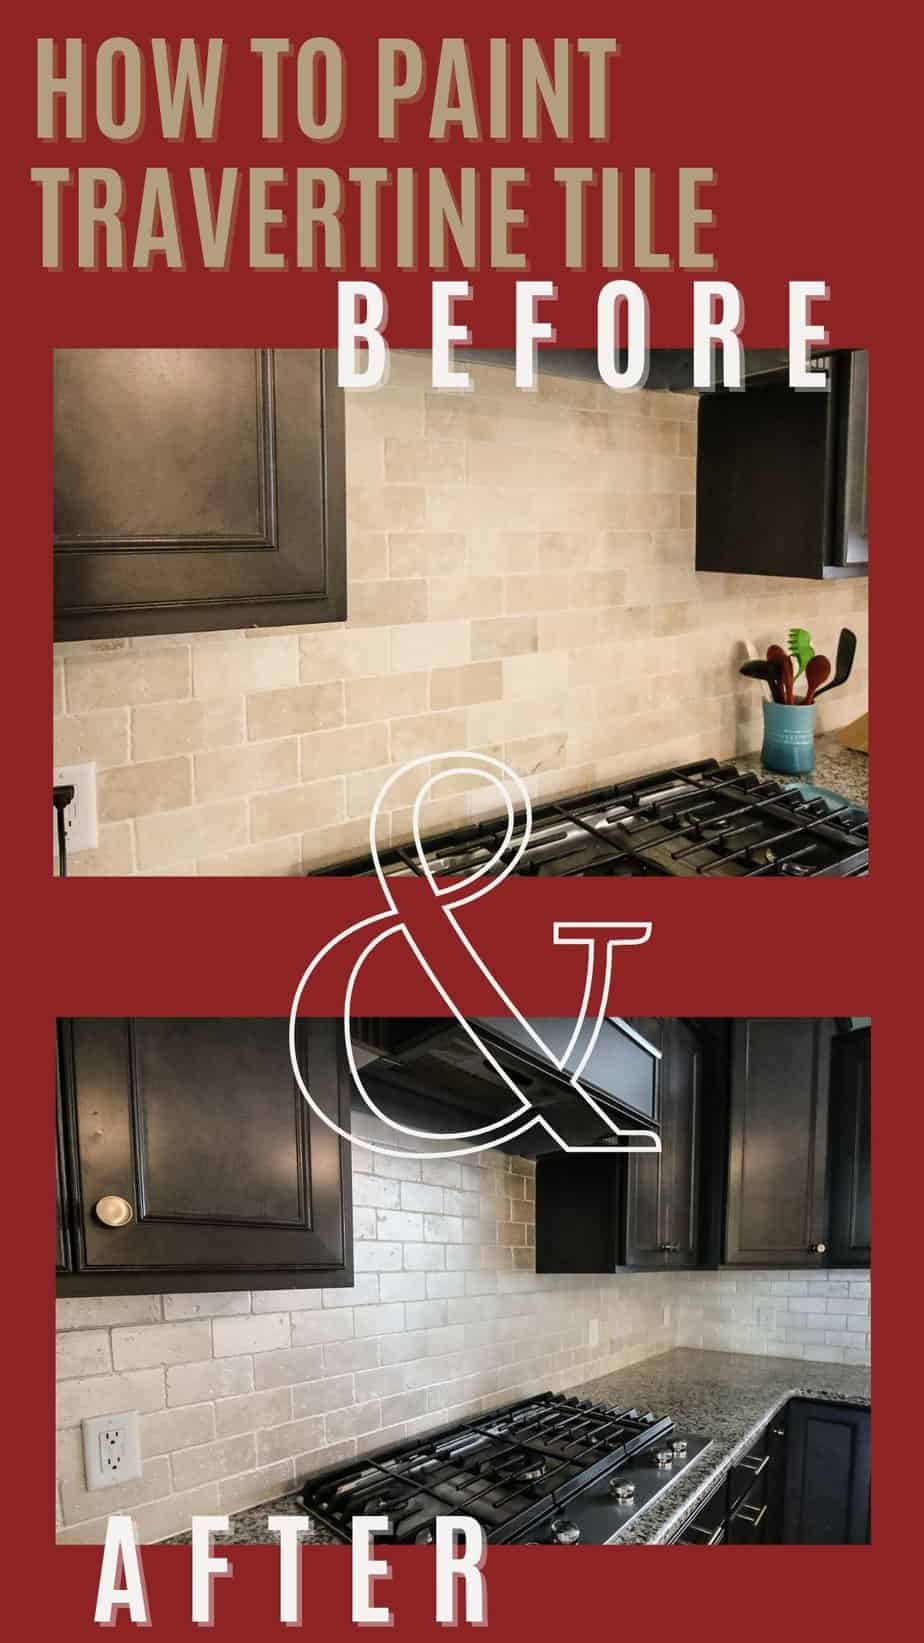
Credit: www.charlestoncrafted.com
How Long Does Painted Stone Last?
With proper preparation and care, a painted stone backsplash can last 5–10 years before needing a touch-up. High-traffic kitchens may need touch-ups sooner, especially near sinks and stoves.
If you use a sealer, the surface can stay looking fresh even longer. If you notice fading or chipping, a quick clean and single coat of paint will restore it.
Is Painting Stone Backsplash Right For You?
If you want a fast, affordable update and don’t mind a little DIY, painting is a smart choice. It’s also a good option if you want a custom color or need to cover stains. However, if your stone is rare, historical, or you prefer a completely natural look, consider other options.
If you love to change your home’s style often, painting gives you more flexibility than permanent stone. But if you want a zero-maintenance surface, natural stone may be better.
Safety Tips
- Always ventilate well when painting indoors.
- Wear gloves and a mask when cleaning with strong chemicals.
- Read all product labels and follow directions.
- Keep pets and children away from the work area.
If you’re sensitive to paint fumes, choose low-odor and low-VOC products.
Practical Tips For The Best Result
- Work in small sections so you don’t miss any spots.
- Use a flashlight to check for missed crevices.
- Keep your workspace clean and organized.
- Label leftover paint with the color and date for future touch-ups.
Another handy tip: Keep a damp cloth nearby to wipe away any paint mistakes immediately before they dry.
If you’re using a ladder or step stool, make sure it’s stable on the floor and not sitting on drop cloth edges. Safety first!
Inspiration: Modern Looks With Painted Stone
Painted stone doesn’t have to look boring. Here are a few ideas:
- White-washed stone: Gives a farmhouse or coastal feel.
- Two-tone backsplashes: Paint upper and lower sections different colors.
- Geometric stencils: Add a pattern using a stencil and contrasting paint.
- Glossy finish: For a sleek, modern kitchen.
You can also try “color washing”—mixing a little water with your paint and brushing it lightly over the stone so some natural color shows through. This technique works well for rustic or vintage kitchens.
Check design websites or magazines for color inspiration. Look for real-life photos of painted stone to see how texture and color work together.
Environmental Considerations
Choose low-VOC (volatile organic compounds) paints and primers if possible. These are safer for your health and the environment. Dispose of paint and cleaning water responsibly. For more on VOCs and paint safety, visit the EPA’s information page.
Reusing brushes and rollers for future projects can also cut down on waste. If you have leftover paint, donate it to a neighbor, school, or community center to reduce landfill waste.
Frequently Asked Questions
How Do I Know If My Stone Backsplash Can Be Painted?
Most stone backsplashes can be painted if they are clean, dry, and not polished marble or granite. Sealed or glossy stones may need extra sanding or a special primer. If you’re unsure, test a small hidden area first.
What Kind Of Paint Should I Use For A Stone Backsplash?
Use masonry paint or acrylic latex paint for best results. These are designed for porous surfaces and resist moisture. Avoid regular wall paint, as it won’t last in kitchens or bathrooms.
How Do I Keep The Paint From Peeling?
Proper preparation is essential. Clean the stone thoroughly, repair cracks, use a quality primer, and apply paint in thin layers. Let each layer dry fully. Protect the painted surface from heavy scrubbing or sharp objects.
Can I Paint Over An Old Painted Backsplash?
Yes, but you must clean, sand, and re-prime the surface before repainting. Remove any loose or peeling paint first. Follow the same steps as for bare stone.
How Long Does The Painting Process Take?
Most projects take 2–3 days from start to finish. Cleaning and drying can take one day, priming and painting another, plus time for each coat to dry. Plan for extra time if your kitchen is humid or the stone is very porous.
Painting your stone backsplash is a project that gives big results for a small investment. With the right approach, you can enjoy a fresh, modern look that lasts for years. Take your time, follow each step closely, and enjoy your updated space.