
Setting up a pool in your backyard can turn summer into a special time for your family. But if you’ve ever noticed your pool legs sinking or the frame leaning, you know how stressful it can be. One common solution is to put pavers under pool legs. This simple step can help keep your pool level, safe, and lasting longer. Still, many pool owners feel unsure about the process or worry about damaging their pool. If you want to do it right and avoid costly mistakes, keep reading. This guide will show you how to put pavers under pool legs, step by step, with practical tips and expert insights. Even if you’re new to DIY projects, you’ll find clear explanations and useful advice for every stage.
Why Put Pavers Under Pool Legs?
If you’re wondering why people recommend putting pavers under pool legs, the answer is simple: stability and safety. Most above-ground pools have metal or plastic legs that support the frame. When these legs rest directly on grass or dirt, the ground can shift over time. Rain, splashing, and even the weight of the pool can make the soil soft. When this happens, legs may sink unevenly, causing the pool to lean, wrinkle, or even collapse.
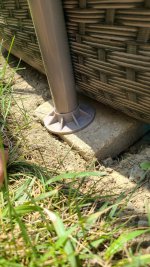
Pavers—flat, sturdy stones or concrete tiles—spread the pool’s weight over a larger area. This keeps the legs from sinking into the ground. They also help protect your pool liner from sharp rocks and roots. By using pavers, you reduce the risk of accidents, make your pool last longer, and enjoy peace of mind.
Common Problems Without Pavers
- Uneven pool water level
- Frame damage from shifting or sinking
- Wrinkles or tears in pool liner
- Increased risk of pool collapse
- Harder to drain and refill the pool safely
Many new pool owners don’t think about these risks until it’s too late. Installing pavers under pool legs is a simple, smart way to prevent these issues from the start.
Choosing The Right Pavers For Pool Legs
Not all pavers are the same. The paver you choose can make a big difference in how well your pool holds up. Here’s what you need to consider:
Material Options
- Concrete pavers: Most popular choice. They’re strong, heavy, and easy to find at hardware stores.
- Patio stones: Thicker and larger than basic pavers. They give even more support for bigger pools.
- Pressure-treated wood blocks: Some people use these, but they can rot or shift over time. Concrete is better for most climates.
- Composite pavers: Made from recycled materials; lighter than concrete, but not as strong for heavy pools.
- Rubber pavers: Sometimes used for small pools, but not recommended for full-sized above-ground pools.
Size And Thickness
Most pool owners use pavers that are 12 inches by 12 inches and at least 2 inches thick. This size fits under most pool legs and spreads the weight nicely. For larger pools or soft soil, thicker pavers work even better.
Surface Texture
Choose pavers with a smooth, flat surface. Rough or uneven pavers can damage the pool frame or liner. Avoid decorative stones with sharp edges.
Weather Resistance
If you live in a place with lots of rain or freezing temperatures, make sure your pavers are weather-resistant. Concrete and patio stones usually handle weather changes well.
Cost Comparison
You might wonder about price differences. Here’s a quick look:
| Type | Average Price Each | Durability | Common Size |
|---|---|---|---|
| Concrete Paver | $2–$5 | High | 12″x12″ |
| Patio Stone | $6–$10 | Very High | 16″x16″ |
| Wood Block | $1–$3 | Low | 12″x12″ |
| Composite Paver | $4–$8 | Medium | 12″x12″ |
For most people, concrete pavers offer the best balance of strength, price, and availability.
Tools And Materials Needed
Before you start, gather your tools and supplies. This makes the job smoother and faster.
- Tape measure (to plan where pavers go)
- Shovel or spade (for digging)
- Level (to check flatness)
- Rubber mallet (to tap pavers into place)
- Sand (for leveling and filling gaps)
- Landscape fabric (optional, prevents weeds)
- Work gloves (protect your hands)
- Wheelbarrow (for moving dirt and sand)
- Broom (to sweep sand over pavers)
- Garden hose (for wetting sand to settle it)
- String and stakes (to mark the pool area)
- Pavers (one for each pool leg, plus extras)
It’s smart to buy a few extra pavers in case one breaks during installation.
Planning Your Pool And Paver Layout
Careful planning saves time and trouble. Here’s how to get ready:
Marking The Pool Area
- Measure your pool. Find out its diameter and count the number of legs.
- Pick the spot. Choose a place with level ground, away from trees and underground pipes.
- Mark the area. Use string and stakes to lay out a circle (or rectangle) for the pool.
- Mark leg positions. Use your pool’s manual to find out where each leg goes. Mark these spots clearly with small flags or spray paint.
Checking For Level Ground
A pool must sit on level ground. If your yard slopes more than 1 inch over 6 feet, you need to level it first. Use your level or a long straight board to check.
Example: Planning For A 15-foot Pool
Suppose you have a 15-foot round pool with 12 legs. You’d measure a 15-foot circle, mark 12 spots evenly spaced around the edge, and plan to place a paver under each leg.

Credit: www.reddit.com
How To Prepare The Ground For Pavers
Many beginners skip this step, but it’s vital for a strong pool setup.
Step 1: Clear The Area
Remove grass, rocks, and roots from the whole pool area. Dig down at least 2 inches where the pool will sit. This helps prevent weeds and sinking.
Step 2: Level The Soil
Rake the soil flat. Use a level to check your work. Fill in low spots and remove high ones until the whole area is even.
Step 3: Compact The Soil
Walk over the soil or use a hand tamper. This packs the ground and reduces future settling.
Step 4: Lay Landscape Fabric (optional)
If you want to stop weeds, lay down landscape fabric before adding sand. Cut holes where pavers will go.
Step 5: Add A Layer Of Sand
Spread 1–2 inches of sand across the area. Sand helps pavers sit flat and protects your pool liner from sharp rocks.
Step 6: Level The Sand
Rake the sand smooth. Use a level to double-check. This surface should be very flat before you add pavers.
Step-by-step Guide: How To Put Pavers Under Pool Legs
Now you’re ready for the main event. Here’s how to do it, one step at a time.
Step 1: Place Each Paver
Go to each marked pool leg spot. Dig a hole the size of your paver, about 2 inches deep. The top of the paver should be level with the sand or soil, not sticking above it.
Step 2: Check For Level
Place your paver in the hole. Put a level on top. If it’s not flat, add or remove sand underneath until it is perfectly level in all directions.
Step 3: Compact And Tap Down
Use your hands or a rubber mallet to press the paver firmly into place. This keeps it from shifting later.
Step 4: Repeat For All Pool Legs
Work your way around the pool, placing a paver under each marked spot. Each paver must be level and even with the others. This step is critical for a safe, straight pool.
Step 5: Double-check Alignment
When all pavers are in, use a long, straight board and your level to check across several pavers. Make sure they all sit at the same height. Adjust if needed.
Step 6: Fill Gaps Around Pavers
Pour sand around the edges of each paver. Sweep it into gaps. Wet the sand lightly with a hose to help it settle.
Step 7: Final Surface Check
Walk around the area. Each paver should feel solid and not rock or move. If any are loose, lift and add more sand underneath, then press down again.
Step 8: Install The Pool Frame
Now you’re ready to build your pool on top of the pavers. Place each pool leg squarely in the center of its paver for best support.
Common Mistakes And How To Avoid Them
Even handy people make errors when putting pavers under pool legs. Here are some traps to watch out for:
- Not leveling the ground: If the base isn’t flat, your pool will lean, even with pavers.
- Pavers above ground level: If pavers sit too high, they can poke the pool liner and cause tears.
- Using thin or weak pavers: Cheap, thin tiles can crack under the pool’s weight.
- Wrong paver placement: If pavers aren’t centered under the legs, legs may slip off.
- Skipping the sand base: Sand helps absorb weight and keeps pavers from shifting.
- Not compacting soil: Loose soil settles over time, making pavers sink.
- Forgetting to check for level: Double-check often during installation.
- Using wood in wet climates: Wood blocks can rot or attract termites, leading to unsafe legs.
- Not accounting for ground freeze: In cold climates, frost can lift pavers if not set deep enough.
Professional installers say that taking your time with the base prep is the best way to avoid problems later.
How Many Pavers Do You Need?
To find out how many pavers you need, count your pool’s vertical support legs. Most round above-ground pools have between 10 and 18 legs, but it depends on the size and brand. Check your pool’s manual for the exact number.
It’s wise to buy 2–3 extra pavers for mistakes or future repairs.
Example: Paver Count Table
| Pool Size (feet) | Approx. Number of Legs | Pavers Needed |
|---|---|---|
| 12 | 10 | 12 |
| 15 | 12 | 14 |
| 18 | 14 | 16 |
| 24 | 16 | 18 |
Always check your specific pool’s leg count, as brands can differ.
Credit: www.troublefreepool.com
Maintaining Pavers Under Your Pool
Once installed, pavers need little care, but a few simple steps can keep your pool safe and level for years.
Regular Checks
- Before each season, walk around and press on each leg. If a paver feels loose or sunken, lift it and add more sand or soil underneath.
- After heavy rain, check for erosion or shifting.
- Look for cracks in concrete or patio stones. Replace damaged pavers right away.
Preventing Weed Growth
If you notice weeds around the pavers, pull them out and refill gaps with sand. Keeping the area weed-free helps prevent uneven settling.
Avoid Heavy Machinery Nearby
Do not drive lawn tractors or cars close to the pool legs. This can shift the ground and pavers.
Winter Care
In cold climates, drain the pool for winter. Deep frost can move pavers. If you see any raised or tilted pavers in spring, re-level them before refilling the pool.
Practical Tips From Experienced Pool Owners
People who have owned above-ground pools for years share some non-obvious advice:
- Use a long, straight 2×4 with your level when checking across several pavers. This shows small dips or high spots you might miss with a short level.
- Mark each paver’s center with chalk before setting the frame. This helps you put each leg in the right spot.
- If your yard has very soft soil, add crushed gravel under the sand for extra support. This helps with drainage and prevents sinking.
- For very large pools, consider using 16″x16″ patio stones instead of 12″x12″ pavers for even more surface area.
- Never skip the final walk-around before filling the pool. It’s much easier to fix a problem before water is added.
These little steps can mean the difference between a pool that lasts one season and one that brings joy for years.
Real-life Example: Solving A Leaning Pool
Imagine you set up a 15-foot round pool without pavers. After the first few weeks, you notice one side is lower than the other, and the water isn’t level. When you check, you see two legs have sunk into the ground.
The frame starts to twist, and small wrinkles form in the liner.
To fix this, you drain the pool, dig out the legs, and install 12″x12″x2″ concrete pavers under each leg. After leveling and resetting the pool, the water line is straight, and the pool feels solid again. This repair costs less than $30 in materials and saves your pool from bigger damage.
This example shows why putting pavers under pool legs from the start is a smart investment.
Comparing Paver Installation Methods
There are two main ways people install pavers under pool legs: before the pool is set up, or after. Here’s how they compare:
| Method | When Used | Pros | Cons |
|---|---|---|---|
| Before Pool Setup | New pools or after full drain | Most accurate, safest, easiest to adjust | Takes more time, must plan carefully |
| After Pool Setup | Fixing a leaning pool | Can solve urgent problems, cheaper than full reset | Risk of damaging liner, hard to get perfectly level |
Best practice: Always install pavers before you fill the pool with water. This avoids stress, damage, and extra work.

Credit: www.youtube.com
Frequently Asked Questions
What Size Pavers Should I Use Under Pool Legs?
Most pool owners use 12″x12″x2″ concrete pavers. This size fits under standard pool legs and spreads out the weight well. For extra-large pools, you can use 16″x16″ stones for even more support. Always check your pool’s manual for specific recommendations.
Can I Put Pavers Under An Already Filled Pool?
It’s risky. Lifting a pool leg while the pool is full can tear the liner or twist the frame. If you must fix a sinking leg, drain water below the level of the leg first. Slide a paver under with care.
For best results and safety, always install pavers before filling the pool.
Do I Need Sand Under Pavers, Or Can I Place Them On Soil?
Sand helps level the paver and protects the pool liner. It also fills gaps and prevents shifting. If you place pavers directly on soil, they may wobble or settle unevenly. A 1–2 inch layer of sand is best for most yards.
How Deep Should I Dig For Pool Pavers?
Dig a hole as deep as the thickness of your paver, usually about 2 inches. The top of the paver should be level with the surrounding sand or soil. This keeps the pool liner safe and makes mowing or walking around the pool easier.
Where Can I Learn More About Pool Installation Best Practices?
You can find more in-depth information on pool setup and maintenance at SwimmingPool.com, which offers guides and expert tips for all pool owners.
Setting up a pool is a big project, but with careful planning and the right steps, you can enjoy safe, worry-free swimming all summer long. Putting pavers under pool legs is a proven way to protect your investment and have more fun with less stress. Take your time, follow each step, and your pool will thank you for years to come.