
Every modern kitchen relies on a dishwasher to save time and effort. But an often-overlooked detail is the drain hose installation. If you do this step wrong, you risk leaks, clogs, or even bad smells. Many people think hooking up a dishwasher is simple, but the way you run the drain hose makes a big difference. Setting it up the right way keeps your kitchen dry, your dishes clean, and your appliance working for years.
In this article, you’ll learn exactly how to run a drain hose for a dishwasher, from planning and tools to troubleshooting common issues. Whether you’re replacing an old unit or installing your first dishwasher, you’ll find clear steps and expert tips.
Even if you’re new to DIY projects, this guide will help you avoid costly mistakes and get professional results.
Understanding The Dishwasher Drain Hose
The dishwasher drain hose is a flexible tube that carries dirty water from your dishwasher to the household drain. This may sound simple, but there are several important things to know:
- The hose must be strong enough to handle hot water and food particles.
- It should be installed to prevent water from flowing backward (backflow).
- The length and route of the hose affect performance and safety.
Most hoses are made from reinforced plastic, about 6 to 10 feet long, and usually 5/8 to 7/8 inch in diameter. Always check your dishwasher’s manual for the correct hose size.
Why Proper Drain Hose Installation Matters
A poorly installed drain hose can cause:
- Leaks under your sink or behind your dishwasher.
- Backflow, sending dirty water into clean dishes.
- Clogs from food or soap buildup.
- Foul odors in your kitchen.
In some cases, a bad installation can even cause water damage to cabinets or floors. Insurance often doesn’t cover damage from improper DIY work.
Planning Your Drain Hose Route
Before you start, take time to plan the best route for the hose. This step is often skipped, but it’s critical.
Common Drain Hose Routes
- To the garbage disposal: Most modern kitchens have a dishwasher port on the side of the disposal unit.
- To the sink drain tailpiece: There’s usually a special inlet above the P-trap.
- To an air gap: Some local codes require a small device on the sink or countertop to prevent backflow.
Each method has pros and cons. For example, connecting to a garbage disposal is easier but may require knocking out a plastic plug. Using an air gap is safest but needs extra hardware.
Measuring And Checking Clearances
- Measure the distance from the dishwasher to the drain connection.
- Make sure the hose is long enough, but not so long that it sags or kinks.
- Check for sharp bends, heat sources, or moving parts that could damage the hose.
A little extra time here can prevent a lot of headaches later.
Tools And Materials You’ll Need
Gathering the right tools ahead of time makes the job easier. Here’s a basic list:
- Dishwasher drain hose (check length and diameter)
- Hose clamp(s)
- Screwdriver (usually flathead)
- Utility knife or scissors
- Bucket or towels (for spills)
- Pliers
- Zip ties or hose brackets (optional for securing hose)
- Air gap kit (if needed by local code)
- Pipe wrench (sometimes needed for stubborn fittings)
Double-check your dishwasher’s manual for any special requirements. Some brands use unique fittings or adapters.
Step-by-step Guide: How To Run A Drain Hose For A Dishwasher
Follow these steps closely for a solid, leak-free installation.
1. Turn Off Power And Water
Always start by turning off the power to the dishwasher at the circuit breaker. Also, shut off the water supply under the sink. This keeps you safe during the installation.
2. Remove The Old Hose (if Replacing)
If you’re replacing a dishwasher or an old hose:
- Place a bucket under the connection to catch water.
- Loosen the hose clamp with a screwdriver or pliers.
- Gently twist and pull the old hose off.
Some water may spill, so have towels ready.
3. Connect The Hose To The Dishwasher
New dishwashers usually come with a hose connection at the back or side.
- Slide the hose onto the outlet. It should fit snugly.
- Secure with a hose clamp. Tighten it enough so it won’t slip off, but don’t overtighten and damage the plastic.
Tip: If the hose won’t slide on, dip the end in hot water for 10 seconds to soften it.
4. Route The Hose Safely
This is a step where many beginners make mistakes.
- Run the hose through the cabinet hole to the sink area.
- Make sure there are no sharp bends, twists, or kinks.
- Avoid letting the hose touch hot water pipes or garbage disposal motors.
- Allow enough slack for the dishwasher to slide in and out for future repairs.
If the hose is too long, trim it with a utility knife. Always leave a little extra length for adjustments.
5. Secure A High Loop Or Install An Air Gap
Preventing backflow is critical. There are two common methods:
High Loop Method
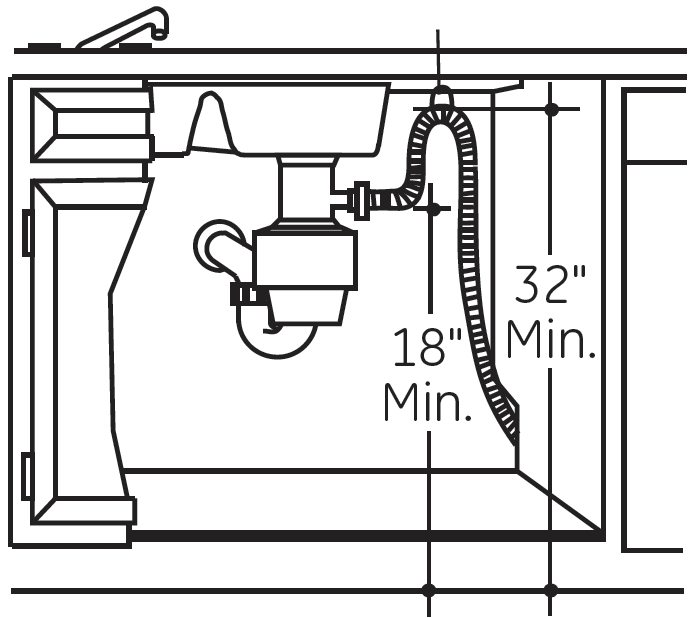
- Run the hose up as high as possible under the sink, usually just below the countertop.
- Use a hose bracket or a zip tie to secure it.
- Then, let the hose drop down to the drain connection.
This loop keeps dirty water from the sink or disposal from flowing backward into the dishwasher.
Air Gap Method
- Mount the air gap device on the countertop or sink (usually in a pre-drilled hole).
- Connect the dishwasher hose to the air gap.
- Run a second hose from the air gap to the drain or disposal.
Some local building codes require an air gap. Check your area’s rules before skipping this step.
6. Connect To The Drain Or Garbage Disposal
You have two main options here:
Garbage Disposal Connection
- Remove the knockout plug inside the disposal’s dishwasher inlet (use a screwdriver and hammer).
- Attach the hose to the inlet and secure with a clamp.
- Check for leaks by running water through the disposal.
Sink Drain Connection
- Find the special inlet on the side of the drain tailpiece, above the P-trap.
- Slide the hose over the inlet and tighten the clamp.
- Double-check the connection is firm and leak-free.
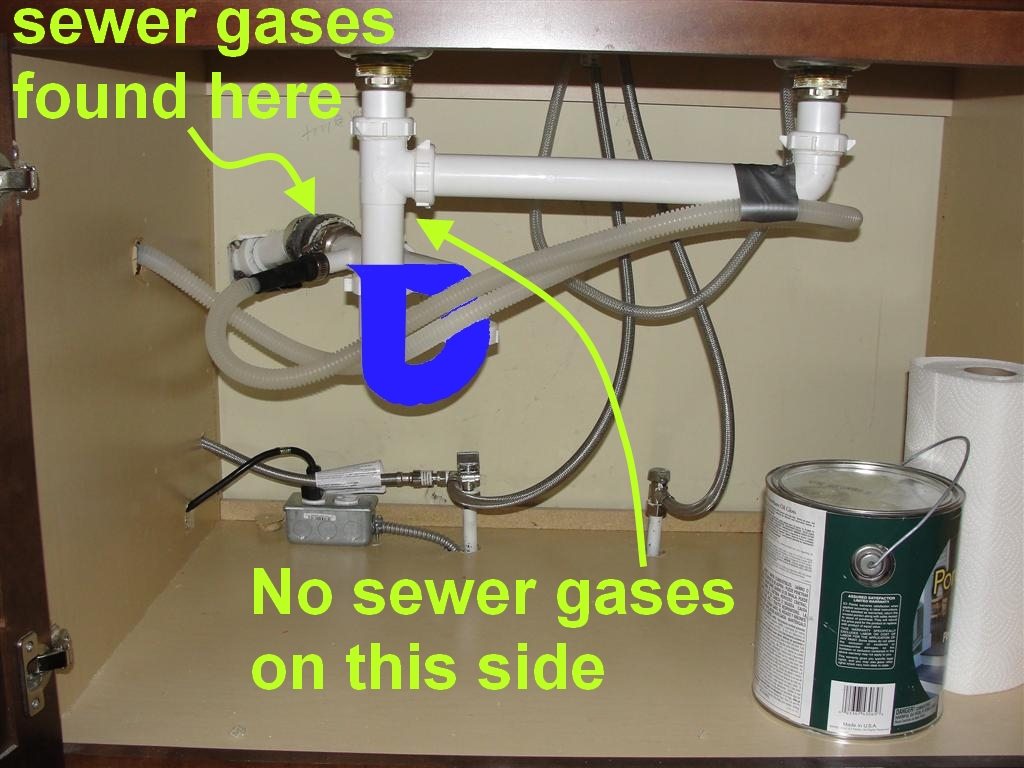
Never connect the hose below the P-trap. This allows sewer gases to enter the kitchen.
7. Test For Leaks And Proper Drainage
Before sliding the dishwasher fully into place:
- Turn the power and water back on.
- Run a short wash cycle.
- Check under the sink and behind the dishwasher for leaks.
- Watch the sink or disposal drain to make sure water flows freely.
If you see slow draining or hear gurgling, you may have a clog or a poorly routed hose.
8. Secure And Finish
- Use zip ties or brackets to keep the hose from sagging or touching hot pipes.
- Slide the dishwasher back into place gently.
- Re-check all connections after one or two wash cycles.
If you notice any leaks, stop and fix them immediately. Even a small drip can cause damage over time.
Credit: structuretech.com
Comparing Drain Hose Installation Methods
Here’s a simple comparison of the main connection methods:
| Method | Pros | Cons | Common Uses |
|---|---|---|---|
| High Loop | Simple, cheap, easy to retrofit | May not meet all codes | Older homes, DIY installs |
| Air Gap | Best backflow prevention, code-compliant | Requires countertop hole, more parts | Newer homes, areas with strict codes |
| Direct to Disposal | Quick, common in U.S. | Requires knockout, can clog if disposal not used often | Most modern kitchens |
Common Mistakes (and How To Avoid Them)
Even handy people can make errors. Here are mistakes to watch out for:
- No high loop or air gap: This is the most common mistake. Without it, dirty water can flow back into your dishwasher.
- Loose hose clamps: Water under pressure can spray out if clamps aren’t tight enough.
- Kinked or crushed hose: This blocks water flow, causing slow draining or error codes.
- Connecting below the P-trap: This lets sewer gas into your kitchen.
- Not removing the knockout plug: If you connect to a disposal without removing the plug, the dishwasher will flood.
- Hose too short or too tight: This puts stress on the fittings and can cause leaks.
- Using the wrong hose size: Always use the correct diameter for your model.
Advanced Tips For A Professional Finish
Professionals do a few extra things that most DIYers skip:
- Use antibacterial tubing if your area has hard water or odors.
- Add a drip tray under the dishwasher for early leak detection.
- Label the hose and clamps with install date for future reference.
- Use a small hand mirror to check connections in tight spaces.
- Run a test with a dishwasher cleaner to flush out any debris before full use.
Troubleshooting Drain Hose Problems
Even with a perfect install, issues can pop up. Here’s how to handle them:
Slow Draining Dishwasher
- Check for kinks or clogs in the hose.
- Clean the filter inside the dishwasher.
- Make sure the high loop or air gap is not blocked.
Water Backing Up Into Dishwasher
- The drain hose may be too low or missing a high loop.
- An air gap (if installed) may be clogged.
Water Leaks Under Sink
- Tighten all hose clamps.
- Look for splits or cracks in the hose.
- Check that the disposal knockout plug was removed.
Bad Odors
- Clean the hose with a vinegar-water solution.
- Run a hot rinse cycle with the dishwasher empty.
- Clean the garbage disposal or drain tailpiece.
How To Replace A Damaged Drain Hose
If your hose is cracked or leaking, replacement is usually easy:
- Turn off power and water.
- Remove the old hose from both ends.
- Clean the fittings with a brush or rag.
- Install the new hose, using new clamps if possible.
- Test for leaks as described above.
Tip: Keep the old hose as a measurement guide for the new one.
Dishwasher Drain Hose Maintenance
Prevention is always easier than repairs. Keep your dishwasher running smoothly with these maintenance tips:
- Check the hose and clamps every six months.
- Clean the air gap or high loop area to prevent buildup.
- Run a hot water cycle with vinegar monthly.
- Never put large food scraps or grease in the dishwasher.
If you notice any change in draining speed or new smells, check the hose right away.
Credit: structuretech.com
Dishwasher Drain Hose Length And Extension Options
Standard hoses are 6 to 10 feet, but sometimes you need more length:
- Use only approved extension kits for your dishwasher brand.
- Avoid joining multiple pieces with tape or glue.
- Secure all connections with clamps.
- The total length should not exceed the manufacturer’s recommendation (usually 12 feet max).
A hose that’s too long can lead to slow drainage or leaks.
When To Call A Professional
Some situations call for an expert:
- You see water damage under cabinets or floors.
- The dishwasher is hardwired (no plug) and you’re unsure about power safety.
- Local code requires a special setup you’re not familiar with.
- Your drain or plumbing is old, rusty, or hard to access.
A plumber can complete the job quickly and safely. In many cities, dishwasher installation must meet building codes to pass inspection.
Safety Considerations
Don’t ignore safety, even for a “simple” job:
- Always turn off power and water before starting.
- Use gloves to avoid cuts from sharp metal or broken parts.
- If you smell gas or see sparks, stop and call a professional.
- Never work on wet floors or in standing water.
A few minutes of caution can prevent a serious accident.
Real-world Examples
Let’s look at a couple of real situations:
- Homeowner with persistent leaks: Anna installed her own dishwasher but skipped the high loop. Dirty water kept backing up. After adding a proper high loop, the problem disappeared.
- Rental property damage: A tenant used an extension hose with tape, which burst and flooded the cabinet. The landlord had to replace the flooring and baseboards—costing over $2,000.
- DIY success story: Mike measured twice, used a proper air gap, and checked for leaks after each cycle. Years later, his kitchen is still dry and odor-free.
Learning from others can save you time and money.
Table: Dishwasher Drain Hose Materials Comparison
Some hoses are better for certain kitchens. Here’s how common materials compare:
| Hose Material | Heat Resistance | Flexibility | Lifespan | Cost |
|---|---|---|---|---|
| Reinforced Vinyl | Good | High | 5-7 years | Low |
| Corrugated Plastic | Excellent | Medium | 10+ years | Medium |
| Antibacterial Tubing | Excellent | High | 12+ years | High |
Choose the right material for your home and budget.
Table: Typical Dishwasher Drain Hose Sizes
Understanding sizes helps you buy the right parts. Here’s a quick reference:
| Dishwasher Brand | Standard Hose Diameter | Recommended Max Length |
|---|---|---|
| Bosch | 7/8 inch | 10 feet |
| Whirlpool | 5/8 inch | 12 feet |
| GE | 3/4 inch | 10 feet |
| Samsung | 5/8 inch | 12 feet |
Always double-check your model’s manual before buying a replacement hose.
Environmental Impact Of Drain Hose Choice
Choosing a quality hose isn’t just about convenience. Poor-quality hoses:
- Are more likely to leak or burst, wasting water and damaging your home.
- May need frequent replacement, adding plastic waste.
- Can break down and release small bits into wastewater.
Look for hoses with longer lifespans or made from recyclable materials. Some cities even have recycling programs for old appliances and parts.
Local Codes And Regulations
Not all areas allow the same installation methods. For example:
- Many U.S. states require an air gap for new installs.
- Some older cities allow the high loop, but only with certain fittings.
- Rental properties may have stricter codes than private homes.
If you’re unsure, check your city’s building department or consult a pro. Following local rules avoids fines and insurance problems.
You can find more about plumbing codes at the International Code Council.
/dishwasher-drain-hose-connections-2718613-09-3f63c303030749e9985b75df021aeeb6.jpg)
Credit: www.thespruce.com
Frequently Asked Questions
What Is The Purpose Of A High Loop In Dishwasher Drain Installation?
A high loop prevents dirty sink or disposal water from flowing back into your dishwasher. By looping the hose up under the countertop, gravity helps keep water moving in the right direction and reduces backflow risk.
Can I Use Any Hose For My Dishwasher Drain?
No, you should use a hose recommended by your dishwasher’s manufacturer. The wrong size or material may leak, clog, or not fit your connections. Always double-check the diameter and length before buying.
How Do I Know If My Dishwasher Drain Hose Is Clogged?
Signs of a clogged hose include water pooling in the bottom of the dishwasher, slow draining, gurgling noises, or error codes. You can check by disconnecting the hose and flushing it with water to see if it flows freely.
Is An Air Gap Always Required?
Not always, but many local codes and new homes require an air gap for safety. Check with your local building department. Even if not required, an air gap offers the best protection against backflow.
What Should I Do If I See A Leak After Installation?
First, turn off power and water. Then, check each connection for loose clamps or cracks in the hose. Tighten as needed, or replace damaged parts. If the leak continues, call a professional plumber to avoid water damage.
—
Running a dishwasher drain hose may look simple, but the details matter. By following these steps, avoiding common mistakes, and maintaining your hose, you’ll enjoy a trouble-free kitchen for years. If you’re ever unsure, don’t hesitate to get expert help.
With careful planning and the right tools, you can achieve a leak-free, code-compliant installation that saves you time, money, and stress.