
Sharpening your kitchen knife with a rod may look simple, but doing it correctly takes some know-how. Many home cooks struggle with dull knives, which make cooking less enjoyable—and even dangerous. A sharp knife is faster, safer, and gives you better results when slicing, dicing, or chopping.
If you want your knives to stay sharp and last longer, learning how to use a sharpening rod (also known as a honing rod or steel) is a skill worth mastering.
In this guide, you’ll discover not just the basic steps, but also the practical tips and deeper insights that most people miss. You’ll understand what a sharpening rod actually does, the difference between honing and sharpening, how to choose the right rod, and step-by-step instructions you can follow at home.
Whether you’re a beginner or have some experience, you’ll find advice here that will help you get the most out of your kitchen knives.
Why Knife Sharpness Matters
A sharp knife isn’t just about making cooking easier. It’s also about safety and quality. When you use a dull knife, you’re more likely to slip and cut yourself. Dull blades force you to use more pressure, which means less control.
For example, when slicing tomatoes or onions, a sharp knife glides easily, keeping slices even and reducing food waste.
Professional chefs sharpen their knives often because they know a keen edge is essential. According to a study by the National Institute for Occupational Safety and Health, kitchen injuries from knives are more common with dull blades. Good knife care can reduce accidents and improve your cooking experience.
Understanding The Sharpening Rod
Before you start, it’s important to know what a sharpening rod does. Many people think the rod actually sharpens the knife, but that’s not always true. Most rods are honing rods, designed to realign the knife’s edge rather than remove metal. Real sharpening—where you grind away metal to restore the blade—needs a whetstone or electric sharpener. However, regular honing with a rod can keep your knife performing its best day after day.
Types Of Sharpening Rods
There are several kinds of rods you’ll see in kitchens and stores:
- Steel rods: Common in home kitchens, these are usually magnetic and have fine grooves. They keep the edge straight but don’t remove much metal.
- Ceramic rods: Harder than steel, these rods can remove a small amount of metal, offering a bit of sharpening and honing.
- Diamond rods: Coated with industrial diamond dust, these are the most abrasive. They sharpen and hone at the same time, but can wear a blade down if used too often.
Here’s a quick comparison of these rods:
| Type | Edge Effect | Best For | Durability |
|---|---|---|---|
| Steel | Honing (realigns edge) | Everyday use | Very durable |
| Ceramic | Honing & light sharpening | Weekly or bi-weekly use | Fragile if dropped |
| Diamond | Sharpening & honing | Occasional sharpening | Moderate |
Honing Vs. Sharpening
Many people confuse these two terms. Honing means straightening the tiny, invisible bends that develop along the blade’s edge during normal use. Honing doesn’t make a dull knife sharp again, but it keeps a sharp knife working well for longer. Sharpening actually removes metal to create a fresh edge. You should hone your knife regularly (even daily if you cook a lot), and sharpen it less often—maybe every few months or when honing no longer works.
Choosing The Right Sharpening Rod
Picking the right rod is as important as using it correctly. Different rods suit different knives and cooking habits.
Key Factors To Consider
- Material: Steel is great for most home cooks. Ceramic and diamond rods are better if your knives are very dull or high-quality.
- Length: Your rod should be at least as long as your longest knife. A 10- to 12-inch rod covers most home needs.
- Shape: Round rods are most common, but oval rods give more contact with the blade.
- Handle Grip: A comfortable, non-slip handle is safer, especially if your hands are wet.
Matching Rod To Knife Type
Not all knives are the same. Softer steel blades (common in Western knives) do well with steel rods. Harder steel (like Japanese knives) may benefit more from ceramic rods, which are less likely to damage a brittle edge.
Here’s a side-by-side look:
| Knife Type | Recommended Rod | Notes |
|---|---|---|
| Western (softer steel) | Steel or Diamond | Frequent honing keeps edge straight |
| Japanese (harder steel) | Ceramic | Gentler, less risk of chipping |
| High-carbon steel | Steel or Ceramic | Wipe after honing to prevent rust |
Common Mistakes When Choosing
- Picking a rod that’s too short for your knife.
- Using a diamond rod too often, which wears the blade down.
- Not considering the knife’s steel hardness.
Preparing To Sharpen: Safety And Setup
Before you begin, set up your workspace for safety and efficiency.
Safety Tips
- Clear your counter. You need space to move your knife without obstacles.
- Hold the rod by its handle, keeping fingers behind the guard.
- Place a damp cloth or non-slip mat under the rod’s tip if you’re sharpening vertically.
- Keep your non-dominant hand away from the knife’s path.
Tools You Need
- Clean sharpening rod (steel, ceramic, or diamond)
- Kitchen knife (clean and dry)
- Damp cloth or non-slip mat
- Towel (to wipe the blade after honing)

Credit: www.amazon.com
Step-by-step: How To Sharpen A Kitchen Knife With A Rod
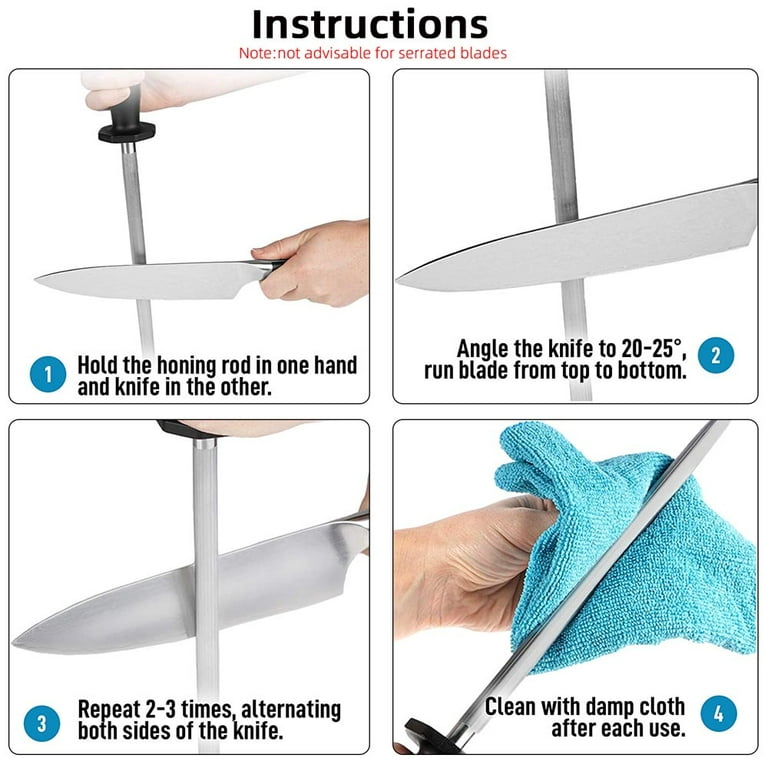
Let’s walk through the process, step by step. There are two popular methods: vertical (rod tip down on the counter) and horizontal (rod held in the air). The vertical method is safer for beginners.
1. Hold The Rod Correctly
Grip the rod’s handle with your non-dominant hand. Point the tip down and press it gently against a sturdy surface. The rod should be straight and stable.
2. Find The Right Angle
The most important part of honing is the angle between the knife and rod. For most kitchen knives, 15 to 20 degrees is best. If you’re not sure, imagine the thickness of a matchstick between the rod and blade. Japanese knives may use a slightly sharper angle (12-15 degrees).
3. Position The Knife
Hold the knife by the handle in your dominant hand. Place the heel of the blade against the top of the rod, near the handle. The edge should face away from your body.
4. Swipe Down And Across
Draw the knife down the rod, moving from heel to tip. Keep the angle steady. The motion should be smooth and controlled, not rushed. Repeat this action on one side.
5. Alternate Sides
After one swipe, switch to the other side of the blade. Place the heel at the top of the rod, and swipe down and across. Repeat the process, alternating sides.
6. Repeat For 6-10 Strokes Per Side
For regular maintenance, 6-10 strokes per side are enough. If the knife is very dull, you may need a few more, but don’t overdo it—this is for honing, not heavy sharpening.
7. Check The Edge
Wipe the blade with a towel. Test the sharpness by slicing a sheet of paper or a tomato. If the knife glides through easily, your work is done.
8. Clean The Rod And Knife
After honing, wipe the rod to remove any metal dust. Wash your knife before using it on food.
Practical Tips For Better Results
Even with the right steps, small details can make a big difference. Here are some expert tips most beginners miss:
- Consistency matters: Keep the same angle for each stroke. Changing angles can dull the edge.
- Light pressure is best: Pressing hard won’t make the knife sharper. Let the rod do the work.
- Full blade coverage: Make sure to move from heel to tip, so the entire edge gets honed.
- Hone before the knife is dull: Regular maintenance keeps knives in top shape. Don’t wait until you notice a problem.
- Practice slowly: Speed comes with experience. Focus on control and accuracy first.

Credit: www.amazon.com
Common Mistakes And How To Avoid Them
Most people make a few errors when learning. Here’s how to avoid them:
- Wrong angle: Using too steep or shallow an angle makes honing less effective. Practice with a protractor or angle guide if needed.
- Too much pressure: Heavy force can damage the blade. Use a gentle touch.
- Incomplete strokes: Only honing part of the blade leaves dull spots. Always move from heel to tip.
- Skipping cleaning: Metal particles can build up on the rod, making it less effective and spreading to food.
- Overuse of diamond rods: These remove metal quickly and should be used sparingly.
How Often Should You Sharpen With A Rod?
The answer depends on how often you cook and the type of food you prepare. Most home cooks should hone their knives every few uses, or at least once a week. Professional chefs might hone their knives several times a day.
Remember, if honing no longer brings the edge back, it’s time for a true sharpening with a whetstone or professional service.
Advanced Techniques For Experienced Users
If you want to go beyond the basics, there are advanced methods that can yield even sharper results.
Using An Angle Guide
Angle guides are small plastic or metal tools that attach to the rod or knife, helping you maintain a perfect angle. While not necessary, they’re helpful for beginners or anyone who wants to be precise.
Double-rod Technique
Some chefs use two rods (one coarse, one fine) to get a sharper finish. Start with the coarser rod (like diamond), then finish with a ceramic or steel rod for polishing.
Honing Serrated Knives
Serrated knives need a special rod (usually tapered and ceramic). Only hone the flat side, following the same motion, but focus on the flat back of the blade.
When To Use A Sharpening Stone Instead
A rod is great for regular maintenance, but not for restoring a damaged or very dull knife. If your knife can’t cut paper or smashes tomatoes instead of slicing, it’s time for a sharpening stone or professional sharpening. Stones actually grind away metal, restoring the edge.
Here’s a quick reference:
| Problem | Use Rod? | Use Stone? |
|---|---|---|
| Edge feels rough or misaligned | Yes | No |
| Knife won’t cut paper | No | Yes |
| Blade has chips or dings | No | Yes |
| Regular maintenance | Yes | No |
Credit: www.walmart.com
Caring For Your Sharpening Rod
Your rod needs care, too. Metal dust, oil, and food particles can build up, making it less effective.
How To Clean Your Rod
- Steel and diamond rods: Wipe with a damp cloth after each use. For deep cleaning, scrub gently with soapy water and a sponge, then dry fully.
- Ceramic rods: Clean with a soft brush and soapy water. Avoid dropping; ceramic can break easily.
Store rods in a dry place, away from humidity. If you use a wall magnet, keep the rod’s surface away from other tools to prevent scratches.
Knife Maintenance Beyond Sharpening
Keeping your knives sharp is only part of the story. Good knife care means your tools last longer and perform better.
Storage
Never toss knives in a drawer. Use a knife block, wall magnet, or blade guard to protect the edge.
Cutting Surfaces
Always use wood or plastic cutting boards. Glass, stone, or ceramic surfaces can damage even the best knife edge.
Cleaning
Wash knives by hand with mild soap and dry immediately. Dishwashers can damage blades and handles.
Regular Inspection
Check for chips, cracks, or rust. Address these issues early to avoid bigger problems.
How To Tell If Your Knife Is Sharp Enough
You don’t need special tools to test your knife’s sharpness. Here are some easy methods:
- Paper test: Hold a sheet of paper by the edge and slice down. A sharp knife should cut cleanly.
- Tomato test: Try slicing a ripe tomato. The skin should break with little pressure.
- Onion test: If the knife slides through onion skin without slipping, it’s sharp.
If your knife fails these tests after honing, consider using a sharpening stone or getting professional help.
The Science Behind Honing
When you cut food, the knife’s edge bends and folds at the microscopic level. Honing rods push the edge back into alignment, so the blade feels sharp again. This is why regular honing can keep a sharp knife working well for months.
Actual sharpening removes metal to create a new edge—a process you do less often.
Many people don’t realize that even expensive knives need regular honing. Skipping this step can make a high-end knife feel dull quickly.
Real-world Example: Chef’s Routine
Professional chefs often keep a honing rod nearby and use it several times during a shift. For example, a chef might hone their main knife before prepping vegetables, again before slicing meat, and once more after washing. This habit keeps the edge working at its best and reduces the need for frequent sharpening.
Home cooks can borrow this practice: hone before each major cooking session for the best results.
Comparing Sharpening Tools: Rod Vs. Stone Vs. Electric
Many people wonder if they should use a rod, stone, or electric sharpener. Each tool has its own strengths.
- Rod: Best for regular maintenance; keeps edge aligned.
- Stone: Restores dull or damaged edges; more skill required.
- Electric sharpener: Fast and easy, but can remove too much metal if overused.
If you’re curious about the science and history of knife sharpening, the Wikipedia page on sharpening steels has a detailed overview.
Frequently Asked Questions
How Often Should I Use A Sharpening Rod On My Kitchen Knife?
For most home cooks, honing once a week is enough. If you cook daily or use your knife heavily, hone every couple of days or before each use. Professional chefs hone several times a day.
Can I Use The Rod On All Types Of Knives?
You can hone most straight-edged kitchen knives with a rod. However, serrated knives and very hard Japanese knives may need special care or a different type of rod (ceramic for Japanese, tapered for serrated).
What’s The Difference Between A Honing Rod And A Sharpening Stone?
A honing rod realigns the edge without removing much metal. A sharpening stone actually grinds away metal to create a new edge. Use the rod for regular maintenance and the stone for when the knife becomes too dull.
How Do I Know If My Rod Is Worn Out?
If your rod has deep grooves, nicks, or doesn’t seem to improve your knife’s edge, it may be worn out. Ceramic rods may become smooth over time, and diamond rods can lose their grit.
Is It Dangerous To Sharpen Knives With A Rod?
It’s safe if you follow proper technique. Always keep your fingers behind the guard, use a stable surface, and never rush. Go slowly until you’re confident.
A well-maintained knife can transform your cooking. With the right knowledge and a bit of practice, sharpening your kitchen knife with a rod becomes a quick, easy routine. This not only keeps your tools performing their best, but also makes every meal safer and more enjoyable.