
Spray painting kitchen cabinets can give your kitchen a fresh, modern look without the high cost of new cabinetry. The secret to a professional finish is in the preparation, especially taping off cabinets correctly. Taping is not just about keeping paint where it should be—it protects your walls, countertops, floors, and hardware from accidental overspray. Many people rush this step, only to regret it later when they see fuzzy paint lines, stuck cabinet doors, or unwanted color on their countertops. If you want results that look like they came from a high-end paint shop, you need to tape like a pro.
This guide covers everything you need to know about how to tape off kitchen cabinets for spray painting. You’ll learn which materials work best, the detailed steps to prepare your space, pro tips to avoid rookie mistakes, and even how to handle tricky spots like hinges and glass inserts.
Whether you’re a DIY beginner or have painted before but want sharper results, you’ll find everything you need here. Let’s make your kitchen transformation smooth, clean, and frustration-free.
Why Proper Taping Matters
Many home improvement shows make painting look easy, but they often skip the hard part: prep work. Taping off your kitchen cabinets is not just about neatness. It’s about:
- Protecting surfaces that shouldn’t be painted
- Achieving sharp, clean lines
- Saving time on cleanup
- Preventing damage to hardware and glass
A rushed or sloppy taping job can mean hours spent scraping paint splatters later or, worse, living with permanent mistakes. Professional painters spend as much time, if not more, on prep as they do on painting. This is why their results look flawless.
Tools And Materials You Need
To tape off kitchen cabinets for spray painting, gather these essential supplies:
- Painter’s tape (blue or green, various widths)
- Plastic sheeting or masking film
- Brown masking paper
- Drop cloths (canvas or plastic)
- Utility knife
- Tape dispenser (optional but speeds up work)
- Scissors
- Screwdriver (for removing hardware)
- Mild cleaning solution and rags
- Gloves and safety glasses
Quality matters. Cheap tape can peel off during painting or leave sticky residue. Choose painter’s tape designed for delicate surfaces, especially if your cabinets have a smooth or glossy finish.
Painter’s Tape Vs. Masking Tape: What’s The Difference?
Not all tapes are equal. Many beginners use regular masking tape, but this can cause:
- Paint bleed (fuzzy lines)
- Sticky residue
- Damage to surfaces
Professional painter’s tape is engineered to seal edges tightly, remove cleanly, and work with most surfaces. It’s worth the extra cost.
| Feature | Painter’s Tape | Masking Tape |
|---|---|---|
| Adhesion | Medium (clean removal) | High (may damage finish) |
| Residue | No residue | Often leaves residue |
| Paint Bleed | Low | High |
| Removability | Easy, even after days | Tears, sticks, hard to remove |
For best results, use a high-quality painter’s tape. Brands like 3M ScotchBlue and FrogTape are trusted by professionals.
Credit: castlecomplements.com
Preparing Your Kitchen Space
Before taping, clear the area and clean all surfaces. Paint sticks best to clean, dust-free cabinets. Follow these steps:
- Remove all items from cabinets, countertops, and nearby walls.
- Take off cabinet doors and drawers if you want to paint them separately (recommended for a smoother finish).
- Clean surfaces with a mild degreaser to remove oil and dust—paint will not stick to greasy wood.
- Let everything dry completely before you start taping.
Many people skip cleaning, but grease and dust can ruin adhesion. Even the best tape won’t stick to a dirty cabinet.
Should You Remove Cabinet Doors Or Paint In Place?
Removing cabinet doors is recommended for the best finish. It allows you to spray all surfaces evenly and avoid paint buildup around hinges. However, if you’re short on space or time, you can paint doors in place—just tape very carefully around the hardware.
Step-by-step: How To Tape Off Kitchen Cabinets
Now you’re ready to tape. Take your time with each step; it’s worth it.
1. Tape The Edges Of Cabinets
Start by outlining the cabinet boxes—the parts attached to the wall. Place painter’s tape along the inside edges where cabinets meet the wall or ceiling. Press the tape firmly with your finger or a plastic tool to seal the edge. This prevents paint from leaking under the tape.
For corners, tear off short pieces of tape and overlap them slightly. Avoid stretching tape, which can make it pull away later.
2. Protect Countertops And Backsplashes
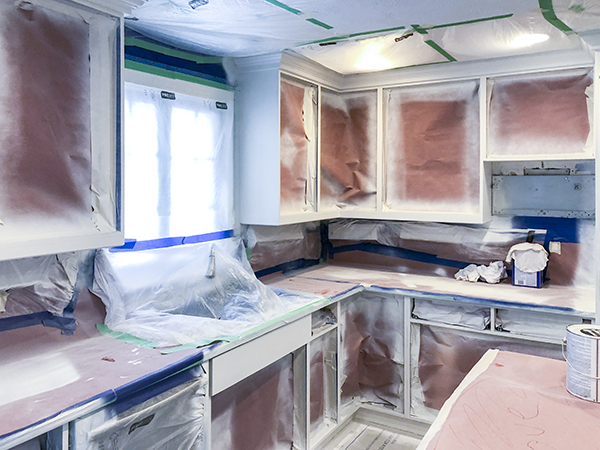
Use plastic sheeting or brown masking paper to cover your countertops and backsplash. Attach the plastic with tape, making sure it overlaps the tape already on the cabinet edges. Don’t leave gaps—paint mist can travel farther than you think.
For granite or marble countertops, use delicate-surface tape to avoid damaging the stone.
3. Cover Floors
Lay down drop cloths to protect the floor from overspray and drips. Tape the edges of the cloths to the base of the cabinets so nothing can sneak underneath. For kitchens with hardwood floors, use fabric drop cloths—they don’t slip or let paint through.
4. Mask Off Appliances
If your stove, refrigerator, or dishwasher is close to the cabinets, cover them with plastic sheeting. Secure the edges with tape, but avoid taping directly to appliance surfaces if possible—some finishes can peel when tape is removed.
5. Tape Hinges, Handles, And Hardware
If you didn’t remove the doors, wrap hinges, handles, and knobs in painter’s tape and small pieces of plastic. Even small bits of exposed hardware can catch spray paint and look unprofessional.
Tip: For quick removal, use a screwdriver to take off hardware. This gives a cleaner finish and saves time later.
6. Mask Cabinet Glass Inserts
Many modern cabinets have glass doors. To protect these, run painter’s tape along the glass edge, pressing it tightly against the wood. Cover the larger glass area with masking paper or plastic, taping down the edges.
For a razor-sharp line, use a utility knife to trim the tape right up to the edge of the wood.
7. Block Off Interior Shelves
If you don’t want to paint the inside of your cabinets, tape plastic or paper just inside the cabinet frame. Make sure the tape is pressed down all the way around, so no spray sneaks inside.
Tip: Fold the paper or plastic a few inches inside the cabinet for extra protection.
8. Seal Off The Room
Spray paint can float in the air and land on things several feet away. Hang plastic sheeting across doorways and over open shelves to keep mist from spreading. If you have a strong exhaust fan, use it to pull fumes outside.

Credit: madewithgraceandgrit.com
Pro Tips For Taping Like A Professional
Here are some advanced tips that set professional painters apart:
- Use a tape dispenser for faster, straighter lines—especially for long cabinet runs.
- Overlap tape slightly at corners and joints to prevent leaks.
- Press tape edges firmly with a plastic scraper or your fingernail for a tight seal.
- Remove tape soon after painting—while the paint is still tacky—for the cleanest edge.
- Label doors and drawers before removing so you can reinstall them in the right place.
Most beginners don’t realize that waiting too long to remove tape can cause paint to tear, ruining the clean line. Plan to remove tape within 30–60 minutes after your last spray coat.
Handling Tricky Cabinet Features
Some kitchen cabinets have features that make taping a little more challenging. Here’s how to deal with them:
Hinges And European-style Cabinets
European cabinets have hidden hinges inside the cabinet. If you can’t remove the doors, wrap the hinges in painter’s tape and plastic wrap. For visible hinges, use a small brush or craft stick to press tape into the corners.
Crown Molding
If your cabinets have crown molding, run tape along the bottom edge where it meets the cabinet. For ornate molding, use short pieces of tape and press into crevices with a plastic tool.
Open Shelves And End Panels
Open shelves should be masked just like cabinet interiors. For end panels that connect to walls, run tape along both sides and cover the panel with plastic if you’re not painting it.
Common Mistakes To Avoid
Even careful DIYers can make errors when taping. Here are mistakes to watch out for:
- Using the wrong tape (cheap masking tape instead of painter’s tape)
- Not cleaning surfaces before taping
- Leaving gaps or wrinkles in tape, letting paint leak through
- Stretching tape when applying, causing it to lift later
- Waiting too long to remove tape, leading to chipped paint edges
- Not covering enough area—overspray travels farther than you think
Avoiding these mistakes can save hours of frustrating cleanup and help your painted cabinets look like new.
How Much Tape And Materials Do You Need?
Estimating supplies depends on your kitchen size, but for an average 10×12-foot kitchen with 20 cabinet doors:
- Painter’s tape: 2–3 rolls (60 yards each)
- Plastic sheeting: One large roll (400–600 sq ft)
- Masking paper: One roll (6–9 inches wide)
- Drop cloths: At least two, 9×12 feet each
It’s better to have too much tape than run out halfway through.
Timing: How Long Does It Take To Tape Off Cabinets?
Taping is not a quick job. For a standard kitchen:
- Removing hardware and cleaning: 1–2 hours
- Taping and masking: 2–4 hours (more for complex kitchens)
- Checking and fixing missed spots: 30 minutes
Rushing leads to mistakes. Plan to spend a whole afternoon just prepping your kitchen for spray painting.
Removing Tape After Painting
Proper tape removal is as important as applying it. Here’s how to get the best results:
- Wait until the paint is dry to the touch, but not fully cured (usually 30–60 minutes after spraying).
- Gently pull tape back at a 45-degree angle, keeping it close to the surface.
- If paint begins to lift, use a razor blade to score along the tape edge before pulling.
Never yank the tape quickly; slow, steady motion gives the cleanest line.

Credit: www.youtube.com
Cleaning Up And Touch-ups
Even with perfect taping, you may need to touch up small spots. Use a small artist’s brush and leftover paint for fixes. If you see paint on countertops or hardware, remove it immediately with a damp cloth and mild cleaner.
Tip: If you used oil-based spray paint, mineral spirits may be needed to clean up mistakes.
Comparing Spray Painting Vs. Brush Painting For Cabinets
Many DIYers wonder if all this taping effort is worth it compared to brush painting. Here’s a quick comparison:
| Feature | Spray Painting | Brush Painting |
|---|---|---|
| Finish Quality | Very smooth, no brush marks | Brush marks, sometimes uneven |
| Speed | Faster to paint, longer to prep | Slower to paint, less prep |
| Prep Time | High (taping, masking) | Medium |
| Cleanup | Medium | Easy |
| Best For | Large, flat areas | Small jobs or detail work |
Spray painting gives the most professional look, but only if you tape carefully. It’s the choice of cabinet factories for a reason.
Troubleshooting: What If Paint Bleeds Under Tape?
Even with careful taping, sometimes paint sneaks under the tape. Here’s how to prevent and fix it:
- Press tape edges firmly before painting.
- Use thin coats of spray paint—thick coats are more likely to bleed.
- Remove tape soon after painting so the edge doesn’t dry to the tape.
- For small bleeds, scrape gently with a razor blade or touch up with a brush.
If you see repeated bleeding, consider switching to a higher-quality tape or using a tape with a special paint-blocking edge (like FrogTape).
Eco-friendly And Safety Considerations
Spray paint contains chemicals that can be harmful if inhaled. Always:
- Open windows and use fans to ventilate the area.
- Wear a mask and safety glasses to protect yourself.
- Dispose of used tape, plastic, and paint cans according to local regulations.
Many brands now offer low-VOC or water-based spray paints, which are safer for indoor use and the environment. Always read labels before starting.
When To Hire A Professional
If your kitchen has:
- Very detailed or expensive cabinetry
- Specialty finishes (high-gloss, laminate, or antique wood)
- Allergies or sensitivities to paint fumes
…it may be worth hiring a professional. They have commercial-grade tools and experience with tricky masking jobs. For most standard kitchens, though, a careful DIYer can achieve excellent results.
Real-world Example: A Kitchen Transformation
Sarah wanted to update her 1980s oak cabinets. She spent a full day removing hardware, cleaning, and taping off every surface. She used 2 rolls of 3M ScotchBlue tape and a roll of plastic sheeting. The taping took 3 hours, but spray painting took only 45 minutes.
The result? A flawless, smooth finish with zero paint on her countertops or floors. She credits the time spent taping for her success—and for saving hours of cleanup.
Final Thoughts
Spray painting kitchen cabinets is one of the most dramatic ways to transform your kitchen on a budget. But the quality of your results depends almost entirely on how well you tape and mask. It’s not the most exciting part of the project, but it’s where pros separate themselves from amateurs. Take your time, use the right materials, and follow each step—your kitchen will thank you for years to come.
If you want to learn more about painting techniques and best practices, the Bob Vila guide to painting kitchen cabinets is a trusted resource.
Frequently Asked Questions
How Long Should I Leave Painter’s Tape On After Spray Painting Kitchen Cabinets?
Remove tape while the paint is still slightly tacky, usually 30–60 minutes after your last coat. Waiting too long can cause the paint to bond to the tape, pulling up the finish when you remove it.
Can I Reuse Painter’s Tape For Multiple Cabinets Or Surfaces?
No. Once tape has been removed, it loses its ability to seal and may carry paint residue. Always use fresh tape for each surface to ensure clean lines and good adhesion.
What’s The Best Way To Tape Off Cabinet Hinges That Can’t Be Removed?
Wrap the hinges carefully with painter’s tape and small pieces of plastic. Press tape into corners with a craft stick. Be patient—covering hardware completely prevents a messy look.
Is It Necessary To Tape The Inside Of Cabinets?
If you don’t want paint on the inside, you must tape and mask just inside the cabinet frame. Overspray can easily drift inside, even if you’re careful.
Will Painter’s Tape Damage My Cabinets Or Walls?
High-quality painter’s tape is designed for clean removal and should not damage surfaces if applied to clean, dry areas and removed promptly. Test a small area if you’re unsure, especially on delicate or old finishes.
Spray painting cabinets is a rewarding project when you invest the time in proper taping. With the right preparation, your kitchen can have a stunning, professional look—without the professional price tag.