
A yard hydrant is a common outdoor water fixture, especially in rural areas, farms, and properties with large gardens. It gives you water even in winter, making it valuable for livestock, irrigation, and many outdoor chores. But what if your yard hydrant is leaking underground?
This problem is tricky—water may not always appear at the surface, and the leak can cause high water bills, muddy patches, or even damage your foundation. Learning how to tell if a yard hydrant is leaking underground is crucial for every property owner who relies on these outdoor faucets.
This guide will show you everything you need to check, step-by-step, with practical tips and clear explanations. You’ll learn the signs, tests, and tools to find a leak, plus what to do next. Whether you’re dealing with an old hydrant or a newer model, these techniques will help you avoid common mistakes and save time and money.
What Is A Yard Hydrant And How Does It Work?
Before you look for a leak, it helps to understand how a yard hydrant works. Unlike regular faucets, yard hydrants are designed for outdoor use year-round. The main pipe goes deep into the ground, below the frost line, to prevent freezing in winter. When you lift the handle, water flows up from the supply line, through the standpipe, and out the spout. When you lower the handle, the hydrant shuts off and drains water left in the riser pipe through a small hole near the base—this is called the drain port.
The key parts are:
- Handle and lever: Controls the water flow
- Riser pipe: Vertical pipe that connects the hydrant to the underground water line
- Plunger and rod: Inside the riser, opens and closes the water flow at the bottom
- Drain port: Lets water escape when the hydrant is shut off, so it doesn’t freeze
If a leak happens underground, it’s often at the base of the hydrant, the connection to the supply line, or a failed drain port. Understanding this layout will help you spot trouble more easily.
Why Underground Leaks Are Hard To Spot
An underground leak is not like a dripping faucet. Sometimes, you’ll see water pooling around the hydrant, but often, you won’t see anything on the surface. The water can seep down, spread sideways, or even flow along pipes to distant areas.
In dry climates, the water may soak in before reaching the surface. If you have clay soil, you might see a muddy patch, but with sandy soil, the water disappears quickly.
A slow underground leak can waste thousands of gallons over time. It can:
- Soften the ground, creating a hazard for vehicles or livestock
- Cause the hydrant pipe to rust or corrode faster
- Increase your water bill even if you don’t notice water on the ground
- Encourage mold or mildew if near a building
Many people ignore small symptoms until the leak gets worse. That’s why it’s important to know the subtle signs and test regularly.
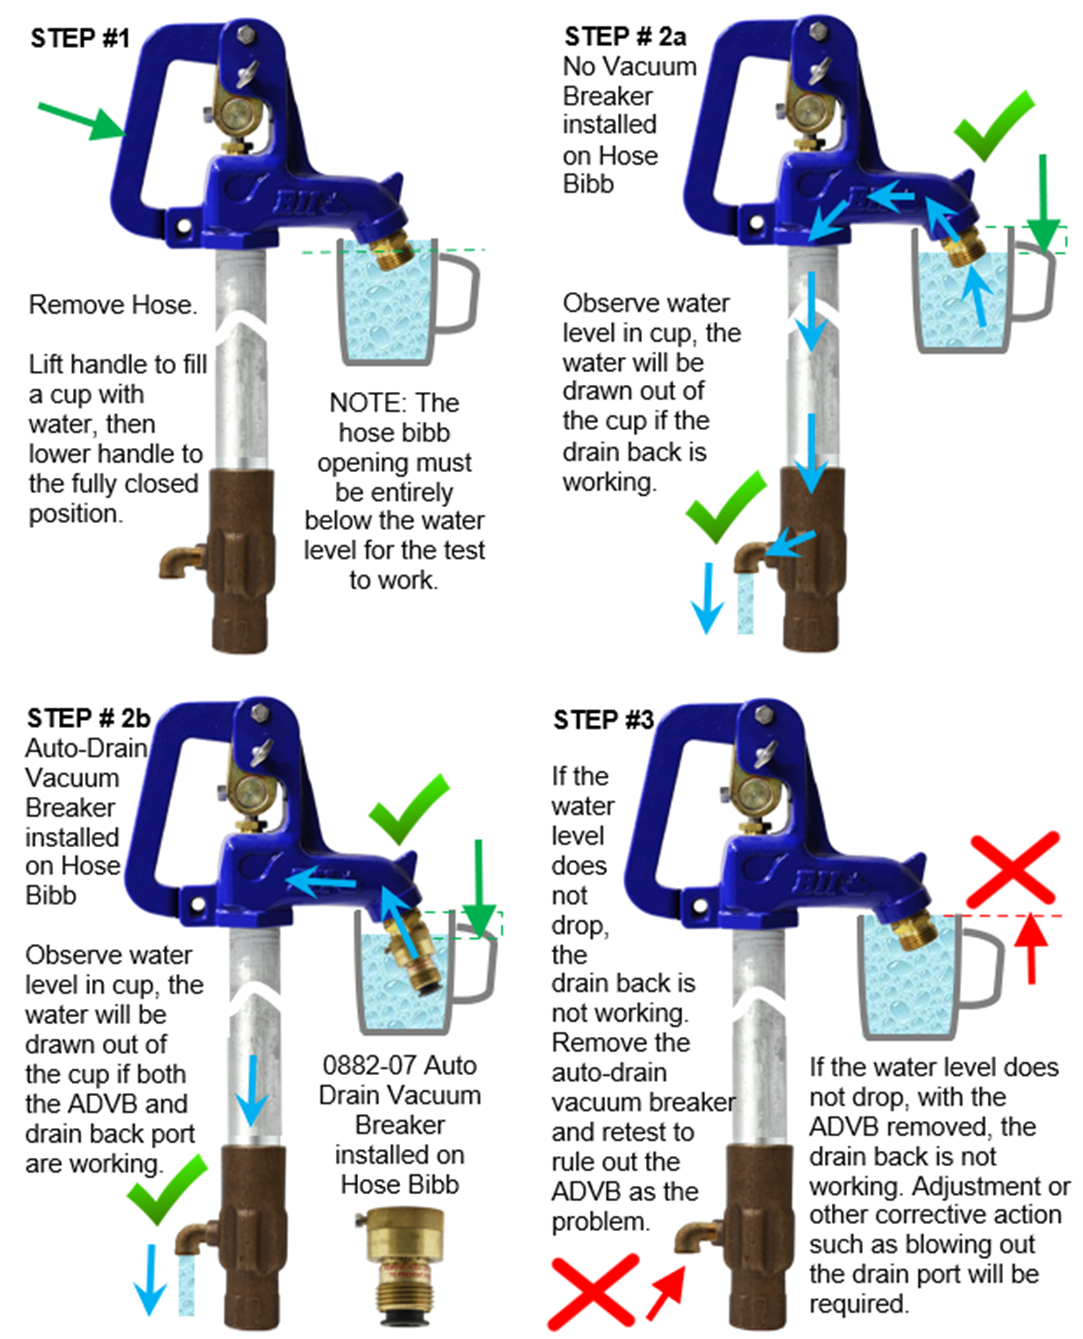
Credit: support.boshart.com
Common Signs Of An Underground Leak
Not every wet spot means a leak, but certain clues are strong warning signals. Watch for these signs around your yard hydrant:
1. Unusual Wet Spots
After a dry spell, you notice a patch of soil around the hydrant that stays damp or muddy. This can mean water is leaking underground and slowly rising to the surface.
2. Lush Grass Or Vegetation
If the grass or plants near the hydrant are greener and grow faster than other areas, it may be getting extra water from a leak below ground.
3. Water Pooling Or Small Streams
Puddles or little streams forming near the base of the hydrant when it hasn’t rained could point to a leak. Sometimes, water can travel along the pipe and surface farther away.
4. Drop In Water Pressure
If you notice weaker flow from the hydrant or nearby faucets, it could be from water leaking out before it reaches the spout.
5. Unexplained High Water Bills
If your water bill jumps for no clear reason, and you’re not using more water, a hidden leak is a likely cause.
6. Sinking Or Soft Ground
The soil around the hydrant feels spongy, or you see the ground sinking. This often means water is washing away soil underneath.
7. Rust Or Corrosion On The Pipe
If you see rust streaks or corrosion on the hydrant riser, it could mean water is escaping underground and wicking up the pipe.
8. Hissing Or Running Water Sounds
Sometimes, you might hear a faint hissing or water movement below ground when the hydrant is off.
Step-by-step Methods To Confirm An Underground Leak
Spotting signs is just the first step. To know for sure, you need to test. Here are the most reliable methods, from simple to advanced.
1. The Bucket Test
This test helps you see if water is leaking when the hydrant is off.
- Turn off all water-using appliances in your house.
- Place a large bucket under the hydrant and fill it with water.
- Mark the water level.
- Leave the hydrant off for several hours.
- Check if the water level drops without any use.
If the bucket loses water (and it’s not from evaporation), it could mean water is draining back underground due to a faulty plunger or drain port.
2. Meter Reading Test
Your water meter is a useful tool for leak detection.
- Make sure no water is being used anywhere in your home.
- Find your main water meter (usually near the street).
- Write down the reading or take a picture.
- Wait 1-2 hours without using any water.
- Check the meter again.
If the number changes, water is going somewhere—possibly through a leak in the yard hydrant. For precise results, repeat this test after shutting off the valve that supplies the hydrant, if possible.
3. Visual Soil Inspection
Sometimes, careful observation reveals hidden leaks.
- Check the soil around the hydrant for dampness, muddy areas, or unusual plant growth.
- Dig a small test hole about 12 inches deep next to the hydrant (not too close to avoid damaging the pipe).
- If the soil is very wet below ground but dry on top, it suggests underground leakage.
4. Listening Test
Leaks under pressure often make noise.
- Stand close to the hydrant when all is quiet.
- Use a mechanic’s stethoscope or even a long screwdriver pressed against the hydrant pipe, with your ear on the handle.
- Listen for hissing, gurgling, or water movement.
Sounds indicate water escaping, especially if the hydrant is off.
5. Dye Testing
This is a simple way to see if water is draining underground after use.
- Open the hydrant and let water flow for a minute.
- Add food coloring or a safe, brightly-colored dye to the water.
- Close the hydrant and wait 30 minutes.
- Dig a small hole near the drain port area (base of the hydrant).
- If you see colored water, the drain port or connections are leaking.
6. Pressure Testing
If you have plumbing experience, you can check for pressure loss.
- Connect a pressure gauge to a hose bib or hydrant.
- Turn on the water and record the pressure.
- Shut off the hydrant and main valve to isolate the line.
- Watch the gauge for drops over time.
A slow, steady drop means water is escaping somewhere, possibly through the hydrant.
7. Professional Leak Detection Tools
For tricky cases, plumbers use specialized tools like acoustic leak detectors or thermal imaging. These are expensive but can pinpoint leaks deep underground without digging.
Comparing Signs And Symptoms
Some symptoms overlap with other issues, so it’s helpful to compare the most common signs.
| Symptom | Possible Cause | How to Confirm |
|---|---|---|
| Muddy soil near hydrant | Underground leak, rain runoff, or surface spill | Check after dry weather, use dye test |
| High water bill | Underground leak, leaking toilets, other pipe leaks | Meter reading test with all valves off |
| Hissing noise | Underground leak, water hammer, loose washer | Listening test, compare with hydrant on/off |
| Lush grass patch | Underground leak, fertilization, shaded spot | Soil moisture test, dig small test hole |
Key Areas Where Leaks Occur
Knowing where to check helps you find the problem faster. Most underground leaks in yard hydrants happen in a few places:
1. Base Of The Hydrant
The joint where the hydrant connects to the supply pipe can loosen, corrode, or crack.
2. Drain Port
This tiny hole is supposed to let water escape after use, but if it doesn’t seal, water can leak constantly.
3. Supply Line Connection
The underground pipe feeding the hydrant may crack due to freezing, settling, or age.
4. Plunger/washer Failure
If the internal plunger or rubber washer is worn, water leaks past it and escapes through the drain port.
5. Riser Pipe Damage
Sometimes, the vertical pipe develops small holes from rust or impact.
6. Improper Installation
If the hydrant wasn’t set at the right depth or sealed correctly, leaks can develop over time.

Credit: blog.qrfs.com
How Soil Type Affects Leak Detection
Your soil type changes how a leak shows up. For example:
| Soil Type | Leak Signs | Detection Difficulty |
|---|---|---|
| Clay | Muddy spots, slow drainage, visible puddles | Easy |
| Sand | Little surface sign, fast drainage, dry surface | Hard |
| Loam | Moderate wet spots, greener grass | Medium |
| Rocky | Water may surface far from leak | Hard |
Non-obvious insight: In sandy or rocky soils, you might see no water at the hydrant, but the leak can travel and show up far away. Always check downhill from the hydrant, especially after a big leak.
The Role Of Weather And Seasons
Leaks are not always constant. In cold weather, frozen ground can hide a leak until spring thaw. In dry seasons, leaks are easier to spot because the ground is otherwise dry. After heavy rain, it’s harder to tell if a puddle is from rain or a leak.
Expert tip: Test for leaks during dry weather, and check again after a freeze-thaw cycle, as frost can crack pipes.
Tools That Make Leak Detection Easier
While you can do most tests with basic tools, a few items make the job easier:
- Soil probe: Lets you feel for soft, wet soil underground without big holes.
- Mechanic’s stethoscope: Cheap tool to hear underground water sounds.
- Pressure gauge: Shows if your line is losing pressure.
- Dye tablets or food coloring: For checking drain leaks.
- Moisture meter: Measures soil dampness below the surface.
Most of these are available at hardware stores or online.
What To Do If You Confirm An Underground Leak
Once you’re sure there’s a leak, act quickly. Underground leaks can cause more damage and higher bills the longer they continue.
1. Shut Off The Water
Find the valve that controls the hydrant’s water supply. Turn it off to prevent further leakage.
2. Excavate Carefully
Dig around the hydrant with a shovel, starting a few feet away to avoid hitting the pipe. Expose the base and connection.
3. Inspect For Damage
Look for cracked pipes, loose fittings, or corrosion. Check the drain port and the bottom of the riser for signs of leaks.
4. Replace Or Repair
Most common repairs are:
- Tightening or replacing the connection to the supply line
- Replacing the plunger or washer inside the hydrant
- Sealing or plugging a faulty drain port (but only if your climate never freezes)
- Replacing damaged pipe sections
- Test Before Covering
Turn the water back on and check for leaks before you fill in the hole. Watch for several minutes to make sure the repair worked.
6. Backfill With Care
Use gravel around the base for drainage, then soil. Pack down gently to avoid shifting the hydrant.
Non-obvious insight: Never seal the drain port unless you’re 100% sure your ground never freezes, or the hydrant will freeze and break in winter.
Preventing Underground Leaks In The Future
Prevention is the best fix. Yard hydrants last many years if installed and maintained properly. Here’s how to reduce the risk:
- Install on Gravel Bed: Gravel allows drain water to escape and keeps the base dry.
- Use Quality Parts: Cheap hydrants often have poor seals or thin metal that rusts.
- Check Annually: Do a quick leak test every spring and fall.
- Winterize: In cold areas, always drain the hydrant after use and check for proper drainage.
- Protect from Impact: Avoid hitting the hydrant with vehicles or equipment.
- Address Small Leaks Early: Fix minor drips before they become bigger problems.
When To Call A Professional
Some leaks are simple to fix, but others require a plumber. Call for help if:
- The leak is below the frost line and hard to reach.
- The supply pipe is broken or collapsed.
- You’re not comfortable digging near underground utilities.
- Repairs don’t stop the leak after two tries.
A professional plumber has specialized tools and experience to handle deep or complex leaks safely.

Credit: www.seppmannenterprises.com
How Yard Hydrants Compare To Other Outdoor Faucets
Understanding the differences helps you diagnose leaks more accurately.
| Feature | Yard Hydrant | Standard Hose Bib | Frost-Free Faucet |
|---|---|---|---|
| Use in freezing temps | Yes | No | Yes |
| Drainage system | Drain port below frost line | None | Drains when off |
| Common leak area | Base/drain port | Handle/washer | Inside pipe, wall penetration |
| Repair complexity | Medium to high | Low | Medium |
If you see water inside a building, it’s more likely a frost-free faucet leak. For leaks outside, especially with a deep riser, suspect the yard hydrant.
Case Study: Real-world Example
On a small farm in Nebraska, the owner noticed a muddy patch around the hydrant even during a dry spell. The water bill was also $40 higher than normal. The owner did a meter reading test, confirming water was being used even with all fixtures off.
After digging, they found the drain port gasket had failed, letting water constantly leak underground. Replacing the gasket and refilling with gravel solved the problem, and the water bill returned to normal.
Key lesson: Even a small underground leak can add up over time. Regular checks can save money and prevent bigger repairs.
Common Mistakes To Avoid
Many property owners make simple mistakes when checking for hydrant leaks:
- Assuming all wet spots are leaks: Sometimes, sprinklers or rain puddles can mimic leaks.
- Digging too close to the pipe: This can damage the supply line and make the problem worse.
- Ignoring small drips: Small leaks often become major repairs if left alone.
- Sealing the drain port in cold climates: This can cause the hydrant to freeze and split.
- Not checking the water meter: The meter gives the clearest evidence of a leak.
- Replacing the hydrant without checking the supply line: Sometimes, the underground pipe is the real problem.
Key Takeaways For Property Owners
- Watch for subtle signs, such as soft ground, high bills, or hissing sounds.
- Confirm with at least two tests for best results.
- Check both the hydrant and the supply line—leaks can occur in either.
- Fix leaks quickly to prevent bigger headaches.
- Prevent problems with regular inspection and proper installation.
Frequently Asked Questions
How Much Water Can A Leaking Yard Hydrant Waste?
A slow leak can waste hundreds of gallons per week. For example, a leak of just one drip per second can add up to more than 3,000 gallons a year.
Can I Fix An Underground Hydrant Leak Myself?
Yes, if you’re comfortable digging and basic plumbing. Most leaks involve tightening fittings, replacing washers, or fixing the drain port. For deep or complicated leaks, a plumber is safer.
What If Water Comes Up Far From The Hydrant?
Water can follow underground pipes or natural layers in the soil. If you see water surfacing far from the hydrant, check the ground slope and dig test holes to trace the leak.
Is A Leaking Yard Hydrant Dangerous?
Leaks can cause slippery mud, wash away soil, and damage foundations or driveways. In winter, leaks can freeze and break pipes. It’s best to fix leaks quickly.
Where Can I Find More Information On Yard Hydrant Repair?
A good resource is the Wikipedia yard hydrant page, which explains the parts and common issues in detail.
Paying attention to your yard hydrant’s condition—and acting fast if you suspect a leak—can save you money, time, and trouble. With regular checks and simple tools, you can keep your outdoor water supply working smoothly for years to come.