
Choosing the right meat slicer can make a big difference in your kitchen, whether you run a restaurant, manage a deli, or just want to slice meats and cheeses at home. Many buyers feel lost when faced with so many models and options.
The wrong choice can waste money, slow down your work, or even be unsafe. But with the right guidance, you can pick a meat slicer that fits your needs and lasts for years.
In this guide, you’ll learn exactly what matters when choosing a meat slicer. You’ll find out which features to focus on, what mistakes to avoid, and see clear comparisons that make your decision easier. By the end, you’ll feel confident about buying a slicer that works for you.
Understanding Meat Slicers: What Are They?
A meat slicer is a machine that uses a sharp, rotating blade to cut meat, cheese, and other foods into even slices. These machines are common in delis, butcher shops, and restaurants, but they are also popular in home kitchens. Slicers come in many sizes and styles, from small manual devices to large, powerful electric models.
Types Of Meat Slicers
There are three main types of meat slicers:
- Manual slicers – You move the meat and control the slicing by hand. These are simple and quiet but require more effort.
- Electric slicers – The machine powers the blade and the carriage. They’re faster and easier for slicing large amounts.
- Commercial slicers – Built for heavy-duty use, these are larger, more powerful, and designed for continuous work.
Some machines can handle cheese, bread, and vegetables as well as meat. But not every slicer is good for every task. Understanding the differences helps you pick the best tool for your kitchen.
Key Factors To Consider When Choosing A Meat Slicer
Choosing a meat slicer is not just about buying the most expensive model or the one with the most features. You need to match the slicer to your specific needs. Here are the most important factors to consider:
1. Usage Frequency
How often you plan to use your meat slicer is one of the most important things to think about.
- Home use: If you slice meat occasionally, a light-duty or home slicer is enough.
- Small business: For a deli or café, you’ll need a medium-duty model that can handle more frequent use.
- Commercial kitchens: If you slice meats all day, choose a heavy-duty, commercial-grade slicer.
If you use a light-duty slicer for heavy work, the motor will wear out quickly. Always pick a model rated for your expected use.
2. Blade Size
The blade diameter decides what foods you can slice and how thick they can be.
- 7–9 inch blades: Good for home use and small items.
- 10–12 inch blades: Suitable for most delis and restaurants.
- 13–14 inch blades: For very large cuts of meat and high-volume work.
A bigger blade can handle larger pieces, but it makes the machine heavier and more expensive. For most home users, a 9–10 inch blade is enough.
3. Motor Power
The motor’s wattage affects how smoothly and quickly you can slice.
- 120–180 watts: Light-duty, good for home.
- 200–240 watts: Medium-duty, suitable for small businesses.
- 250+ watts: Heavy-duty, best for high-volume or commercial use.
A weak motor may overheat or stall with tough meats or cheese. If you plan to slice cheese or frozen meat, choose a more powerful motor.
4. Construction Material
Meat slicers are usually made from stainless steel, aluminum, or plastic.
- Stainless steel: Strong, rust-resistant, and easy to clean. Best for commercial use.
- Aluminum: Lighter and still durable. Good for most users.
- Plastic: Cheaper but less durable, usually found in low-cost home slicers.
Stainless steel costs more but lasts longer and is easier to sanitize.
5. Blade Type: Serrated Vs. Smooth
There are two main blade types:
- Serrated blades: Good for bread, tough meats, or frozen foods.
- Smooth (plain) blades: Best for deli meats, cheese, and very thin slices.
Some slicers let you swap blades, but many do not. If you mostly slice meats and cheese, a smooth blade gives the cleanest cut.
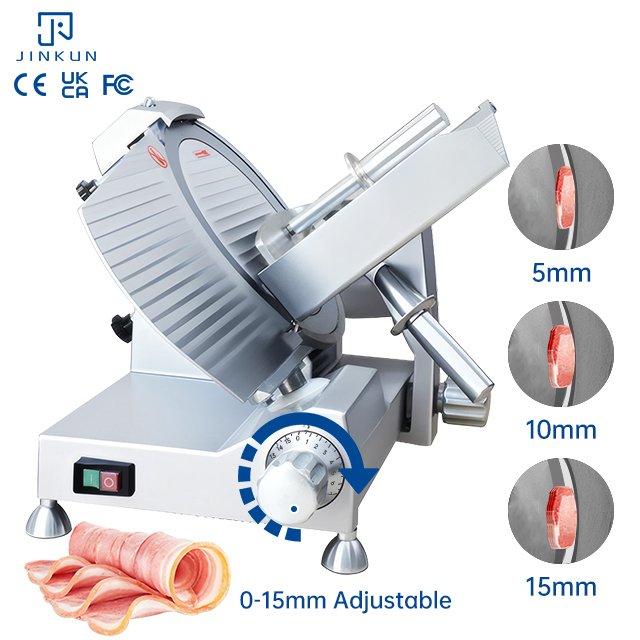
6. Slice Thickness Adjustment
A good slicer lets you set the thickness of each slice. Most offer a range from paper-thin (1mm) up to ¾ inch (about 19mm).
Look for a model with a clear, easy-to-use adjustment knob. Make sure the settings cover the thickness you want for sandwiches, charcuterie, or other needs.
7. Safety Features
Meat slicers can be dangerous. Good safety features are a must, especially for beginners or busy kitchens.
Look for:
- Blade guards that cover the edge when not in use
- Non-slip feet to keep the machine steady
- Safety switches to prevent accidental start-up
- Hand protection like thumb guards or food pushers
Never ignore safety, even if you’re experienced.
8. Ease Of Cleaning
Food safety is critical. Slicers should be easy to take apart and clean. The best models allow you to remove the blade, carriage, and tray for washing.
Some models are dishwasher-safe, but many need to be washed by hand. Check if the manufacturer provides cleaning instructions or special tools.
9. Size And Storage
Think about how much counter space you have. Meat slicers can be heavy and bulky. If you plan to store it away between uses, check the dimensions and weight.
A larger, heavier machine is often more stable, but not everyone has the space for it.
10. Noise Level
Some electric slicers are loud, which can be a problem in a quiet home or small café. Commercial slicers tend to be noisier than home models. If noise matters to you, look for user reviews or test the machine in-store.
11. Price And Warranty
Prices vary widely:
- Home models: $60–$250
- Medium-duty: $300–$600
- Commercial: $700 and up
Check the warranty. Many quality slicers offer at least a one-year warranty. Longer warranties suggest better build quality.
12. Brand Reputation
Choose a slicer from a trusted brand with positive reviews and good customer service. Some well-known brands are Berkel, Chef’sChoice, KWS, Hobart, and Cuisinart.
Don’t just trust advertising—read reviews from real users and check for common complaints.
Comparing Meat Slicer Types
It’s easy to get confused between manual, electric, and commercial slicers. Here’s a comparison to help you see the main differences:
| Type | Main Use | Blade Size | Power | Price Range | Best For |
|---|---|---|---|---|---|
| Manual | Light, occasional | 7–9 inches | Manual | $60–$150 | Home kitchens |
| Electric (Home) | Regular home use | 7–10 inches | 120–180W | $100–$250 | Home, small families |
| Electric (Commercial) | Heavy, constant | 10–14 inches | 200–300W+ | $350–$1500+ | Restaurants, delis |
Non-obvious insight: Many buyers overlook how much work it takes to clean a commercial slicer. If you only need it a few times a week, a smaller, easier-to-clean model may actually save you time.
Common Mistakes When Buying A Meat Slicer
Many first-time buyers make similar mistakes. Avoid these to save money and frustration:
- Buying too large or powerful for your needs. A huge commercial slicer is hard to store and clean at home.
- Choosing a slicer with no spare parts or poor brand support. Cheap slicers may break quickly and can’t be repaired.
- Ignoring safety features. Even professionals can get hurt with a poor design.
- Not checking cleaning instructions. Some slicers are hard to take apart, which can lead to unsafe food buildup.
- Assuming all slicers cut cheese well. Slicing cheese takes more power and the right blade—many small slicers can’t handle it.
Credit: smartbuy.alibaba.com
Must-have Features For Different Users
The best meat slicer for you depends on your kitchen and how you use it. Here’s what to look for in different situations.
Home Users
- Blade size: 7–10 inches is usually enough.
- Motor power: 120–180W is fine for meats and bread.
- Safety: Look for a blade guard and a food pusher.
- Easy to clean: Removable parts are a plus.
- Price: Don’t overspend. Many good models cost under $200.
Small Businesses & Cafés
- Blade size: 10–12 inches.
- Motor: At least 200W for busy periods.
- Adjustable thickness: For different sandwiches and platters.
- Durability: Choose stainless steel or high-grade aluminum.
- Brand support: Make sure you can get parts and service.
Restaurants & Delis
- Blade size: 12–14 inches for large roasts and bulk meat.
- Motor: 250W or more for heavy use.
- Continuous run: Look for a slicer that handles long shifts.
- Sanitation: Easy cleaning is critical. NSF-certified models are a good choice.
- Safety: Make sure all staff are trained on safe use.
Practical tip: Restaurants should have a backup slicer. If your main slicer breaks, service can take days. A small, secondary slicer helps you avoid downtime.
Top Features To Look For
With so many slicers on the market, some features stand out. These can make your work faster, safer, and more enjoyable.
- Built-in blade sharpener – Keeps the blade sharp without extra tools.
- Removable blade – Makes cleaning much easier and safer.
- Strong, stable base – Prevents wobbling during use.
- Food tray or carriage – Holds meat securely and slides smoothly.
- Clear slice thickness dial – Easy to set the slice you want.
- On/off safety switch – Prevents accidents when cleaning or storing.
Not all slicers have these features. Decide which matter most to you.
Meat Slicer Performance: Data And Real-world Examples
Let’s compare two popular slicers and see how they perform on key points.
| Feature | Home Electric Slicer | Commercial Slicer |
|---|---|---|
| Blade Size | 9 inches | 12 inches |
| Motor Power | 150W | 320W |
| Cleaning Time | 10 minutes | 20–30 minutes |
| Max Slice Thickness | 0.6 inch (15mm) | 0.75 inch (19mm) |
| Cheese Slicing | Light cheese only | All cheeses |
| Price | $120 | $850 |
Insight: Home slicers are faster to clean and store but struggle with hard cheeses or large roasts. Commercial slicers can handle anything but take more work to clean and maintain.
Safety And Maintenance: What Buyers Forget
Many people focus only on slicing ability but forget about safety and maintenance. Here are things you might miss:
- Sharpening: Even the best blade gets dull. A built-in sharpener or easy blade removal saves time and keeps slices even.
- Lubrication: Some slicers need oiling for the carriage or gears. Missing this step can wear out the machine.
- Cleaning after cheese: Cheese leaves sticky residue. If not cleaned right away, it can build up and cause bacteria.
- Replacing blades: Not all models let you buy a new blade. Check if replacements are available before buying.
Tip: Always unplug the slicer before cleaning or blade removal. Accidents happen when people skip this basic step.
How Much Should You Spend?
Your budget matters, but it’s important to balance cost with quality.
- Under $100: Mostly plastic, for very light use. May feel flimsy.
- $100–$250: Good for most home kitchens. Decent power and safety features.
- $250–$600: Small businesses, busy home users. More durable, better motors.
- $700 and up: Commercial, all-day use. Built to last, easy to repair.
Don’t buy the cheapest model unless you only slice meat a few times a year. It may not last or be safe enough.
Real-world Example: Matching Slicer To Need
Let’s see how these choices work in practice.
Case 1: A home cook wants to slice roast beef for sandwiches weekly.
- Best fit: 8–10 inch electric slicer, 120–180W, removable blade, under $200.
Case 2: A small deli needs to serve 50 sandwiches a day with meats and cheeses.
- Best fit: 10–12 inch blade, 200–250W, stainless steel body, easy thickness adjustment, around $500.
Case 3: A large restaurant slices 20 lbs of meat daily plus cheese blocks.
- Best fit: 12–14 inch blade, 300W+, heavy-duty construction, built-in sharpener, NSF certified, $900+.
If you’re not sure which to pick, choose a model slightly bigger than you need, but not the biggest. It’s better to have a little extra power than not enough.
Credit: www.food-prep.com
Essential Maintenance Tips
To keep your meat slicer working well for years, follow these steps:
- Clean after every use – Remove all food and wash removable parts in hot, soapy water.
- Dry all parts – Water can cause rust, especially on the blade.
- Sharpen the blade regularly – A dull blade is dangerous and makes uneven cuts.
- Oil moving parts – If the manual recommends it, use food-safe lubricant.
- Check for loose screws – Tighten any loose parts before each use.
If you use your slicer for cheese, clean it immediately after. Cheese can harden and gum up the machine.
Non-obvious insight: Many owners only sharpen the blade when it feels dull. Regular sharpening, even before you notice problems, makes the slicer work better and last longer.
Comparing Popular Meat Slicer Brands
Brand reputation is important for parts, service, and resale value. Here’s a quick look at leading brands:
| Brand | Best For | Price Range | Warranty |
|---|---|---|---|
| Berkel | Commercial use | $800–$2000+ | 1–3 years |
| KWS | Heavy-duty home, small business | $250–$600 | 1 year |
| Chef’sChoice | Home kitchens | $100–$350 | 1 year |
| Hobart | High-volume commercial | $1200–$5000+ | 1–2 years |
| Cuisinart | Budget home use | $60–$150 | Limited 1 year |
Look for brands that offer replacement blades and customer support. Cheap, unbranded slicers may not have spare parts when you need them.
Questions To Ask Before You Buy
Before making your final decision, answer these questions:
- How much meat will you slice each week?
- Will you slice cheese, bread, or frozen foods?
- Do you have space for a large slicer?
- Who will use the machine? (Are they trained?)
- How much time will you spend cleaning and maintaining the slicer?
- What is your budget?
Answering honestly helps you avoid buying the wrong slicer and wasting money.
Where To Buy A Meat Slicer
You can find meat slicers at kitchen equipment stores, restaurant supply shops, and online retailers. Some buyers prefer to see the machine in person before buying, especially for large or expensive models.
If you buy online, read user reviews and check the return policy. Look for brands with a local repair center or good phone support.
For more information about different slicer types and safety, you can visit the Wikipedia meat slicer page.

Credit: www.dotbglobal.com
Frequently Asked Questions
What Is The Best Blade Size For Home Use?
For most home kitchens, a 7–10 inch blade is enough. It can handle deli meats, bread, and small roasts. Larger blades are harder to store and clean, and are not usually needed unless you slice very large items often.
Can I Slice Cheese With Any Meat Slicer?
Not all meat slicers can handle cheese well. Slicing cheese needs more motor power and a sharp, smooth blade. Many entry-level slicers struggle with hard or sticky cheeses. Check the product manual or choose a slicer rated for cheese if this is important to you.
How Often Should I Sharpen The Slicer Blade?
Sharpen the blade every few weeks if you use the slicer often, or whenever you notice slicing becomes harder or uneven. Many commercial models have a built-in sharpener. A sharp blade is safer and gives better results.
Is It Safe To Wash Meat Slicer Parts In The Dishwasher?
Some removable parts can be washed in the dishwasher, but always check the manual. The blade and motor unit should never go in the dishwasher. Hand wash all parts with hot, soapy water for best results and safety.
What Is The Difference Between A Serrated And A Smooth Blade?
A serrated blade is good for bread, tough meats, or frozen food. A smooth blade is better for deli meats and cheese, giving cleaner, thinner slices. Some slicers let you swap blades for different tasks, but many do not, so choose the blade based on what you slice most.
—
Choosing a meat slicer is a big decision, but with the right information, you can find the perfect fit for your kitchen. Take your time, focus on your real needs, and don’t be fooled by flashy features you won’t use.
With a good slicer, you’ll save time, get better results, and enjoy preparing meals more than ever.