
If your pool or spa uses a Hayward flow switch, you know how important it is for safe and efficient operation. This small device plays a big role: it makes sure water is moving correctly through your system. If something goes wrong with the flow switch, your heater might not run, your salt cell may not generate chlorine, or your equipment could be damaged. Testing your flow switch is a smart way to avoid bigger problems and costly repairs.
But how do you test a Hayward flow switch the right way? Many pool owners feel nervous about working with pool electronics. Some worry about damaging their equipment, while others simply don’t know where to start. The good news is, testing a Hayward flow switch is not as complicated as it seems.
With simple tools, patience, and careful steps, you can check your switch and get clear answers.
This guide will walk you through everything you need to know about testing a Hayward flow switch—step by step. You’ll learn why this device matters, how it works, when to test it, what tools you need, and how to test it safely.
You’ll also learn how to spot common problems, what to do if your switch fails, and when it’s time to call a professional. Let’s get started and make sure your pool system keeps running smoothly.
Understanding The Hayward Flow Switch
Before you start testing, it helps to understand what a flow switch is and how it works inside your pool system. The Hayward flow switch is a safety device often found in saltwater chlorination systems (like the Hayward AquaRite), pool heaters, and other water equipment. Its main job is simple: it senses whether water is moving through the pipes.
When your pool pump turns on, water flows through the pipe, and the switch paddle moves. This closes (or opens, depending on the design) the internal switch, sending a signal to your control unit. If the water stops flowing, the paddle returns to its original position, breaking the signal. This prevents your heater or salt cell from running without water, protecting your equipment from damage.
Why Is The Flow Switch Important?
- Prevents dry firing of heaters (which can cause major damage)
- Ensures salt systems only produce chlorine when water is moving
- Protects pumps and pipes from overheating or pressure issues
- Improves safety by stopping operation during low or no flow
Where Is The Flow Switch Located?
On most Hayward systems, the flow switch is installed in the return plumbing, usually after the filter and before the salt cell or heater. It’s often a small plastic or metal device threaded into a tee fitting, with two or three wires leading to your control panel.
Common Signs Of Flow Switch Problems
- “No Flow” or “Low Flow” errors on your pool controller
- Salt system not generating chlorine
- Heater refuses to start or shuts down quickly
- Pool pump runs, but water features or cleaning systems do not work
When Should You Test Your Hayward Flow Switch?
Testing your flow switch is not something you do every day. But there are clear situations when it’s necessary:
- Error Messages: If your control panel shows “No Flow” or “Low Flow,” even when your pump is running.
- Salt Cell Not Generating: When your salt system won’t produce chlorine, and you’ve ruled out simple problems.
- Heater Won’t Start: If your heater won’t ignite, and there’s no obvious plumbing issue.
- After Cleaning or Repairs: If you’ve just cleaned your filter, replaced pipes, or done other work.
- Seasonal Startup: At the start of the pool season to ensure all sensors are working.
- Unusual Pool Behavior: If water features stop or the system acts strangely.
Testing helps you confirm if the switch is working, or if another issue is causing your problems.

Credit: www.amazon.com
Tools And Safety: What You Need Before Testing
Testing a Hayward flow switch is not dangerous, but you must use caution, especially around water and electricity. Before you start, gather these tools:
- Multimeter (digital or analog)
- Small flathead screwdriver
- Phillips screwdriver
- Towel or rag (for drying wires and hands)
- Needle nose pliers (optional, for connectors)
- Camera or phone (take pictures before disconnecting anything)
- Owner’s manual for your specific Hayward system
Safety Reminders
- Turn off all power to your pool equipment at the breaker before working on the system.
- Dry your hands and tools completely before touching wires.
- Work in daylight or with good lighting so you can see connections clearly.
- Label wires if you’re worried about forgetting where they go.
Never test a flow switch with wet hands or in a puddle of water. If you’re not sure, ask for help from a pool professional.
Step-by-step Guide: How To Test A Hayward Flow Switch
Testing a Hayward flow switch is mostly about checking if the switch opens and closes as it should. Here’s a complete process, explained in detail.
1. Turn Off Power And Locate The Switch
First, make sure all equipment is OFF. Go to your pool’s main electrical panel and turn off the breaker for the pool system. This is for your safety.
Next, find the flow switch. On most Hayward systems, it is:
- In the return line after the filter
- Before the salt cell or heater
- Small with 2 or 3 wires coming out
Take a picture of how the wires are connected. This will help you reconnect them later.
2. Disconnect The Flow Switch Wires
Most Hayward switches use a simple plug or screw terminal. Carefully disconnect the switch wires from the control panel or the wiring harness. If you need to, use a small screwdriver or needle nose pliers.
Place the wires on a dry towel.
3. Set Up Your Multimeter
A multimeter measures electrical resistance (ohms, Ω) and continuity. Set your multimeter to the continuity or lowest ohms setting. If your meter beeps in continuity mode, that means the circuit is “closed” (current can flow).
4. Test The Switch With No Water Flow
With the pool pump still OFF and no water moving, place the multimeter leads across the two main wires (usually black and red or black and white).
- If the switch is normally open, your multimeter should show no continuity (no beep, or infinite resistance).
- If the switch is normally closed, it will beep or show zero resistance.
Most Hayward flow switches are normally open—the switch only closes (completes the circuit) when water is flowing.
5. Test The Switch With Water Flow
Now, restore power to the pump only (not the salt system or heater). Turn the pool pump ON so water flows through the pipe.
Watch the multimeter:
- If the switch works, the reading will change (from open to closed, or vice versa). For a normally open switch, you should now get a beep or zero resistance.
- If nothing changes, the switch is stuck or broken.
Turn the pump OFF again after this test.
6. Check The Physical Paddle
Sometimes, debris or calcium buildup stops the paddle inside the switch from moving. To check:
- Gently unscrew and remove the flow switch from the pipe (some water may drip out).
- Look at the paddle. It should move freely with a gentle push.
- If stuck, clean off debris and re-test.
7. Reconnect And Final Test
Replace the flow switch in the pipe, reconnect wires exactly as before, and restore all power. Run your system and see if errors clear.
If your switch passes the continuity test and the paddle moves freely, but your control panel still shows errors, the problem is likely somewhere else (wiring, control board, or plumbing).
Common Flow Switch Problems And How To Fix Them
A Hayward flow switch is reliable, but issues can still happen. Here are the most common problems, their causes, and what you can do.
1. Debris Blocking The Paddle
Leaves, bugs, or calcium can block the paddle, making it stick. This prevents the switch from closing, even when water is flowing.
Fix: Remove the switch, clean the paddle, and reinstall.
2. Worn Or Broken Paddle
The paddle is plastic and can become brittle over time. If it cracks, breaks, or falls off, the switch won’t work.
Fix: Replace the flow switch—paddles are not usually sold separately.
3. Corroded Or Loose Wires
Pool environments are humid and can cause wire corrosion. Loose connections also cause false errors.
Fix: Clean contacts with electrical contact cleaner. Tighten connections and use dielectric grease to prevent future corrosion.
4. Faulty Internal Switch
The tiny switch inside can fail after years of use.
Fix: Replace the entire flow switch.
5. Incorrect Installation
If the flow switch is installed backward, it will not sense flow. Look for the arrow on the body showing the correct direction.
Fix: Reinstall with the arrow pointing in the direction of water flow.
6. Low Flow From Other Issues
Sometimes the flow switch is fine, but your system flow is too low due to:
- Dirty filter
- Closed valves
- Pump problems
- Air leaks
Fix: Check and fix these issues first. If water isn’t moving fast enough, the switch can’t activate.
7. Using Non-oem Parts
Some generic switches don’t fit or work right with Hayward systems.
Fix: Always use genuine Hayward flow switches for your model.
Troubleshooting: Advanced Testing And Diagnosis
If you’ve done the basic tests and still have trouble, these advanced steps can help find stubborn problems.
Checking Voltage At The Control Board
Sometimes, the switch is fine, but the control board isn’t sending or receiving the signal.
- With power OFF, locate where the flow switch wires connect to the control board.
- With power ON (use caution! ), check for the correct voltage as described in your manual.
- If voltage is missing, the board or wiring could be at fault.
Simulating The Switch
To rule out the switch itself, you can “jump” the switch by temporarily connecting the two wires together (with the system OFF). If the “No Flow” error disappears, your switch is bad. If not, the problem is elsewhere.
Note: Never leave the system “jumped” for normal operation. This bypasses safety.
Checking For Intermittent Problems
Sometimes, switches fail only when hot, cold, or under vibration.
- Wiggle the wires gently during testing.
- Tap the body of the switch lightly.
- If the meter reading changes, the switch is failing.
Using Diagnostic Leds
Some Hayward control units have diagnostic LEDs for flow. If the light does not change when you start and stop the pump, this is a clue the switch or wiring is bad.
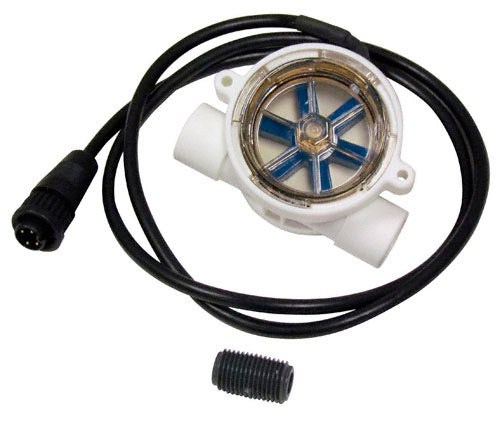
Credit: www.poolweb.com
Real-world Example: Diagnosing A Stubborn No Flow Error
Imagine a pool owner named Maria. Her Hayward AquaRite system shows “No Flow,” even with a brand-new flow switch installed. She checks:
- Filter is clean, pump is strong
- Flow switch paddle moves freely
- Wires are clean and tight
She tests the switch with a multimeter: it works. Still, the error remains.
Maria checks the control board voltage and finds it’s lower than the manual says. The board has a small burned spot—likely from a surge.
Result: The real problem was a failing control board, not the flow switch. Without thorough testing, she might have replaced parts for no reason.
Insight: Sometimes, the switch isn’t the culprit. Proper testing saves money and time.
How To Replace A Hayward Flow Switch
If your tests show the switch is bad, replacement is the answer. Here’s how to do it safely and correctly.
1. Turn Off All Power
Always start by cutting power at the breaker.
2. Relieve Pressure
Open the air relief valve on your filter, or remove the pump lid, to let out any built-up pressure.
3. Remove The Old Switch
Unscrew the flow switch from its tee fitting. Some water will drip out—this is normal.
4. Install The New Switch
- Check the arrow for correct water flow direction
- Use Teflon tape on threads for a leak-free seal
- Hand-tighten—do not overtighten
5. Reconnect Wires
Connect wires just as before, using your reference photo.
6. Restore Power And Test
Turn on your pump, check for leaks, and confirm the error message is gone.
Practical Tip
Some Hayward switches are sold with extra wire length. If your wire is too long, coil it neatly—don’t cut or crimp it. This prevents weak connections.

Credit: www.youtube.com
Comparing Flow Switch Models And Features
Not all Hayward flow switches are the same. Here’s a comparison of the most common types:
| Model | Number of Wires | Compatible Systems | Paddle Type |
|---|---|---|---|
| GLX-FLO-RP | 2 | AquaRite, AquaTrol | Plastic |
| GLX-FLO-HP | 3 | AquaRite Pro, AquaLogic | Plastic |
| GLX-FLO-GEN | 2 | Generic Systems | Plastic |
Insight: Always match the number of wires and connector type. Using the wrong model causes errors.
How A Flow Switch Differs From A Pressure Switch
Some pool owners confuse flow switches with pressure switches. Here’s how they compare:
| Feature | Flow Switch | Pressure Switch |
|---|---|---|
| What it measures | Water movement | Water pressure |
| Location | Return line, after filter | Heater manifold or pressure side |
| Main job | Detects flow for safety | Prevents heater operation at low pressure |
| Failure symptoms | No flow/low flow errors | Heater won’t start, pressure errors |
Note: Some systems use both switches for extra safety.
Tips For Long-term Flow Switch Health
You can avoid many problems by caring for your flow switch:
- Clean your filter regularly to keep water moving.
- Flush plumbing lines at least once a year.
- Inspect wires for corrosion or wear each season.
- Check paddle movement when opening the pool.
- Use only Hayward-approved parts for replacements.
Non-obvious Insights
- Salt systems can cause more paddle buildup due to minerals. Rinse your switch with fresh water during maintenance.
- Sudden power surges can damage both the flow switch and control board. Use a surge protector on your pool equipment.
When To Call A Professional
Testing a flow switch is a good DIY job, but sometimes you need expert help:
- If you’re uncomfortable with electricity or water
- If your control board shows multiple errors
- If you see burned or melted wires
- If your system won’t reset after replacing the switch
A certified pool technician can diagnose complex problems quickly, saving you time and stress.
Frequently Asked Questions
What Does A Hayward Flow Switch Do?
A Hayward flow switch checks if water is moving in your pool’s plumbing. If water stops, it tells your system to shut down the heater or salt cell to prevent damage.
How Long Does A Hayward Flow Switch Last?
Most Hayward flow switches last 3 to 5 years with regular maintenance. Hard water, debris, or poor installation can shorten their life.
Can I Bypass A Hayward Flow Switch?
Bypassing is not safe. The flow switch is a safety device. If you bypass it, your heater or salt system could run without water, causing serious equipment damage or even fire risk.
Why Does My System Show “no Flow” After Replacing The Switch?
If you still see “No Flow,” check for low pump speed, dirty filters, closed valves, or wiring issues. Sometimes, the problem is not the switch but low water movement or a control board fault.
Where Can I Find Official Hayward Support For My Flow Switch?
For manuals, wiring diagrams, and troubleshooting, visit the official Hayward Pool website for up-to-date resources and support.
Testing a Hayward flow switch is a smart way to keep your pool running safely and efficiently. With the right tools, careful steps, and some practical know-how, you can solve most problems yourself and enjoy your pool worry-free.