
If you have ever hosted a large gathering, you know how important it is to serve hot coffee efficiently. For many events—weddings, conferences, church socials, or office meetings—a coffee urn is the solution. This large coffee maker can brew and keep coffee hot for dozens, or even hundreds, of guests at a time. However, using a coffee urn is not as simple as plugging it in and pouring water. To get the best results, you need to understand how it works, how to prepare it, and how to avoid common mistakes.
This guide will walk you through every detail of using a coffee urn, from setup and brewing to cleaning and troubleshooting. Whether you are a first-timer or want to improve your skills, you will find clear steps, practical tips, and answers to the most common questions about coffee urns.
Understanding Coffee Urns
Before you begin, it’s good to know what a coffee urn is and how it works. A coffee urn is a large-capacity, electric coffee brewer designed for serving many people. Most urns range from 20 cups to 100 cups or more. They function differently than home drip coffee makers. Instead of water dripping through grounds, a coffee urn uses a percolation system. This means hot water circulates repeatedly through the coffee grounds, extracting flavor until the brewing cycle is complete.
Coffee urns are popular because they keep coffee hot for hours, allow self-service, and reduce the need for making multiple small batches. You will find them in hotels, conference centers, and even at family reunions.
Types Of Coffee Urns
There are several types of coffee urns available. Understanding their differences helps you choose the right one for your event.
| Coffee Urn Type | Capacity | Brewing System | Best For |
|---|---|---|---|
| Electric Coffee Urn | 20–100+ cups | Percolator | Large events, continuous hot coffee |
| Stovetop Coffee Urn | 10–50 cups | Percolator | Outdoor use, places with no electricity |
| Insulated Coffee Urn | 20–60 cups | Manual (No brewing) | Transporting and serving pre-made coffee |
Most people use the electric coffee urn because it brews and keeps coffee hot automatically. Stovetop urns are less common, mostly used in camps or power outages. Insulated urns are just for keeping coffee warm, not brewing.
Preparing To Use A Coffee Urn
Good coffee starts with good preparation. Here are the essential steps before you brew.
1. Inspect And Clean The Urn
Before every use, check the urn for cleanliness. Old coffee oils can give a burnt taste. Wash the inside with warm, soapy water. Rinse very well to remove any soap residue. Don’t forget the spigot and filter basket. Many urns have parts that can be removed for easy cleaning.
A clean urn means better-tasting coffee.
2. Check The Power Source
Coffee urns need a strong power source. A typical 100-cup urn draws 1500 watts. Plug it directly into a wall outlet. Avoid extension cords, which can overheat or cause power loss. Make sure the cord is not frayed or damaged. If using a stovetop urn, prepare a stable heat source.
3. Gather Ingredients And Tools
You need:
- Fresh, cold water
- Coarse ground coffee
- Coffee filter (if recommended)
- Measuring cup
- Stirring spoon
Some urns do not require paper filters, as they have a built-in metal basket. Always read the user manual for specific instructions.
4. Decide How Much Coffee To Brew
Estimate how many guests will drink coffee. Most adults drink about one 8-ounce cup, but at breakfast or long meetings, plan for more.
| Guests | Cups to Brew | Ground Coffee Needed |
|---|---|---|
| 10 | 12–15 | 1/2 to 3/4 cup (40–60 g) |
| 25 | 30–36 | 1 1/2 to 2 cups (120–160 g) |
| 50 | 60–75 | 3 to 3 3/4 cups (240–300 g) |
| 100 | 100–120 | 5 to 6 cups (400–480 g) |
The average coffee urn cup is 5–6 ounces (smaller than standard mugs). Plan for seconds if your guests are coffee lovers.
Step-by-step: How To Use A Coffee Urn
Now you’re ready to brew. Follow these steps for the best results.
1. Add Cold Water
Remove the lid and coffee basket. Pour cold, fresh water into the urn up to the desired mark. Most urns have lines inside for easy measuring. Do not overfill—the water should not go above the “max” line.
Why cold water? Hot water can trick the thermostat, causing under-extracted, weak coffee.
2. Assemble The Coffee Basket
Place the metal or paper filter in the basket if required. Add coarse ground coffee (not regular drip or espresso grind). Fine grounds can clog the filter and make cloudy coffee.
Spread the grounds evenly in the basket. Do not press down or tamp—this restricts water flow.
3. Insert The Basket And Stem
The coffee basket sits on a central stem (metal rod) inside the urn. This stem allows hot water to rise and percolate through the grounds. Insert the basket and ensure it sits flat and stable.
4. Secure The Lid
Lock the lid in place. Some urns twist to secure; others simply rest on top. Make sure it’s tight. A loose lid can cause heat loss, slower brewing, or spills.
5. Plug In And Start Brewing
Plug the urn into a grounded outlet. Switch it on if it has a power button. The urn will start heating immediately. Most models have an indicator light that turns on during brewing and switches off (or changes color) when ready.
Do not open the lid during brewing—steam can cause burns, and it interrupts the brewing cycle.
6. Wait For Brewing To Finish
Brewing time varies by urn size. Most urns take 1 minute per cup (e.g., 60 cups = about 60 minutes). Some commercial models are faster. When finished, the urn will switch to “keep warm” mode automatically.
A common beginner mistake is to try serving coffee before brewing is complete. This leads to weak, watery coffee.
7. Stir Before Serving
When brewing is done, carefully remove the lid and coffee basket (use oven mitts—the basket is hot and wet). Give the coffee a gentle stir with a long spoon. This mixes the stronger and weaker layers for even flavor. Replace the lid immediately to keep heat in.
8. Serve
Guests can now dispense coffee from the spigot. Place cups, sugar, cream, and stirrers nearby for convenience.
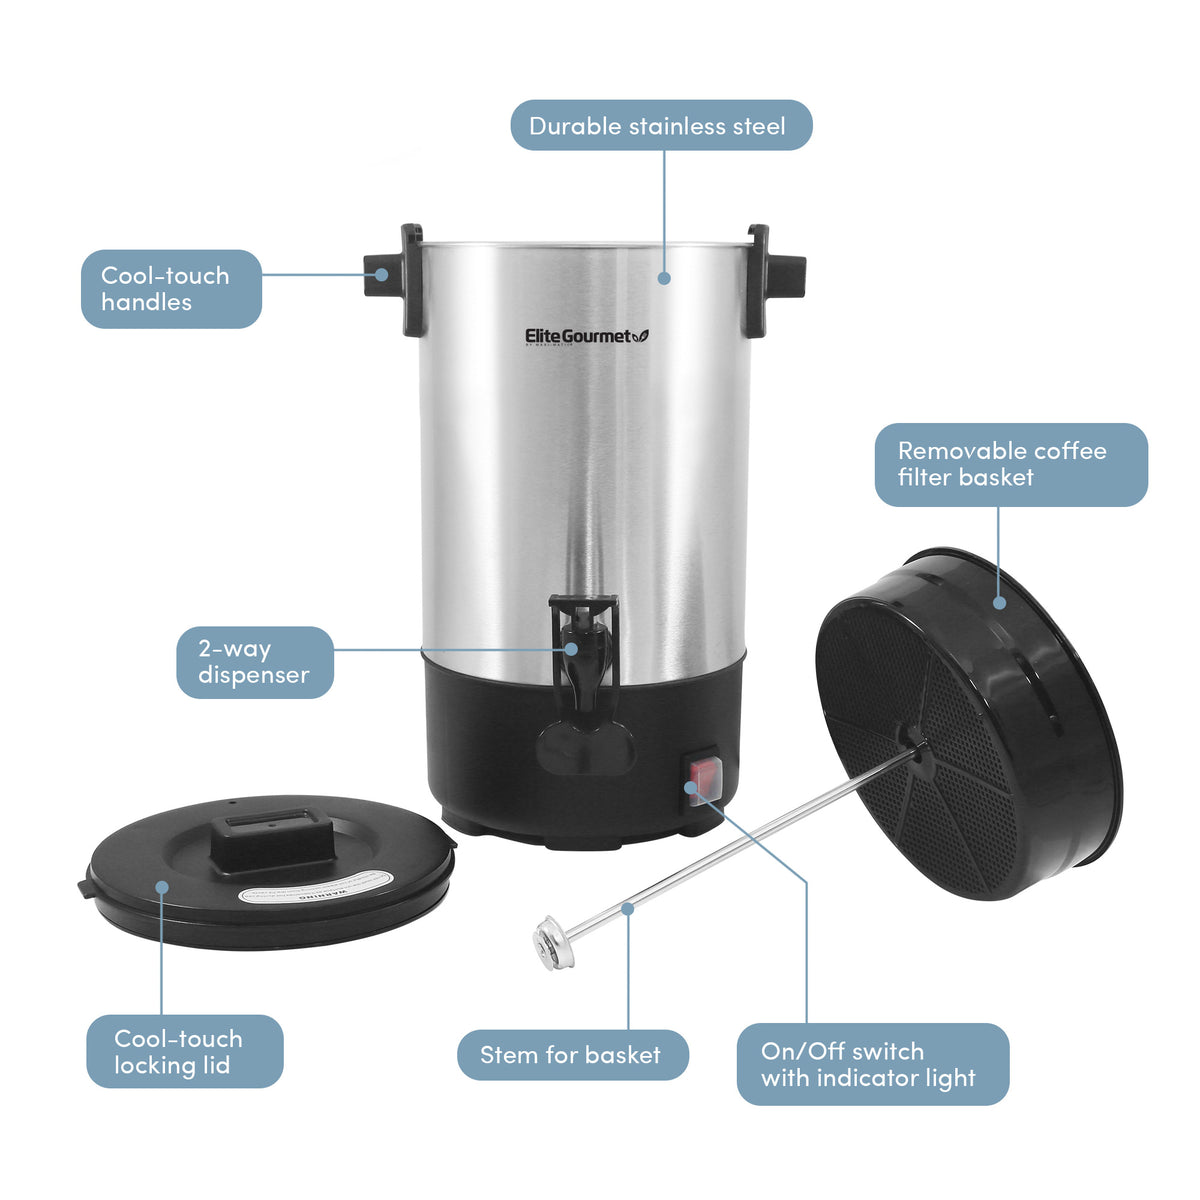
Credit: shopelitegourmet.com
Tips For Better Tasting Coffee
Even with the right steps, small details can make a big difference.
- Use fresh, cold water. Tap water with chlorine or strong odors affects taste. If possible, use filtered water.
- Buy quality, fresh coffee. Cheap or stale coffee will taste bad, no matter the method.
- Grind coffee just before brewing. Pre-ground coffee loses flavor quickly.
- Choose the right grind. Too fine means cloudy or bitter coffee; too coarse means weak coffee.
- Don’t under-fill or overfill the basket. Follow the manufacturer’s guide for the best ratio.
- Clean the urn after every use. Old oils make the next batch taste burnt.
Some urns allow you to adjust brew strength by changing the amount of coffee. If you want stronger coffee, add more grounds, not less water.
Common Mistakes And How To Avoid Them
Coffee urns are simple, but these mistakes can ruin your coffee or damage the urn.
Using The Wrong Grind
Fine grounds clog the filter, leading to overflow or grounds in your cup. Always use coarse grind.
Overfilling With Water
Never fill above the “max” line. Overfilling can cause leaks, poor brewing, and electrical hazards.
Not Cleaning Properly
Coffee oils and residue build up quickly. Clean all parts thoroughly, including the spigot. A vinegar rinse once a month removes mineral deposits.
Starting With Hot Water
Hot tap water can confuse the thermostat, ending the brew cycle too soon. Always start with cold water.
Using Extension Cords
Extension cords can overheat or fail to supply enough power. Plug directly into a wall outlet.
Ignoring Brewing Time
Don’t try to speed up the process. Let the urn finish its full cycle for the best flavor.
Leaving Coffee In The Urn Too Long
Coffee left on “keep warm” for several hours becomes bitter. Brew only what you need or transfer leftovers to insulated containers.
Cleaning And Maintaining A Coffee Urn
Proper care makes your urn last longer and keeps coffee tasting fresh.
After Each Use
- Unplug the urn and let it cool.
- Remove the basket, stem, and lid.
- Wash all removable parts in hot, soapy water. Rinse well.
- Wipe the inside and outside of the urn with a soft cloth.
- Rinse the spigot by running clean water through it.
- Let all parts dry fully before reassembling.
Deep Cleaning (once A Month)
Mineral deposits from water can build up. Here’s how to clean deeply:
- Fill the urn with a solution of 1 part white vinegar to 2 parts water.
- Run a brewing cycle without coffee grounds.
- Let the solution sit for 15–20 minutes after brewing.
- Empty and rinse the urn several times with clean water.
Never immerse the urn’s electrical base in water.
Spigot Maintenance
Disassemble the spigot (if possible) for cleaning. Coffee residue can build up inside and cause blockages or bad taste.
Safety Tips For Using A Coffee Urn
Safety is important, especially when serving hot liquids to many people.
- Place the urn on a sturdy, flat surface away from the edge.
- Keep the power cord out of the way to prevent tripping.
- Use caution when opening the lid; steam can burn.
- Do not move the urn when full of hot coffee.
- Always unplug before cleaning.
- Do not immerse the entire urn in water—this damages the electrical parts.
Special Uses And Variations
Coffee urns are not just for black coffee. Here are some creative options:
Brewing Tea
You can use a coffee urn to brew large amounts of tea. Place loose tea in a large filter bag or use tea bags in the basket. Use the same brewing process as coffee.
Hot Water For Other Beverages
Some urns can heat water only (without coffee grounds) for hot chocolate, instant coffee, or soup. Check your model’s instructions.
Cold Brew Or Iced Coffee
Coffee urns are not designed for cold brew, but you can use them to serve iced coffee. Brew a strong batch, cool it, and pour over ice.
Troubleshooting Common Problems
Even with the best care, sometimes things go wrong.
Coffee Is Too Weak
- Check the coffee-to-water ratio—did you use enough grounds?
- Was the grind too coarse?
- Did you remove coffee before brewing finished?
Coffee Is Too Strong Or Bitter
- Did you use too much coffee?
- Was the grind too fine?
- Was the coffee left on “keep warm” too long?
Grounds In The Coffee
- Was the filter basket assembled correctly?
- Did you use the recommended grind size?
- Is the basket or filter damaged?
Urn Won’t Heat Or Brew
- Check the power source and cord.
- Is the lid tightly secured?
- Is the thermostat working?
If the urn still does not work, consult the user manual or contact the manufacturer.

Credit: www.youtube.com
Comparing Coffee Urns Vs. Other Large-batch Brewers
You might wonder why not just use several drip coffee makers or a large thermal dispenser. Here’s how urns compare:
| Feature | Coffee Urn | Drip Coffee Maker | Thermal Dispenser |
|---|---|---|---|
| Capacity | 20–100+ cups | 8–14 cups per cycle | Up to 60 cups (no brewing) |
| Brewing Time | 1 min per cup | 6–10 min per batch | Not applicable |
| Heat Retention | Heats and keeps warm | Some models only | Excellent |
| Self-Service | Yes | Some models | Yes |
| Best Use | Events, large groups | Small gatherings | Transport, all-day events |
Coffee urns are the best choice for continuous, hot coffee for many people. Drip makers are good for small groups or home use. Thermal dispensers keep coffee hot but do not brew.
Non-obvious Insights
Many new users miss these important points:
- Coffee urns brew slower as they near full capacity. Brewing 100 cups takes much longer than 50 cups—plan ahead.
- Altitude affects brewing. Water boils at a lower temperature at high altitudes, which can change extraction. If you live above 3,000 feet, your coffee may taste different. Use slightly more coffee grounds to compensate.
- Urns must rest between batches. Brewing batch after batch without cooling down can overheat the unit and burn coffee. Allow 10–15 minutes to cool before starting another batch.
- Not all urns are suitable for flavored coffees. Some flavors, like hazelnut or vanilla, can leave strong odors behind. Clean the urn extra well if switching back to plain coffee.

Credit: www.amazon.com
Practical Event Planning With Coffee Urns
If you are organizing an event, here are some planning tips:
- Brewing Time: Start brewing 1–2 hours before guests arrive to ensure coffee is ready.
- Serving Station: Set up cups, lids, sugar, creamers, stirrers, and napkins close to the urn.
- Allergens: Label decaf and regular urns clearly. Some guests may have allergies to flavored coffee or creamers.
- Backup Plan: Have extra coffee grounds and water ready in case you need to brew more.
- Monitor the Urn: Assign someone to check the urn during the event for spills, empty levels, or overheating.
Environmental And Cost Considerations
Using a coffee urn is often more environmentally friendly and cheaper than using many single-serve pods or disposable cups.
- Energy Use: A coffee urn uses less electricity per cup than many smaller machines.
- Waste Reduction: Brewing in bulk means less packaging waste.
- Cost: Bulk coffee is much cheaper than single-serve or specialty drinks. For example, brewing 100 cups in an urn can cost less than $0.10 per cup.
When Not To Use A Coffee Urn
Coffee urns are great for most big events, but not always the right choice.
- If you need many coffee types at once (espresso, latte, etc. ), urns are not flexible.
- For small groups (under 10 people), a drip maker or French press is easier.
- When you want specialty coffee (cold brew, pour-over), urns can’t produce those results.
For most large gatherings, though, a coffee urn is the most practical and reliable option.
Frequently Asked Questions
How Do I Keep Coffee From Tasting Burnt In A Coffee Urn?
Burnt taste usually comes from old coffee oils, leaving coffee on “keep warm” for too long, or using stale grounds. Clean the urn thoroughly after each use and brew only what you need. Serve coffee within 2–3 hours for best flavor.
Can I Use Regular Drip Coffee Grind In A Coffee Urn?
It’s best to use coarse grind. Regular drip grind is finer and can clog the basket, leading to grounds in your coffee or over-extraction, making coffee bitter.
How Long Does It Take To Brew Coffee In A 100-cup Urn?
A 100-cup urn takes about 60–70 minutes to brew a full batch. Start the process early, especially if you’re serving a large group. Brewing time can vary by model and water temperature.
Do I Need To Use A Paper Filter In A Coffee Urn?
Most urns use a metal basket and do not require a paper filter. However, some models recommend using a large paper filter for easier cleanup and fewer grounds in coffee. Always check your urn’s instructions.
Where Can I Find More Information About Safe Food Service Practices For Coffee Urns?
For official guidance, see the USDA’s Safe Food Handling page. It covers hot beverage safety, sanitation, and best practices for serving large groups.
Using a coffee urn may seem intimidating at first, but with practice and attention to detail, you can serve great-tasting coffee to any crowd. Remember, the key is preparation, patience, and cleanliness. Your guests will appreciate a hot, satisfying cup every time.