
If you have a Breville appliance, you already know it is one of the most recognized kitchen brands worldwide. But even the best appliances can be confusing at first. The Breville lineup includes espresso machines, air fryers, blenders, ovens, and more. Each model is packed with smart features, but many users feel lost when they first try to use them. If you want to get the most from your Breville, understanding the basics and learning a few expert tips will help you make perfect coffee, crispy fries, or smooth smoothies every time.
This guide gives you step-by-step instructions on how to use popular Breville appliances. You’ll also find common mistakes to avoid, essential cleaning tips, and pro tricks that most beginners miss. Whether you’re a first-time owner or want to master your kitchen gadget, this article will help you unlock your Breville’s true potential.
Understanding Your Breville Appliance
Breville makes different types of kitchen appliances, but their main products include espresso machines, blenders, toasters, ovens, juicers, and air fryers. Even though each product is unique, many of the basic principles for using them are similar. Before using any Breville device, always read the user manual. The manual explains important safety rules, recommended settings, and cleaning instructions.
Why Breville Stands Out
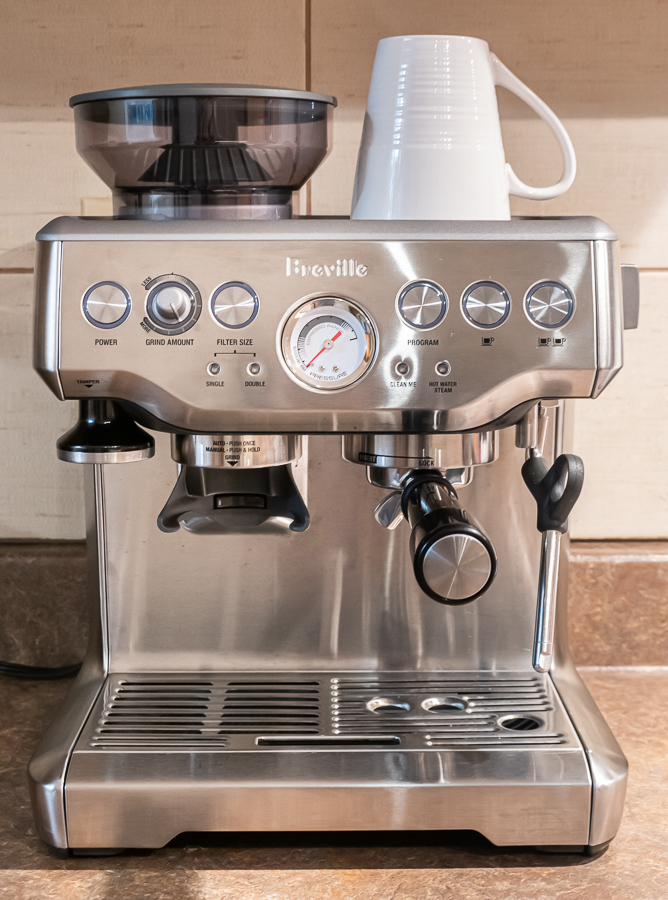
Breville is known for combining technology with user-friendly design. Their machines often have features like pre-set programs, digital displays, and custom controls. This makes them powerful, but also more complex than basic brands. For example, the Breville Barista Express espresso machine lets you control grind size, water temperature, and shot volume—features that are rare in cheaper machines.
The Importance Of First Use
Many people skip the initial setup steps. This is a mistake. For most Breville appliances, you need to:
- Wash all removable parts before first use
- Run a cleaning cycle or ‘rinse’ mode (especially for coffee machines and blenders)
- Check that all packaging materials are removed from inside and outside the appliance
Skipping these steps can cause bad smells, poor taste, or even damage your new machine.
How To Use A Breville Espresso Machine
Breville espresso machines are among the most popular products. Models like the Barista Express and the Bambino Plus are used by both beginners and coffee enthusiasts. Here is how to use a typical Breville espresso machine step-by-step.
Preparing The Machine
- Fill the water tank: Use fresh, filtered water. Tap water can cause limescale buildup and affect taste.
- Turn on the machine: Press the power button and let the machine heat up. This usually takes 1-2 minutes.
- Insert the portafilter: Make sure it is clean and dry.
- Select your coffee beans: Use high-quality, freshly roasted beans for the best flavor.
Grinding And Tamping
- Choose the grind size: Adjust the grind dial to match your beans. A finer grind gives stronger flavor, but too fine can block water flow.
- Grind the coffee: Place the portafilter under the grinder and fill with 18-20g of coffee (for a double shot).
- Tamp evenly: Press the coffee down using the tamper. Apply firm, even pressure. If the coffee bed is uneven, the water will flow through one side and taste will suffer.
Brewing Espresso
- Lock the portafilter: Insert it into the group head and twist to secure.
- Place your cup: Position your cup or shot glass under the spout.
- Start extraction: Press the single or double shot button. Extraction should take 25-35 seconds.
- Check the shot: Good espresso has a golden ‘crema’ on top. If the shot is too fast or slow, adjust your grind size or tamping pressure.
Steaming Milk
- Purge the steam wand: Turn it on for 2 seconds to remove water.
- Fill your jug: Pour cold milk to just below the spout of the jug.
- Steam the milk: Insert the wand and turn on steam. Keep the tip just below the surface for creamy foam.
- Wipe the wand: After steaming, clean the wand with a damp cloth.
Cleaning After Use
Always clean the portafilter, drip tray, and steam wand after each use. Once a week, run a cleaning cycle using a special cleaning tablet.
Pro Insights
- Preheat your cup before brewing. A cold cup cools your espresso too fast.
- Use a kitchen scale. Weighing your coffee and water gives more consistent results than using the machine’s timer alone.
Using The Breville Smart Oven
The Breville Smart Oven is famous for its versatility. It can toast, bake, roast, broil, and even air fry (for some models). Here’s how to get the best results.
Setting Up
- Place the oven on a flat, heat-proof surface.
- Plug it in and remove all inside packaging.
- Insert the crumb tray at the bottom.
- Choose and insert the right rack (top for broil, middle for bake, bottom for pizza).
Using Different Modes
- Toast: Place bread on the rack, select the ‘Toast’ mode, adjust darkness and slices, then press ‘Start’.
- Bake: Use the ‘Bake’ mode for cakes, cookies, or casseroles. Preheat if the recipe says so.
- Broil: Use for steaks, fish, or gratin. Always use the top rack.
- Pizza: Place pizza on the included tray, select ‘Pizza’ mode, and adjust for frozen or fresh.
- Air Fry (if available): Use the air fry basket, not the standard tray, for best crispiness.
Tips For Perfect Results
- Do not overcrowd the oven. Air needs to circulate for even cooking.
- Use the light button to check food without opening the door.
- For even browning, rotate your pan halfway through cooking.
Cleaning And Maintenance
- Wait for the oven to cool.
- Remove the crumb tray and wash with warm, soapy water.
- Clean the inside with a damp cloth, but do not use harsh chemicals.
Hidden Features
Many users miss the ‘A Bit More’ button. This gives extra time with one touch, perfect if your toast isn’t quite done. Also, the oven remembers your last settings, so you don’t need to reprogram each time.
Making Smoothies With The Breville Blender
The Breville blender line includes models like the Fresh & Furious and Super Q. These blenders are known for powerful motors and smart presets.
Getting Started
- Place the blender on a flat surface.
- Insert the jug and make sure it clicks into place.
- Add ingredients: Always add liquid first, then soft ingredients, then hard or frozen items on top. This prevents jams.
Choosing The Right Settings
- Smoothie: Use the ‘Smoothie’ program for fruits, yogurt, and milk-based drinks.
- Ice Crush: For frozen drinks or slushies, select the ‘Ice Crush’ mode.
- Pulse: Use for chunky salsa or to mix ingredients without pureeing.
Blending Tips
- Do not fill past the max line. Overfilling can cause leaks or poor blending.
- Start at low speed, then increase for smoother results.
- If ingredients stick to the sides, stop and use a spatula.
Cleaning Your Blender
- Fill half with warm water and a drop of dish soap.
- Run the ‘Clean’ cycle (or blend for 30 seconds on low if your model has no cleaning mode).
- Rinse and air dry.
Pro Tips
- For green smoothies, blend leafy greens with liquid first for a smoother texture.
- If your smoothie warms up, add a few ice cubes at the end and pulse for a cold finish.
Using The Breville Juicer
Breville juicers are famous for their large feed chutes and powerful motors. Models like the Juice Fountain can handle whole apples and carrots with no cutting.
Basic Steps
- Assemble the juicer: Attach the pulp container, juice jug, and locking arm.
- Wash fruits and vegetables. Remove hard pits and thick peels.
- Turn on the juicer. Start at low speed for soft fruits, high speed for hard veggies.
- Feed produce slowly. Use the pusher, not your hands.
- Collect juice in the jug and pulp in the container.
Cleaning Up
- Unplug and disassemble immediately after use.
- Rinse all parts before pulp dries out.
- Use the included brush to clean the filter basket.
Easy-to-miss Details
- Alternate soft and hard produce for better yield.
- If juice backs up, stop and clean the filter. Clogged filters reduce performance.
How To Use A Breville Toaster
Breville toasters are more advanced than basic models. Features like ‘Lift and Look’ and extra-wide slots make them user-friendly.
Toasting Bread
- Place bread in the slot. Choose the thickness setting if your model has one.
- Select darkness level.
- Press the lever. The toaster will automatically adjust for the chosen settings.
- Use the ‘Lift and Look’ button to check progress without stopping the cycle.
- When ready, the toaster pops up. If you want more browning, use the ‘A Bit More’ button.
Cleaning And Safety
- Always unplug before cleaning.
- Remove and empty the crumb tray weekly.
- Wipe the exterior with a damp cloth.
Pro Insights
- For bagels, use the bagel mode for even browning.
- Thin bread toasts faster than thick slices—adjust the setting accordingly.
Using The Breville Air Fryer
Many Breville ovens now include an air fry mode. This function gives crispy results with little or no oil.
Getting Started
- Insert the air fry basket on the recommended rack position.
- Preheat if your recipe suggests it.
- Place food in a single layer for best results.
- Select the ‘Air Fry’ mode and set time and temperature.
Tips For Crispy Food
- Do not overcrowd the basket.
- Shake or turn food halfway for even browning.
- Use a light spray of oil for extra crispiness.
Cleaning
- The air fry basket is usually dishwasher-safe, but check your manual.
- Wipe the oven interior to remove grease splatter.
Common Mistakes
- Using too much oil can cause smoke.
- Soggy results usually mean food was crowded or not turned during cooking.
Comparing Breville Appliances By Function
Here is a simple comparison of key Breville appliances, highlighting what each is best for.
| Appliance | Main Use | Best For | Special Feature |
|---|---|---|---|
| Espresso Machine | Making espresso and milk drinks | Coffee lovers | Custom shot control |
| Smart Oven | Bake, toast, broil, air fry | Families, busy cooks | ‘A Bit More’ button |
| Blender | Smoothies, soups, ice crush | Health enthusiasts | Auto-clean cycle |
| Juicer | Fresh juice extraction | Juice fans | Large feed chute |
| Toaster | Toasting bread, bagels | Breakfast lovers | Lift and Look |
| Air Fryer | Healthier frying | Snack fans | Low-oil crisping |

Credit: www.bibliotecaoscura.com
Troubleshooting Common Problems
Even the best Breville appliances can have issues. Here’s how to solve the most frequent problems.
Espresso Machine Issues
- No coffee comes out: Check if the water tank is empty or blocked.
- Coffee tastes bitter: Try a coarser grind or use fresh beans.
- Milk not foaming: Clean the steam wand and use cold, fresh milk.
Oven Or Air Fryer Issues
- Food burns easily: Lower the temperature or use a lower rack position.
- Uneven browning: Rotate the tray or pan halfway.
- Fan is loud: This is normal for air fry mode but should not be very noisy. If it rattles, check for loose parts.
Blender Or Juicer Issues
- Blender won’t start: Check that the jug is locked in place.
- Ingredients not blending: Add more liquid or cut food into smaller pieces.
- Juicer leaks: Make sure all parts are assembled tightly.
Toaster Issues
- Toast is uneven: Clean the heating elements and crumb tray.
- Lever won’t stay down: Make sure the toaster is plugged in and not overloaded.
Cleaning And Maintenance For Long Life
Proper cleaning keeps your Breville appliance working well and tasting great. Here are the best practices for each type.
Espresso Machine
- Daily: Rinse portafilter, wipe steam wand, empty drip tray.
- Weekly: Backflush with cleaning tablet.
- Monthly: Descale with vinegar or special solution.
Smart Oven / Air Fryer
- After each use: Wipe interior, wash trays and racks.
- Weekly: Remove crumb tray, clean glass door.
Blender / Juicer
- After each use: Rinse parts right away.
- Weekly: Deep clean filter basket (juicer) and blade (blender).
Toaster
- Weekly: Empty crumb tray, wipe outside.
- Monthly: Check for stuck crumbs inside slots.
Storage Tips
- Store in a dry place.
- Keep cords wrapped to prevent damage.
- Do not stack heavy items on top of your Breville.
Credit: www.kevinandamanda.com
Safety Tips When Using Breville Appliances
Safety is important for all kitchen appliances, but Breville machines are powerful and should be used with care.
- Do not operate near water or with wet hands.
- Unplug when not in use or before cleaning.
- Keep children away from hot surfaces.
- Do not use damaged cords or plugs.
- For air fryers and ovens, leave enough space for heat to escape.
Energy Use And Efficiency
Breville appliances are generally energy-efficient, but here are ways to save even more:
- Use the right size appliance for your job. A toaster oven uses less energy than a full-size oven.
- Preheat only when the recipe requires it.
- Batch tasks (for example, juice several servings at once).
Here’s a comparison of typical energy use:
| Appliance | Average Power (Watts) | Typical Use Time | Approx. Cost per Use |
|---|---|---|---|
| Espresso Machine | 1450 W | 5 min | $0.02 |
| Smart Oven | 1800 W | 20 min | $0.10 |
| Blender | 1200 W | 2 min | $0.01 |
| Juicer | 850 W | 5 min | $0.01 |
| Toaster | 900 W | 3 min | $0.005 |
| Air Fryer | 1500 W | 15 min | $0.07 |
*Note: Costs are based on U.S. average electricity rates (13 cents/kWh) and may vary.*
Getting The Most Out Of Your Breville
Here are two often-overlooked ways to maximize your Breville’s performance:
- Regularly update your knowledge. Breville often releases new recipes, how-to videos, and firmware updates for smart ovens. Check their official site for updates that can improve cooking and fix bugs.
- Experiment with accessories. Many Breville machines have optional accessories, like different baskets, jugs, or filters. For example, using a precision filter in your espresso machine or an extra-crisp tray in your oven can take your results to the next level.
Most beginners only use the default settings, but exploring extra features and accessories can open up a whole new world of possibilities.
Frequently Asked Questions
How Do I Descale My Breville Espresso Machine?
Descaling removes mineral buildup. Fill the water tank with a mix of descaling solution and water. Run the cleaning cycle as shown in your manual. Rinse with clean water to remove any leftover solution. For details, visit the official Breville website.
Why Does My Breville Oven Smell During First Use?
A new Breville oven can give off a smell when first heated. This is normal and comes from protective oil burning off. Run the oven empty at 400°F for 15 minutes to remove the smell. Make sure your kitchen is well ventilated during this step.
Can I Use Metal Utensils In My Breville Appliance?
It depends on the appliance. Never use metal utensils in non-stick blender or oven trays, as this can cause scratches. Use silicone, wooden, or plastic utensils to keep surfaces safe. For espresso machines, the portafilter and tamper are metal and designed for use.
How Do I Know If My Breville Blender Is Overloaded?
If the blender stops or makes a loud noise, it may be overloaded. Turn it off, unplug, and reduce the amount of food inside. Always follow the max fill line. Overloading can damage the motor or cause leaks.
What Should I Do If My Breville Appliance Is Not Working?
First, check that it is plugged in and the outlet works. Make sure all parts are correctly assembled. If it still does not work, consult the user manual or contact Breville customer support. Never try to repair an electrical appliance yourself.
Using a Breville is about more than just pushing buttons. With the right knowledge, you’ll enjoy restaurant-quality coffee, perfect toast, and delicious meals at home. Take the time to explore your appliance, clean it regularly, and don’t be afraid to try new features.
You’ll soon see why Breville is a favorite among home cooks everywhere.

Credit: www.youtube.com