
Vacuuming a pool after flocking is a task that can turn cloudy, dirty water into a clear and inviting oasis. But if you don’t know how to do it right, you can end up frustrated, wasting chemicals, or even damaging your pool.
This guide will walk you through every detail of the process, from understanding what flocking is, to the best way to use your vacuum, and even how to avoid the mistakes that catch many pool owners off guard. If you want a truly clean pool after flocking, this guide is for you.
Understanding Flocking: Why And When
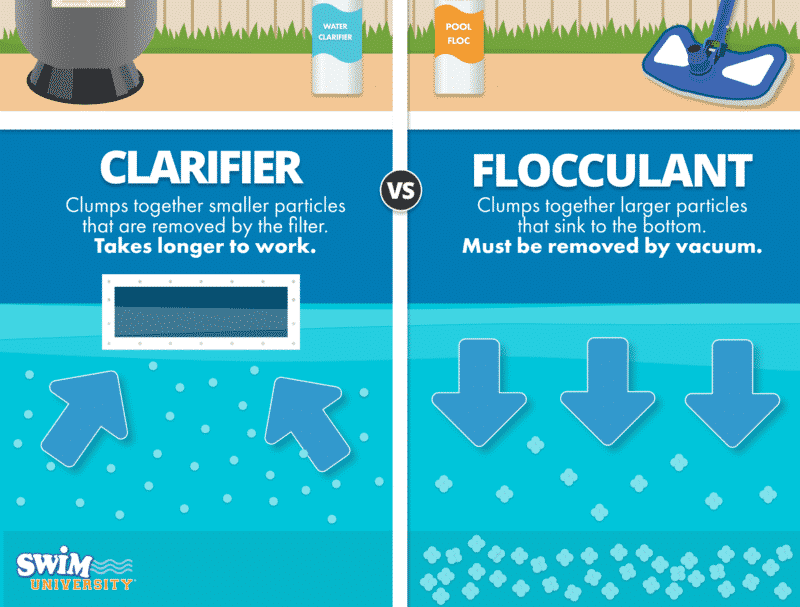
Flocking, sometimes called pool flocculation, is a method used to clear up cloudy pool water. When your pool water is filled with tiny particles—like dust, pollen, or dead algae—your standard filter often can’t catch them. These particles are so small they slip right through. Flock, or flocculant, is a chemical that binds these tiny particles together into larger clumps, which then sink to the bottom of the pool. These clumps are now big enough to be vacuumed away.
You might need to flock your pool if:
- The water remains cloudy after normal filtration
- You’ve tried clarifiers, but the problem persists
- You’ve had a severe algae bloom that left fine residue
- Dust, debris, or pollen is stuck in the water after a storm
Flocking isn’t a weekly or monthly job. It’s a special treatment, best used when other cleaning methods fail. Knowing when to flock saves you time, money, and effort on unnecessary chemicals.
What You Need Before Vacuuming After Flocking
Before you start, gather the right tools and prepare the pool. Skipping this step is a common beginner mistake.
- Manual pool vacuum (not an automatic pool cleaner): Automatic cleaners will stir up the debris, making things worse.
- Vacuum hose and vacuum head: Make sure these are clean and free from damage.
- Telescopic pole: So you can reach all areas of the pool.
- Pool filter (preferably sand or DE filter): Cartridge filters aren’t ideal for vacuuming to waste, but you can use them with extra care.
- Waste/drain setting on your filter: You’ll need to vacuum to waste, not through the filter, so the debris doesn’t get recirculated.
- Garden hose (optional): To refill the pool after vacuuming, since you’ll lose water.
- Test kit or strips: To check water chemistry after the process.
- Protective gloves and goggles: Flocking chemicals can be irritating.
Pro tip: Don’t use a robotic or suction-side pool cleaner after flocking. They’ll just stir up the clumps, making your water cloudy again.

Credit: www.youtube.com
Steps To Flock Your Pool (before Vacuuming)
You can’t vacuum until the flocking process is complete. Here’s how to do it correctly:
- Balance Your Water: Make sure the pH is between 7.2 and 7.6, and chlorine is at normal levels. This helps the flocculant work best.
- Turn Off the Pump: The water must be still so particles can settle.
- Add the Flocculant: Follow your product’s instructions for dosage. Pour it evenly around the pool.
- Circulate for a Few Hours: Turn the pump on ‘recirculate’ for 2–4 hours. This spreads the chemical without filtering.
- Shut Off the Pump Overnight: Let the water sit still for 8–24 hours. The debris will sink to the bottom.
- Inspect the Pool: The next day, you’ll see a thick layer of sediment at the bottom. This means you’re ready to vacuum.
Missing any of these steps means the debris won’t settle properly, and your vacuuming effort will be wasted.
Preparing To Vacuum After Flocking
Once you see the sediment settled, preparation is key. Rushing in now is a common way to undo all your hard work.
- Avoid swimming or splashing: Any movement will disturb the sediment.
- Check water clarity: If the clumps look loose, wait another few hours.
- Set up your manual vacuum: Connect the head, hose, and pole, and fill the hose with water to prevent air pockets.
- Position the filter: Set your multiport valve to waste. This sends dirty water out of the pool, not back through the filter.
- Plan for water loss: Vacuuming to waste removes a lot of water. If your pool is already low, add water before you start.
Expert insight: If you have a cartridge filter without a waste setting, you may need to partially drain the pool after vacuuming, or vacuum very slowly to avoid clogging the filter.
How To Vacuum A Pool After Flocking: Step-by-step
Here’s the exact process, explained in detail. Take your time with each step, and don’t rush—the more careful you are, the clearer your pool will be.
Step 1: Attach The Manual Vacuum
Connect the vacuum head to your telescopic pole. Attach the vacuum hose, submerge the entire assembly, and fill the hose with water to remove air. You can do this by holding the hose end over a return jet until all bubbles stop.
Step 2: Set The Filter To Waste
Turn off the pump. Set the multiport valve on your filter to the waste position. If you’re not sure where this is, check your pool filter’s labeling or manual. For cartridge filters, see if your system has a drain-to-waste option or a way to bypass the filter.
Step 3: Begin Vacuuming Slowly
Turn the pump back on. Move the vacuum head slowly along the pool floor. The key is gentle, even motions—if you move too quickly, you’ll stir up the sediment, and it will cloud your water again.
Don’t rush: If you see a cloud form, stop and let it settle before continuing.
Step 4: Monitor Water Level
Vacuuming to waste removes water quickly. Keep an eye on your water level—if it drops below the skimmer, stop and refill before continuing. Running the pump without enough water can damage it.
Tip: Aim to work in sections, taking breaks to refill the pool as needed.
Step 5: Dispose Of Wastewater Responsibly
The water you remove contains chemicals and debris. Never drain it into storm drains or natural water sources. Direct it to a sanitary sewer or follow your local guidelines for pool wastewater.
Step 6: Continue Until All Sediment Is Gone
It may take several passes to remove all the debris. Be patient. If some clumps are missed, let them settle again and repeat the process.
Step 7: Rinse Equipment And Reset Filter
When finished, rinse your vacuum hose, head, and pole with clean water. Return your filter valve to its normal setting (filter or recirculate). If you used a cartridge filter, check and clean it thoroughly.
Step 8: Restore Water Level
Top up your pool to the normal operating level. Use a garden hose and add water slowly to prevent stirring up any remaining debris.
Step 9: Check And Balance Chemistry
Test your pool water. After vacuuming and adding new water, you’ll likely need to adjust pH, alkalinity, and chlorine levels. Add chemicals as needed, and run your pump for several hours to mix.
Non-obvious insight: If you used a lot of flocculant or lost much water, your stabilizer (cyanuric acid) and calcium hardness may also need adjustment.
Key Factors For A Successful Vacuum After Flocking
Many pool owners miss these critical points, leading to cloudy water or repeated cleaning.
Move Extra Slowly
The sediment is light and can be disturbed easily. Move the vacuum head at a snail’s pace, and avoid sudden turns.
Use The Right Vacuum
Manual vacuums are best. Automatic pool cleaners or robotic vacuums will not pick up the clumps effectively and will just stir them up.
Don’t Use The Filter Mode
If you vacuum on the filter setting, you’ll recirculate the debris, and it will end up back in your pool. Always use the waste setting.
Prepare To Lose Water
Vacuuming to waste can drop your water level by several inches or more. Plan ahead to avoid exposing pool walls or damaging your pump.
Watch For Clogs
If you notice weak suction, check for clogs in the hose or vacuum head. Sediment can block the pathway, especially if the debris is thick.
Multiple Sessions May Be Needed
Sometimes, the debris is too much for a single vacuum session. Let any remaining particles settle again, then repeat.
What If You Make A Mistake?
Mistakes happen, especially the first time you vacuum after flocking. Here’s what to do if something goes wrong:
- You stir up the sediment: Turn off the pump, wait several hours for it to settle, and start again.
- You lose too much water: Stop, refill, and continue later. Never let the water drop below the skimmer opening.
- Filter gets clogged: Clean or backwash your filter before resuming.
- Water is still cloudy: Run the filter for 24–48 hours, then reassess. You may need to flock and vacuum a second time.
Pro insight: Patience is your best friend. Rushing means repeating the whole process.
Comparing Flocking To Other Pool Clarification Methods
It’s helpful to understand how flocking compares to other methods like pool clarifiers. Here’s a comparison:
| Method | Purpose | How It Works | Best For | Water Loss |
|---|---|---|---|---|
| Flocking | Removes fine debris | Binds particles, sinks to floor | Heavy cloudiness, post-algae | High (vacuum to waste) |
| Clarifier | Helps filter trap particles | Clumps particles, caught in filter | Mild cloudiness | None |
Flocking is powerful but labor-intensive. Use it when clarifiers can’t fix the problem.

Credit: www.amazon.com
Pool Filter Types: How They Affect Vacuuming To Waste
Not all filters have a waste setting. Here’s how common pool filters compare:
| Filter Type | Vacuum to Waste? | Notes |
|---|---|---|
| Sand Filter | Yes (multiport valve) | Easy to use waste setting |
| Diatomaceous Earth (DE) | Yes (multiport valve) | Works like sand filter, but needs recharging DE powder |
| Cartridge Filter | No (usually) | Most models lack waste; may need to bypass or remove cartridge |
Non-obvious insight: If your filter can’t vacuum to waste, you can try a sump pump with a vacuum attachment as a workaround.
Common Problems And Solutions After Flocking
Many pool owners face these issues after flocking. Here’s what to watch for and how to fix them.
Sediment Is Not Settling
- Possible causes: Pump was left running, water is not balanced, or too much circulation.
- Solution: Check water chemistry, let the pool sit longer, and avoid swimming.
Water Is Still Cloudy
- Possible causes: Not all debris was vacuumed, or particles were too small.
- Solution: Repeat flocking, vacuum again, and check filter condition.
High Water Loss
- Possible causes: Vacuuming too long or not monitoring water level.
- Solution: Vacuum in sections, refill between sessions.
Algae Returns
- Possible causes: Chlorine is low, or not all algae was removed.
- Solution: Shock the pool, brush walls, and monitor chemicals.
Filter Issues
- Possible causes: Sediment clogs the filter or multiport valve.
- Solution: Clean or backwash the filter, check for blockages.
Best Practices For A Crystal Clear Pool
- Always balance water before and after flocking.
- Use a manual vacuum for the best results.
- Move the vacuum slowly and gently.
- Plan for water loss, especially in smaller pools.
- Clean all equipment after use.
- Monitor your filter pressure and backwash as needed.
- Test water chemistry after refilling and adjust as necessary.
How Long Does The Whole Process Take?
Flocking and vacuuming is not a quick fix. Here’s a realistic timeline:
| Step | Time Needed |
|---|---|
| Balancing water & adding floc | 1 hour |
| Circulating flocculant | 2–4 hours |
| Letting debris settle | 8–24 hours |
| Vacuuming to waste | 1–2 hours |
| Refilling & rebalancing | 2–6 hours (depending on refill speed) |
Expect the whole process to take one to two days. Plan around weather and pool use.
Safety And Environmental Tips
- Always wear gloves and eye protection when handling chemicals.
- Store flocculant out of reach of children and pets.
- Don’t discharge pool water into storm drains; follow local waste disposal rules.
- Check for leaks around equipment after vacuuming.
- Recheck water balance before swimming.
Two Beginner Mistakes To Avoid
- Vacuuming too soon: If you vacuum before the debris has fully settled, you’ll just stir it up. Wait until you see a clear layer on the pool floor.
- Using the wrong vacuum mode: Never vacuum to ‘filter’ after flocking. Always use the ‘waste’ setting, or you’ll just recirculate the debris.
Credit: www.swimuniversity.com
Can You Use A Pool Robot Or Automatic Cleaner After Flocking?
Not right away. These devices are designed for routine cleaning, not for heavy debris after flocking. Wait until all sediment is gone, then resume using your automatic cleaner.
Aftercare: Keeping Your Pool Clear
Once your pool is clean, keep it that way:
- Test and adjust chemicals weekly.
- Run your filter daily for 8–12 hours.
- Brush walls and vacuum weekly.
- Shock the pool after heavy use, storms, or algae blooms.
If you want more technical details about flocking chemicals, you can visit this Wikipedia article on flocculation.
A clear pool is not just about looks. Clean water protects swimmers from bacteria and extends the life of your equipment.
Frequently Asked Questions
How Soon Can I Swim After Vacuuming A Pool Following Flocking?
Wait until the water is clear, chemicals are balanced, and the filter has run for several hours. This usually means waiting at least 24 hours after vacuuming and refilling.
Can I Vacuum To Waste With A Cartridge Filter?
Most cartridge filters do not have a waste setting. If your system allows, you can bypass the filter or use a submersible pump. Otherwise, vacuum very slowly and clean the cartridge often.
Is Flocking Safe For All Pool Types?
Flocking is safe for most inground and above-ground pools, but check your manufacturer’s guidelines. Don’t use flocculant in small inflatable or kiddie pools.
What If The Debris Keeps Coming Back After Vacuuming?
Recurring debris can mean a filter issue, poor water balance, or algae. Check your filter, shock the pool, and retest water chemistry.
How Often Should I Flock My Pool?
Flocking is not a routine treatment. Only flock your pool when you have persistent cloudiness that cannot be fixed with normal filtration or clarifiers.
A properly flocked and vacuumed pool will reward you with sparkling, clear water. With patience and careful steps, you can handle even the cloudiest pool and avoid common pitfalls. Enjoy your clean pool!