
Many people dream of a kitchen with a window right above the sink. It brings in natural light and makes washing dishes less of a chore. But when you remodel or build your kitchen, you may find that venting the kitchen sink under a window is not as simple as it seems.
Plumbing codes are strict about venting to prevent bad smells, slow draining, and even dangerous sewer gases. Yet, the window can block the usual path for a vent pipe. This problem is common in both old homes and new builds.
If you are planning to install or move a kitchen sink under a window, it’s important to know how to vent it correctly. Doing it wrong can cause clogs, water backups, or code violations. The good news is, there are several proven methods to vent a kitchen sink in this situation.
Some work for DIYers, while others need a licensed plumber. This guide will break down each method, explain the rules, and help you choose the best option for your kitchen—without using complicated words or leaving out important details.
Why Venting Is Essential For Kitchen Sinks
Every drain in your house needs a way for air to get in and out. This is what vent pipes do. Without proper venting, you might notice:
- Slow draining: Water may move slowly down the sink or even bubble up.
- Gurgling sounds: Air trapped in the pipes makes strange noises.
- Bad odors: Sewer gases can enter your home.
- Traps losing water: The U-shaped part under the sink (the trap) might get emptied by suction, letting smells in.
Building codes require venting for safety and health. The most common way is to run a vent pipe straight up from the drain, through the wall, and out the roof. But a window over the sink blocks the path, so you need to use another method.
Challenges Of Venting Under A Window
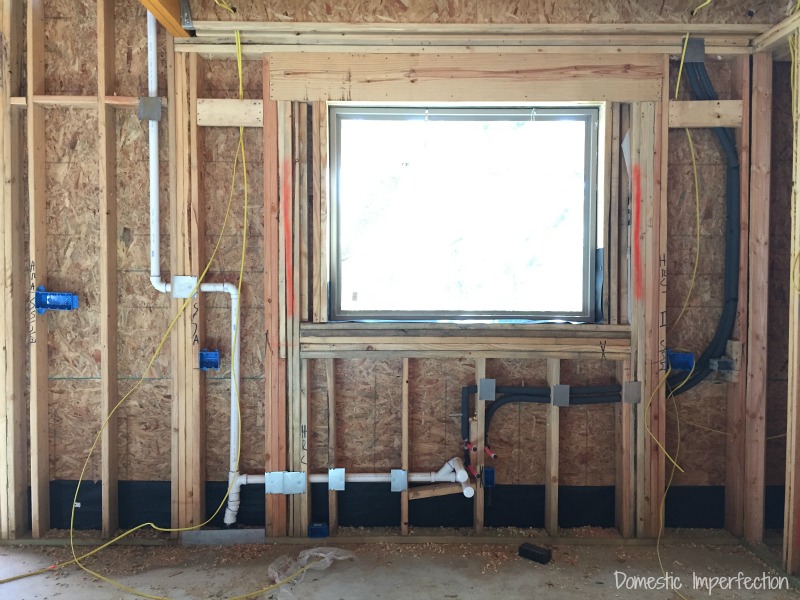
When a kitchen sink sits under a window, the wall behind it is often full of glass, not wood or drywall. There’s usually no space for a vent pipe to go straight up. Other issues include:
- Limited wall space: Not enough room for large pipes.
- Window framing: Pipes can’t run through window headers or interfere with the glass.
- Distance to main vent: The main stack (the big vent pipe going through your roof) might be far away.
This means you need to get creative—while still following code.
Understanding Code Requirements
Before picking a venting method, it’s important to know the rules. Most regions follow the International Residential Code (IRC) or similar local rules. These say:
- Every plumbing fixture needs a vent.
- Vents must connect above the flood rim (top edge) of the sink.
- Pipes must be sized correctly (usually 1.5–2 inches for kitchen sinks).
- Distance from the trap to the vent (called “critical distance”) must not be too long—usually 5 feet or less for a 1.5-inch pipe.
You should always check with your local building department or a plumber. Some codes allow modern solutions like air admittance valves (AAVs), but not everywhere.
Common Methods To Vent A Kitchen Sink Under A Window
There are several ways to vent a kitchen sink when a window is in the way. Each has pros and cons. Here are the main options:
1. Use A Loop Vent (island Vent)
A loop vent is often used for kitchen sinks in islands, but it also works under windows. It lets you vent the sink without a pipe going straight up behind it.
How it works:
The drain pipe leaves the sink, drops down, and then forms a loop that rises up inside the cabinet, then connects to a vent pipe running sideways through the wall (away from the window area).
Steps:
- The drain exits the sink trap and drops down below the cabinet.
- It loops up as high as possible (usually just under the countertop).
- The loop connects to a horizontal vent pipe that runs to a wall where it can go up to the roof.
Benefits:
- Works when there’s no wall space behind the sink.
- Meets code if installed right.
- No moving window needed.
Drawbacks:
- Takes up space inside the base cabinet.
- More complex to install.
Example:
Suppose your sink is centered under a wide window. The loop vent will run inside the cabinet and turn left or right to connect to a wall far from the window.
2. Air Admittance Valve (aav)
An AAV is a mechanical device that opens to let air in when water drains, but closes to keep sewer gas out. It’s a modern solution and can save a lot of work.
How it works:
The AAV sits on top of a vertical pipe (after the trap but before the main drain) inside the cabinet. When water flows, it opens to let air in.
Steps:
- The drain goes from the sink trap to a T-fitting.
- The AAV is installed on the top of the T, pointing up.
- The drain continues out to the waste line.
Benefits:
- No vent pipe through the wall or roof.
- Easy to install.
- Saves money and time.
Drawbacks:
- Not allowed everywhere (check your code).
- Must be accessible for inspection or replacement.
- Can fail after years (though modern ones last long).
Example:
You install an AAV under your sink. The rest of the venting is hidden, and you don’t need to cut any wall or window framing.
3. Horizontal Vent To Nearby Wall
If there’s a side wall close to the sink, you may be able to run a horizontal vent pipe behind the cabinets to that wall, then up to the roof.
How it works:
The vent pipe leaves the drain just after the trap, turns sideways, and runs to a wall not blocked by a window. There, it goes up like a normal vent.
Steps:
- Connect a horizontal vent pipe (with a slight upward slope) from the drain.
- Run it behind the cabinets to the side wall.
- Go up the wall, then through the ceiling and roof.
Benefits:
- Simple and reliable.
- Uses standard materials.
- No moving parts.
Drawbacks:
- Needs enough space behind cabinets.
- Long horizontal runs can collect grease or clog if not sloped correctly.
Example:
Your kitchen sink is under a window, but there’s a corner wall two feet away. You run the vent pipe to that wall and up, avoiding the window.
4. Re-vent Or Auxiliary Vent
A re-vent (also called auxiliary vent) is a second vent line that connects from the drain to a vent pipe higher in the wall.
How it works:
After the trap, a vent pipe leaves the drain and connects to the main vent stack higher up—away from the window.
Steps:
- After the trap, run a vent pipe sideways or at an angle.
- Connect it to the main vent stack or another vent line.
- Make sure the connection is above the flood rim of the sink.
Benefits:
- Meets most codes.
- Can be hidden in walls or ceilings.
Drawbacks:
- May be tricky in crowded walls.
- Requires planning and careful pipe routing.
Example:
You run a small vent pipe from under the sink, through the cabinet, and connect it to a main vent line on the next wall.
5. Combination Of Methods
In some kitchens, a mix of methods works best. For example, you might use a horizontal vent pipe and an AAV together.
Benefits:
- Offers flexibility in tough spaces.
- Can meet code where single methods fail.
Drawbacks:
- Must be carefully designed.
- More work to install.
Example:
Your kitchen has very little space, so you use a short horizontal vent and add an AAV for backup.
Step-by-step Guide: How To Vent A Kitchen Sink Under A Window
Now, let’s walk through the key steps for venting your kitchen sink when a window is in the way. We’ll focus on practical steps, safety, and tips to avoid mistakes.
Planning And Measuring
Start by looking at your kitchen layout. You need to measure:
- Distance from sink to nearest wall (not blocked by a window)
- Cabinet space: Is there room for pipes inside?
- Location of main vent stack: Find where the main roof vent is.
- Plumbing code: Check with your city or county.
Tip: Always sketch a quick diagram with pipe sizes and distances.
Choosing Your Venting Method
Pick the method that fits your kitchen. Some questions to ask:
- Is there space for a loop vent?
- Is an AAV allowed by your local code?
- Can you reach a side wall for a horizontal vent?
- Is a re-vent possible (enough room in walls)?
If you’re not sure, ask a licensed plumber. They can spot challenges you might miss.
Gathering Materials And Tools
Common materials include:
- PVC or ABS pipe (1.5–2 inches)
- Fittings: T-fittings, elbows, couplings
- Pipe cement or glue
- AAV (if using)
- Pipe supports or straps
- Pipe cutter or saw
- Tape measure and marker
Tip: Buy extra fittings. Mistakes are common in tight spaces.
Installing The Drain And Vent
1. Install The Sink Trap:
Place the trap directly under the sink. Make sure it’s level and the right height.
2. Run The Drain Pipe:
Connect the pipe from the trap to the wall or floor drain. Keep the slope at about 1/4 inch per foot to help water flow.
3. Add The Vent Pipe:
Depending on your method:
- For loop vent, form the loop and connect horizontally.
- For AAV, install the T-fitting and attach the valve vertically.
- For horizontal vent, run the pipe to the side wall.
- For re-vent, connect to the main stack higher up.
- Connect to the main vent or waste line:
Join your vent pipe to the main stack or roof vent, or finish the AAV connection.
5. Test For Leaks:
Fill the sink with water, then drain quickly. Check all joints and the trap.
Tip: Don’t glue pipes until you’re sure everything fits.
Sample Pipe Layouts
Here’s how different venting methods might look in your kitchen:
| Method | Pipe Route | Best For |
|---|---|---|
| Loop Vent | Down, loop up, sideways to wall | No wall space behind sink |
| AAV | Trap to T-fitting, vertical AAV | Quick DIY, limited space |
| Horizontal Vent | Trap to side wall, up to roof | Window with side wall nearby |
| Re-vent | Trap to main stack higher up | Stack in adjacent wall |
Testing And Inspection
Once installed, you need to:
- Test for leaks at every joint.
- Check vent function: Fill and quickly drain the sink. Listen for gurgling or slow draining.
- Inspect with local authority: In many places, an official must check your work before you close walls.
Practical tip: If you hear gurgling or smell odors, the vent may not be working. Fix problems before covering pipes.
Mistakes To Avoid
Even experienced DIYers make errors with kitchen sink vents under windows. Watch out for these common problems:
1. Ignoring Local Code:
You must follow your city or state’s rules. An AAV might be legal in one place but banned in another.
2. Long Horizontal Runs Without Slope:
Pipes must slope up for vents, down for drains. Flat pipes cause clogs.
3. Using Wrong Pipe Sizes:
Too-small pipes clog. Too-large pipes may not vent properly.
4. Not Making The Vent Pipe Accessible:
AAVs and some vent lines need to be reachable for inspection.
5. Cutting Into Window Headers Or Frames:
Never damage window structure for a pipe. This can cause window failure or leaks.
6. Not Supporting Pipes:
Pipes must be secured so they don’t sag or move.
7. Hiding Leaks:
Always test and fix leaks before closing cabinets or walls.

Credit: www.reddit.com
Cost Comparison: Venting Methods
Different methods have different costs. Here’s a simple overview:
| Method | DIY Cost (USD) | Pro Install Cost (USD) | Maintenance |
|---|---|---|---|
| Loop Vent | $80–$180 | $400–$600 | Low |
| AAV | $30–$60 | $150–$300 | Replace every 10–20 years |
| Horizontal Vent | $50–$120 | $350–$500 | Low |
| Re-vent | $60–$150 | $400–$700 | Low |
Note: These are averages for simple installs. Costs can be higher in older homes or crowded spaces.
How To Choose The Best Method For Your Kitchen
Each kitchen is different. Here’s how to pick the right venting solution:
- Check your code: Some methods (like AAVs) may not be allowed.
- Measure your space: How much room is there behind and beside the sink?
- Decide on DIY or pro: Some methods (like loop vents) are easier for professionals.
- Think about future repairs: AAVs are simple to swap out. Hidden vents are harder to fix.
- Plan for inspections: Make sure everything is accessible if your city inspects.
Non-obvious insight:
Many beginners forget to check cabinet depth. If your cabinets are shallow, a loop vent or big horizontal pipe may not fit. Measure before you buy materials.
Advanced Tips For Difficult Kitchens
Some kitchens have extra challenges—thick walls, old framing, or limited access. Here are expert tips:
- Use flexible fittings: Modern plumbing parts allow for small bends and tricky angles.
- Plan access panels: If you use an AAV, install a small panel so you can reach it later.
- Combine vents: Sometimes, you can connect two sinks to one vent to save space.
- Consider soffits: If there’s no room in walls, you might run a vent pipe in a soffit above cabinets.
- Ask your inspector early: Many plumbing inspectors will review your plan before you start.
Example: Real-world Kitchen Sink Venting
Let’s say you’re remodeling an old kitchen. The sink is under a wide window, with no wall space for a vertical pipe. The nearest side wall is four feet away. Here’s how you could solve it:
- Measure the space under the sink: There’s enough room for a pipe loop.
- Choose a loop vent: Run the drain down, loop up near the cabinet top, and then sideways to the side wall.
- Run a horizontal vent: At the side wall, turn the pipe up into the wall cavity, then through the roof.
- Check with code: Your city allows loop vents if the loop is as high as possible.
- Install and test: Assemble the pipes, glue joints, and test for leaks.
Practical tip:
If you have a dishwasher, connect its drain before the trap, not after. This keeps smells out.
Credit: www.plbg.com
Maintenance And Long-term Care
Most venting systems need little care, but some simple steps help keep them working:
- Check for leaks under the sink every few months.
- Clean the trap if the sink drains slowly.
- Replace AAVs every 10–20 years, or if you smell sewer gas.
- Inspect vent pipes in the attic for blockages—birds or debris can clog roof vents.
- Listen for gurgling: This means venting is failing and needs repair.
Non-obvious insight:
Cold climates can cause roof vent pipes to ice up in winter. If your sink starts to drain slowly in cold weather, check the roof vent for ice.
Environmental And Safety Considerations
Kitchen sink venting is not just about following code—it’s about health and safety.
- Prevents sewer gas: Proper vents keep dangerous gases out of your home.
- Stops mold: Good drainage keeps cabinets dry.
- Reduces water waste: Well-vented sinks drain faster, so you use less water.
Practical tip:
If you ever smell gas or rotten eggs near your sink, check your vent system immediately.
What If You Can’t Vent The Sink?
Sometimes, venting a kitchen sink under a window is just not possible due to old construction or other barriers. In these cases, you have a few options:
- Talk to a plumber: They may know hidden tricks—like using an AAV in a special location.
- Ask for a code exception: Some cities allow “grandfathering” or special permits for old homes.
- Move the sink: As a last resort, moving the sink a few feet may solve the problem.
For more technical details, you can read about plumbing vents on the Wikipedia DWV system page.
Frequently Asked Questions
What Size Vent Pipe Do I Need For A Kitchen Sink?
Most kitchen sinks need a 1.5-inch or 2-inch vent pipe. Check your local plumbing code to be sure. The size depends on how far the vent is from the trap and how many fixtures are connected.
Can I Use An Air Admittance Valve For My Kitchen Sink?
In many places, AAVs are allowed for kitchen sinks. However, always check your city’s code first. Some regions require a traditional vent pipe instead.
How Far Can The Vent Be From The Sink Trap?
The maximum distance depends on your pipe size. For a 1.5-inch pipe, the vent should be no more than 5 feet from the trap. For a 2-inch pipe, up to 8 feet is common. Local codes can be stricter.
Do I Need A Plumber To Vent A Kitchen Sink Under A Window?
If you’re experienced with plumbing and know your local code, you may do it yourself. For complex layouts or if you’re unsure, hiring a licensed plumber is the safest choice.
What Happens If The Kitchen Sink Is Not Vented Properly?
A poorly vented sink can cause slow draining, gurgling noises, bad smells, and even allow sewer gas into your home. Always vent kitchen sinks to protect your health and your plumbing.
Venting a kitchen sink under a window might seem tricky, but with the right plan, it’s very doable. Choose the method that fits your space, follow your local code, and don’t cut corners on safety or testing. Whether you use a loop vent, horizontal pipe, or AAV, good venting keeps your kitchen smelling fresh and your drains working smoothly.
If you’re ever in doubt, a quick call to a local plumber or inspector can save you hours of trouble later. With patience, careful measurement, and the tips above, you can enjoy your kitchen window—and a perfectly draining sink—for years to come.

Credit: www.youtube.com