Giving your kitchen cabinets a fresh look does not always mean a big renovation. Sometimes, a small change like adding trim can make a huge difference. Cabinet trim is a strip of wood or molding that you attach to the edges or faces of your cabinets.
It adds detail, style, and a custom touch that can transform a plain kitchen into something special. If your cabinets look flat or outdated, trim can add depth and personality without the cost of replacing everything.
Many people believe that installing trim is too hard or only for professionals. Actually, with the right tools and patience, almost anyone can do it. You do not need to be a skilled carpenter. This guide will show you, step by step, how to add trim to kitchen cabinets.
It will also explain the different types of trim, how to choose the right style, and how to avoid common mistakes. If you want your kitchen to feel more finished and polished, keep reading. You will see that this project is both achievable and rewarding.
Why Add Trim To Kitchen Cabinets?
Trim does more than just decorate. It can solve small problems and make your kitchen feel more expensive. Here are some key reasons to consider adding trim:
- Covers gaps and imperfections: If your cabinets have small gaps, uneven edges, or minor damage, trim can hide these flaws.
- Upgrades builder-grade cabinets: Many homes have simple, flat cabinet doors. Trim can make them look custom and high-end.
- Adds style and character: Whether you like modern, traditional, or farmhouse style, there is a trim design to match.
- Increases home value: Kitchens with custom touches often attract buyers and can increase the value of your home.
- Lets you personalize your space: With so many types and finishes, you can create a look that is truly yours.
Many homeowners are surprised at how much of a difference trim makes. Even if your cabinets are in good shape, trim can give them a new life and help your kitchen stand out.
Types Of Cabinet Trim
Choosing the right trim is the first step. There are several types, and each creates a different effect. Here are the most common options:
Crown Molding
Crown molding is installed at the top of cabinets, where the cabinet meets the ceiling or wall. It adds height and a classic look. This type is best if you want your kitchen to feel grand or traditional. Crown molding comes in many patterns, from simple curves to intricate designs.
Light Rail Molding
Light rail molding attaches to the bottom of upper cabinets. Its main job is to hide under-cabinet lights and give a finished edge. This trim is perfect if you have or plan to add lighting below your cabinets.
Scribe Molding
Scribe molding is a thin strip used to cover small gaps between cabinets and walls. Sometimes walls are not perfectly straight. Scribe molding fills these uneven spaces, making your cabinets look built-in and seamless.
Base Molding
Base molding is used at the bottom of lower cabinets. It can match your baseboards or add a decorative touch to the “toe-kick” area. This trim helps cabinets look more like furniture.
Edge And Applied Molding
Edge molding attaches to the outside edges of cabinet doors and drawer fronts. Applied molding sits on the face of a flat cabinet to create shapes, such as squares or rectangles, for a “Shaker” or “panel” effect.
Decorative Or Accent Trim
Decorative trim includes rosettes, corbels, and onlays. These are usually added to corners or special areas for extra style.
Each type of trim can be painted or stained to match your cabinets. Mixing different trim styles is also common for a unique, layered look.
How To Choose The Right Trim Style
Picking the right trim is important. It should fit your kitchen’s style and your cabinet shape. Here are some tips to help you decide:
- Match your home’s architecture: If your home is modern, choose simple, straight trim. For traditional homes, ornate or curved molding works well.
- Consider your cabinet doors: Flat doors look great with applied molding for a shaker style. Raised-panel doors can handle more detail.
- Think about ceiling height: Tall ceilings allow for larger crown molding. In small kitchens, slim trims are better.
- Choose a finish: Paint or stain your trim to match or contrast with your cabinets. White trim is classic, but dark or bold colors can add drama.
- Mix, but don’t overdo: You can combine crown with base or light rail molding, but too much trim can look busy.
If you are unsure, take photos of your kitchen and bring them to a home improvement store. Many stores display trim samples you can hold up to your cabinets.
Tools And Materials Needed
To add trim to kitchen cabinets, you will need some basic tools and materials. Some tools are optional but can make the job easier.
Tools
- Measuring tape: For precise lengths.
- Pencil: To mark cut lines.
- Miter saw or miter box with hand saw: For angled cuts.
- Finish nailer or hammer and finish nails: To attach trim securely.
- Level: Ensures trim is straight.
- Caulk gun: For applying caulk to fill gaps.
- Wood glue: Adds strength to joints.
- Sandpaper or sanding block: Smooths rough edges.
- Safety glasses: Protect your eyes while cutting.
Materials
- Trim or molding pieces: Buy extra in case of mistakes.
- Wood filler or putty: For filling nail holes.
- Paint or stain: Matches or accents your cabinets.
- Caulk: Fills small gaps between trim and cabinet.
- Primer: Needed if painting unfinished wood.
Some hardware stores rent tools if you do not want to buy them. A miter saw is very helpful for perfect corners, but a miter box and hand saw can work if you go slowly.
Measuring And Planning
Before you start cutting or attaching anything, careful planning is key. Accurate measurements save time and prevent wasted materials.
Steps For Planning
- Measure each cabinet: Measure the length of every edge where you will add trim. Write down the numbers.
- Sketch your cabinets: Draw a simple diagram and label the trim locations and lengths.
- Plan your cuts: Most trim is cut at a 45-degree angle for corners. Mark where you need inside and outside corners.
- Buy extra trim: Always get 10-15% more than your measurements in case of mistakes or bad cuts.
- Check for obstacles: Look for things like light switches, outlets, or uneven walls. Plan how you will work around them.
If you are adding trim to the tops of cabinets and they do not reach the ceiling, decide if you want to fill the gap with extra wood or just add crown molding.
Cutting Trim To Size
Cutting trim is the part that worries most beginners, but with patience, you can get professional results. The key is to measure twice and cut once.
Tips For Cutting
- Use a miter saw for accuracy: This tool makes clean, straight, or angled cuts.
- Practice on scrap pieces: Before cutting your real trim, make a few test cuts.
- Cut at the correct angle: For corners, use a 45-degree angle so two pieces meet neatly.
- Label your pieces: After cutting, write on the back where each piece goes.
- Keep your hands safe: Always use safety glasses and keep fingers away from the blade.
Here’s a quick comparison of cutting tools:
| Tool | Best For | Skill Level | Cost |
|---|---|---|---|
| Miter Saw | Fast, accurate cuts | Beginner–Expert | Medium–High |
| Miter Box & Hand Saw | Simple, small jobs | Beginner | Low |
| Table Saw | Long, straight cuts | Intermediate–Expert | High |
Most homeowners use a miter saw or miter box for cabinet trim. If you do not own one, many hardware stores offer tool rental.
Painting Or Staining The Trim
It is much easier to finish your trim before you install it. This way, you can paint or stain all sides and get a smoother result.
Steps For Finishing Trim
- Sand the trim: Use fine sandpaper to smooth any rough spots or edges.
- Wipe clean: Remove dust with a damp cloth.
- Prime (if painting): If the trim is bare wood, apply a coat of primer and let it dry.
- Paint or stain: Apply your chosen paint or stain in thin, even coats. Let each coat dry fully before adding another.
- Touch up after installing: After attaching the trim, fill nail holes and touch up any spots as needed.
If your cabinets are painted, match the trim color for a seamless look. For stained wood, try to get as close as possible in color and grain.
Attaching The Trim To Cabinets
This is the most satisfying part of the project. Take your time and check each piece for fit before nailing or gluing.
Step-by-step Instructions
- Dry fit each piece: Hold the trim up to the cabinet to make sure it fits. Trim or sand if needed.
- Apply wood glue: Put a thin line of glue on the back of the trim for extra hold.
- Nail the trim in place: Use a finish nailer or hammer and finish nails. Nail into the thickest part of the cabinet, such as the frame.
- Check for level: Use a level to make sure the trim is straight, especially on long runs.
- Work one piece at a time: Start with the longest pieces, then add the shorter ones.
- Set the nails: If nails stick out, tap them below the surface with a nail set.
If you make a mistake, do not panic. Trim can be removed and re-attached if caught early.
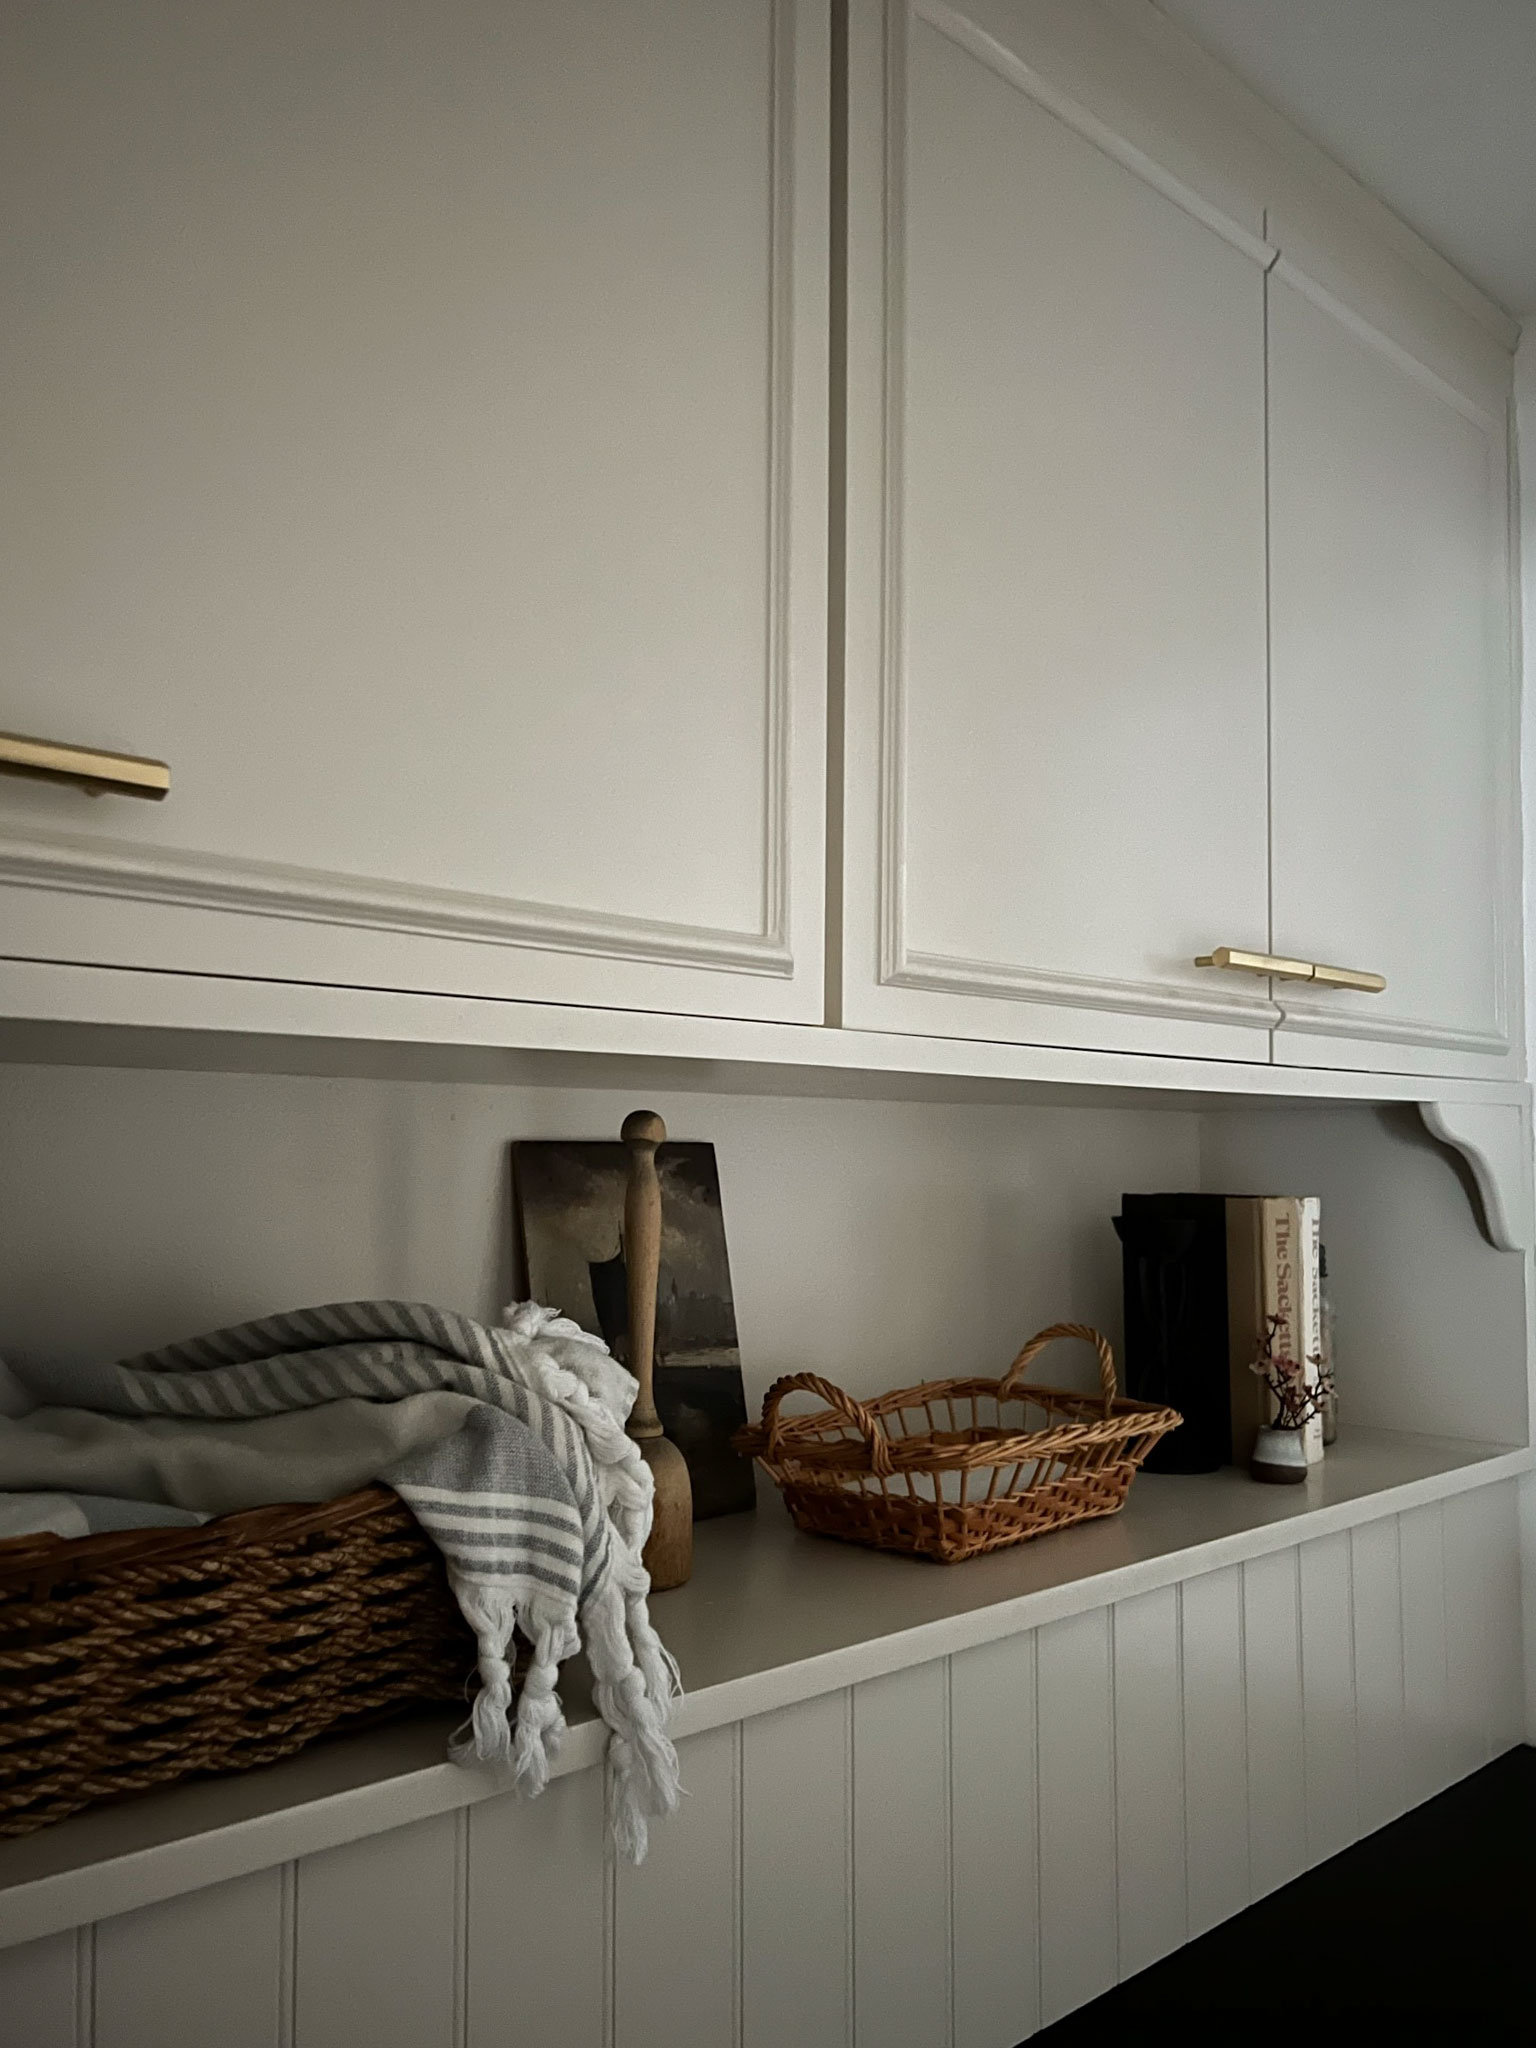
Credit: erinzubotdesign.com
Filling Gaps And Holes
Even with careful work, you will have small gaps, seams, or nail holes. Filling these makes your trim look professional.
How To Fill And Finish
- Wood filler: Use this for nail holes or small dents. Let it dry, then sand smooth.
- Caulk: Fill tiny gaps where the trim meets the cabinet or wall. Use paintable caulk for best results.
- Sand again: Lightly sand filled areas before touch-up painting.
Avoid overfilling. Too much caulk or filler can create lumps.
Painting Touch-ups And Final Finish
After the trim is installed and all holes are filled, do a final check. Look for spots that need touch-up paint or stain.
- Use a small brush for touch-ups, especially in corners.
- Clean up drips right away with a damp cloth.
- Let everything dry fully before using the cabinets.
When dry, your cabinets should look like they were always made this way.
Common Mistakes To Avoid
Adding trim is simple, but there are some mistakes that can ruin the finished look. Here are the most common errors and how to avoid them:
- Wrong measurements: Always double-check before cutting. Even a small mistake can leave a gap.
- Poorly cut corners: Use a sharp saw and make sure angles match. Practice on scrap wood first.
- Skipping sanding or priming: Rough or unprimed trim does not look good painted.
- Using too little glue or nails: Trim may come loose over time if not attached well.
- Not filling holes or gaps: Unfilled holes stand out, especially on painted trim.
- Rushing the job: Take your time at each step for the best results.
One insight many beginners miss: Letting paint or stain fully cure before installation makes touch-ups easier and gives a smoother finish. Also, when buying trim, check for straightness. Warped pieces are hard to install and may not lay flat.
Style Ideas And Design Inspiration
Trim is not just functional; it is a chance to show your style. Here are a few popular looks:
- Farmhouse style: Simple, flat trim with a white or distressed finish.
- Modern look: Straight, square-edge trim in a matching color.
- Classic elegance: Layered crown molding with detailed profiles.
- Coastal vibe: Light wood tones and beadboard-style trim.
Some homeowners use contrasting colors for the trim, such as white molding on dark cabinets. Others match exactly for a subtle, unified effect. Try looking at kitchen magazines or Houzz for more ideas.
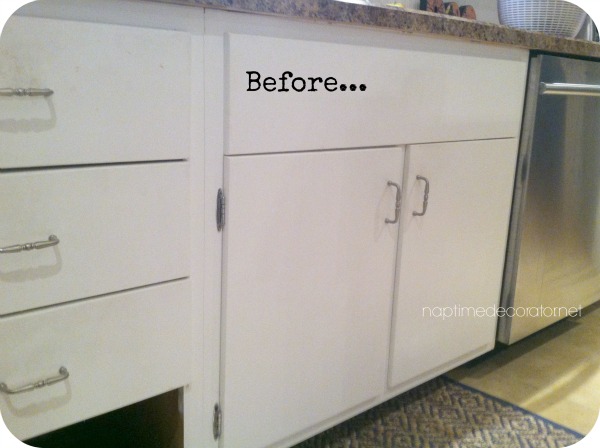
Credit: www.naptimedecorator.net
Costs And Time Required
Adding trim is affordable compared to replacing cabinets. Here are some average costs and time estimates:
| Material | Average Cost per Foot | Quality |
|---|---|---|
| Pine | $1–$2 | Basic, easy to paint |
| Maple/Oak | $2–$4 | Harder, takes stain well |
| MDF | $1–$1.50 | Budget-friendly, only for paint |
| Pre-finished | $3–$6 | Factory painted/stained |
For a medium kitchen, expect to spend $50–$200 on materials. The project usually takes 1–2 days, depending on your skill and how much trim you add.
Special Tips For A Professional Finish
Here are a few advanced tricks that make a big difference:
- Use corner blocks: These small blocks fit in corners and let you use straight trim without cutting angles. They save time and look stylish.
- Sand between coats: For a glass-smooth finish, lightly sand after each paint or stain coat.
- Back-cut for tight joints: Slightly angle the back of your cut so the face fits tightly, reducing visible gaps.
- Plan trim sequence: Always install the longest runs first, then fit the shorter pieces to them.
- Label every piece: After cutting, write its location on the back. It prevents mix-ups.
Many beginners also forget to allow for expansion. Wood can change size with humidity, so leave a tiny gap at the ends if your kitchen is very humid or dry.
Credit: thecrowninnderbyshire.co.uk
When To Call A Professional
Most people can add simple trim themselves. But you may want professional help if:
- Your cabinets are very uneven or out of square.
- You want complex crown molding or multiple layers.
- You do not have the right tools or time.
- You want a guaranteed perfect finish.
Hiring a carpenter costs more, but the results can be flawless. For most homes, though, DIY is enough, and you will save hundreds of dollars.
Frequently Asked Questions
How Do I Choose The Best Trim For My Kitchen Style?
Look at your cabinet doors and overall kitchen design. For modern kitchens, choose simple, straight trims. Traditional kitchens can use more detailed crown or base moldings. Bring a photo of your kitchen to a home store and compare samples for the best match.
Can I Add Trim To Laminate Or Mdf Cabinets?
Yes, you can add trim to laminate or MDF cabinets. Use wood glue and finish nails, but avoid heavy or thick trim that could pull off. Light sanding can help glue stick better to smooth surfaces.
Should I Paint Trim Before Or After Installing?
It’s best to paint or stain trim before installation. This gives a more even finish and makes it easier to cover all sides. Do touch-ups after attaching the trim and filling nail holes.
How Can I Avoid Gaps At The Corners?
Use a miter saw for precise 45-degree cuts and always dry-fit the pieces before attaching. If there are small gaps, fill them with caulk or wood filler for a seamless look.
Do I Need To Remove Cabinet Doors Before Adding Trim?
You do not need to remove doors to add crown, base, or light rail molding. If you’re adding edge or applied molding to door faces, take the doors off and lay them flat for easier work.
Adding trim to kitchen cabinets is a smart and affordable way to upgrade your space. With careful planning, simple tools, and a bit of patience, you can achieve a custom look that adds style and value to your home. This project is within reach for most DIYers and can give your kitchen a whole new personality. If you want more design inspiration or technical advice, check out trusted resources like This Old House for expert tips.