
Adjusting Ikea drawer fronts can be tricky for first-timers. You assemble your new furniture, stand back, and see crooked drawers – gaps, uneven lines, or fronts sticking out. If you want your Ikea drawer fronts to look neat and professional, learning how to adjust them is essential. Whether you have Malm, Alex, Kallax, or another Ikea unit, this guide will help you achieve perfect alignment. With clear steps, practical tips, and helpful examples, you’ll soon have drawers that look as good as showroom models.
Understanding Ikea Drawer Fronts
Before adjusting, it’s helpful to know how Ikea drawer fronts are designed. Most Ikea drawers use a cam lock and screw system or metal brackets to attach the front to the drawer box. The fronts are adjustable so you can correct alignment after installation. Ikea’s popular lines like Malm and Alex use metal rails with adjustable screws, while units like Kallax use simpler connector pieces.
You’ll usually find:
- Horizontal adjustment: Lets you move the front left or right.
- Vertical adjustment: Moves the front up or down.
- Depth adjustment: Brings the front closer or further from the drawer box.
Each system is a bit different, but the principles are similar. For example, in Malm and Alex, you have the flexibility to do all three adjustments, which is essential if your floors or walls are not perfectly level. Kallax, on the other hand, is more basic, and the cam lock method is less forgiving if the initial assembly was off.
Knowing which system your unit uses helps you plan your adjustments. For instance, if you see that the fronts are only slightly off, you might only need to tweak the horizontal screws. For more obvious misalignment, you may need to adjust in two or even all three directions.
Tools You Need
Adjusting Ikea drawer fronts doesn’t require special tools. You’ll need:
- Phillips screwdriver (most important)
- Flathead screwdriver (sometimes for cam locks)
- Tape measure or ruler
- Spirit level (optional, but helps with precision)
- Soft cloth (to protect surfaces)
- Flashlight (for dim areas)
Having these on hand will make the process easier and prevent damage. A tape measure is especially useful for checking consistent gaps. The spirit level isn’t just for perfectionists—if your home has uneven floors (common in older buildings), this tool can reveal why drawers look “off” even when the fronts are adjusted.
A flashlight is underrated. Many Ikea units are installed in bedrooms, closets, or offices where light is not always ideal. Being able to see the screws and rails clearly helps you avoid mistakes.
Credit: www.kitcheninstallation.ca
Preparing For Adjustment
Before you start, check a few things:
- Clear the workspace: Remove items from the drawers and nearby surfaces.
- Check drawer alignment: Open and close each drawer, looking for gaps, misalignment, or sticking.
- Inspect hardware: Make sure screws and cam locks are not loose or missing.
If you find damaged parts, order replacements from Ikea before continuing.
Also, check if your floor is level. Place your spirit level on top of the unit and look for bubble movement. Uneven floors can make drawer alignment nearly impossible until you adjust the feet or add shims under the unit.
This small detail is often missed but can save hours of frustration.
Take a moment to inspect the condition of each drawer box. Sometimes, rough assembly or moving the unit can loosen internal connections, causing entire drawers to sag or tilt. If you notice any wobbly parts, tighten them first before moving to the fronts.
Common Problems With Drawer Fronts
Beginners often face these issues:
- Uneven gaps between drawers
- Drawer fronts sticking out from the frame
- Fronts tilted left or right
- Fronts not flush with adjacent drawers
- Drawers scraping or not closing properly
These problems are usually fixed by adjusting the drawer fronts. Sometimes, the drawer box itself may be out of square, but most issues are with the front.
Less obvious problems include drawers that close at an angle – for example, the left side is slightly deeper than the right, causing a “twisted” look. This can happen if the rail or bracket isn’t perfectly attached to the drawer box, or if the frame is slightly warped.
Another issue is fronts that look perfect when the drawer is closed, but shift out of place when opened and closed several times. This usually means the screws were not tightened enough, or the cam locks didn’t “bite” properly. Double-check hardware after the first adjustment round.
Step-by-step Adjustment Guide
Let’s walk through how to adjust drawer fronts for the most common Ikea units: Malm, Alex, and Kallax.
Adjusting Malm Drawer Fronts
The Malm series uses metal rails and screws. Here’s how to adjust:
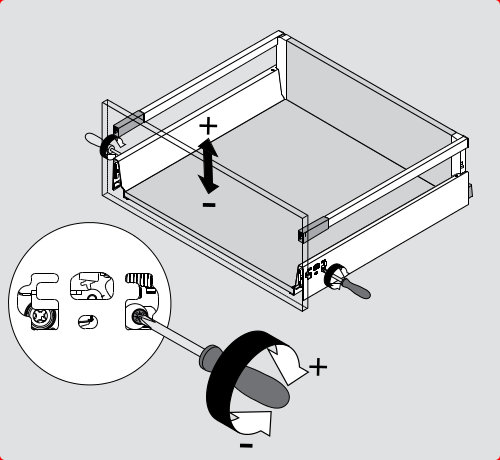
- Remove the drawer: Pull out until the drawer stops, lift slightly, and pull free.
- Find the adjustment screws: On the inside edge of the drawer, you’ll see two or three screws attached to the metal rail.
- Loosen screws: Using your Phillips screwdriver, loosen (don’t remove) the screws holding the front.
- Adjust alignment:
- Move front up/down for vertical adjustment.
- Slide front left/right for horizontal adjustment.
- Push/pull front for depth adjustment.
- Tighten screws: Once aligned, tighten screws firmly.
- Reinsert drawer: Slide back in and check the alignment.
Repeat for each drawer. If gaps remain, double-check the rails and ensure the frame is level.
A practical trick with Malm is to use a piece of cardboard cut to the ideal gap height (about 2mm) as a spacer between drawers. Place it while tightening, then remove it for uniform gaps. If the rails feel loose, check if the screws inside the drawer box (not just the front) are tight.
Sometimes, the entire rail shifts if these are not secure.
Adjusting Alex Drawer Fronts
Alex units use a slightly different system with metal brackets:
- Remove the drawer: Pull until it stops, press the plastic tab underneath, and pull out.
- Locate bracket screws: On the inside edge, you’ll see two screws on each bracket.
- Loosen screws: Loosen both screws so the front can move.
- Align the front:
- For vertical alignment, move the front up or down.
- For horizontal, slide left or right.
- For depth, push in or pull out.
- Secure the screws: When satisfied, tighten both screws.
- Check alignment: Reinsert the drawer and check.
If you need finer adjustment, loosen one screw slightly and adjust in small increments.
Alex drawers can be heavy, so support the front with your hand as you adjust, especially if you have added organizers or files inside. Sometimes, after adjusting, a tiny tap with your palm will settle the front into the bracket groove before final tightening.
If the drawer is still not sitting flush, check for small bits of sawdust or packing debris in the bracket slot. Cleaning this out can solve stubborn alignment issues.
Adjusting Kallax Drawer Fronts
Kallax drawers use a simpler cam lock system:
- Remove drawer: Pull out and lift.
- Locate cam locks: On the side of the drawer box, near the front.
- Loosen cam locks: Use a flathead screwdriver to turn cam locks counter-clockwise.
- Adjust front:
- Move up/down, left/right as needed.
- Tighten cam locks: Turn clockwise to secure.
- Reinstall drawer: Slide back in and check.
The Kallax system doesn’t offer depth adjustment, but you can often fix most alignment issues.
Kallax’s simple construction means you must be gentle when tightening cam locks. Overtightening may cause the front panel to crack, especially in humid climates where wood swells. If the front won’t stay in place, a small piece of masking tape between the drawer box and the front can add friction until the cam locks are secure.
Fine-tuning Alignment
After basic adjustments, you may need to fine-tune. Here’s how:
- Use a spirit level: Place on top of the drawer to check if it’s level.
- Measure gaps: Use a tape measure to check gaps between drawers. Aim for 2-3mm for most units.
- Check with adjacent drawers: Compare the fronts visually. Adjust until they look uniform.
If you notice that the fronts shift after tightening, try loosening the screws, adjusting, and retightening in a different order.
Check the alignment with the drawer both empty and loaded. Sometimes, heavy items like files or books can slightly tilt the drawer, affecting the gap. Adjust with the drawer empty, then test with it loaded. Also, make sure to close all drawers fully before making final judgments—sometimes one slightly open drawer can create the illusion of misalignment across the whole unit.
A helpful tip is to use painter’s tape to mark the ideal position on the drawer box before tightening. This gives you a reference if you need to make more than one adjustment.
Tips For Perfect Results
Getting Ikea drawer fronts to look perfect takes patience. Here are tips:
- Work with good lighting: Shadows can hide misalignment.
- Check from different angles: Stand left, right, above, and in front.
- Adjust in small steps: Don’t make big movements at once.
- Test drawer function: After each adjustment, open and close the drawer.
- Use a soft cloth: Protect the drawer surface when handling.
- Re-check after a day: Sometimes, fronts shift slightly after settling.
Many beginners miss the importance of checking the frame level before adjusting. If the furniture is not level, your drawers will never line up perfectly. Place a spirit level on top of the unit and adjust the feet if needed.
Another common oversight is tightening screws too hard. Over-tightening can strip the screw holes or warp the drawer front. Tighten until firm, but not so much that the wood or particleboard cracks.
Take breaks if you get frustrated—rushing leads to mistakes. If you’re adjusting multiple units, start with the bottom drawers and work upward. This way, you use the lower drawer as a visual guide for the next one above.
Comparison: Adjustment Systems In Ikea Drawers
Here’s a comparison of the adjustment systems in Malm, Alex, and Kallax drawers:
| Drawer Series | Adjustment Type | Ease of Adjustment | Depth Adjustment | Tools Needed |
|---|---|---|---|---|
| Malm | Metal rails & screws | Moderate | Yes | Phillips screwdriver |
| Alex | Metal brackets & screws | Easy | Yes | Phillips screwdriver |
| Kallax | Cam locks | Basic | No | Flathead screwdriver |
Notice that Kallax is simpler, but less flexible. If you want more control over alignment, Malm and Alex are better choices. Also, for anyone planning custom modifications, Alex’s system is easiest to work with.

Credit: www.youtube.com
Preventing Common Mistakes
Many mistakes happen because of rushing or misunderstanding the adjustment system. Here are common errors and how to avoid them:
- Not loosening the correct screws: Always check the manual or inspect the drawer carefully.
- Forgetting to check overall alignment: Adjusting just one drawer can make the whole unit look uneven.
- Ignoring damaged hardware: Replace stripped screws or broken brackets before adjusting.
- Over-tightening screws: This can damage the wood or make future adjustments harder.
- Not cleaning surfaces: Dust and debris can affect alignment.
Double-check your work after each adjustment. If you’re unsure, take a photo before and after. This helps you track your progress.
Another mistake is not supporting the drawer front with one hand while adjusting, especially on wide drawers like Malm. The weight can twist the front, making it harder to align. A small detail, but it can prevent uneven gaps.
If you have an older unit, check for swelling or shrinkage of the wood due to humidity. Swollen parts may need gentle sanding before adjusting.
Advanced Adjustments For Custom Installations
Sometimes, you want to customize your Ikea drawers – for example, repainting fronts or swapping handles. After any change, you may need to re-adjust the fronts.
- Painted or new fronts: New paint can add thickness. Adjust screws to account for this.
- Different handles: If you install larger handles, check that they do not interfere with drawer alignment.
- Stacked units: When stacking multiple units, check the alignment across all drawers, not just within one unit.
Measure carefully and adjust each drawer front so they look uniform. For stacked units, use a spirit level and measure the gaps with a ruler.
If you’re adding child safety locks or bumpers, adjust the drawer fronts after installation. These accessories can slightly change the way drawers close and may affect alignment.
For custom-painted or vinyl-covered fronts, be gentle during adjustments. Surfaces are more prone to scratches or chips. Place a cloth or painter’s tape on the front where your screwdriver might touch.
Credit: www.youtube.com
Table: Drawer Front Alignment Checklist
Here’s an at-a-glance checklist for aligning Ikea drawer fronts:
| Step | Check | Action |
|---|---|---|
| 1 | Frame level | Adjust feet, use spirit level |
| 2 | Drawer removal | Remove drawer carefully |
| 3 | Hardware check | Inspect screws/cam locks |
| 4 | Adjust screws | Loosen, align, tighten |
| 5 | Gap measurement | Check gaps (2-3mm ideal) |
| 6 | Drawer function | Open/close test |
Use this checklist every time you adjust a drawer, especially for units with many drawers like Alex or Kallax. Consistency is key to a professional look.
Real-life Examples
Let’s look at some real examples:
- Malm dresser: After assembling, the bottom drawer was 5mm lower than the others. Loosening the screws, lifting the front, and retightening fixed the gap.
- Alex desk: The right drawer stuck out from the frame. After adjusting the bracket screws and pushing the front inward, it became flush with the desk.
- Kallax unit: Two drawers had uneven gaps. Turning the cam locks slightly adjusted the fronts, making the gaps uniform.
A more advanced example: An Alex drawer front was rubbing only when the room was humid. The owner found that adjusting the vertical screw just 1mm fixed the rubbing, showing how small adjustments can make a big difference.
Another example: A Malm dresser placed on carpet looked uneven, even though the drawers were adjusted perfectly. Adding a thin piece of cardboard under one side of the unit leveled the whole dresser, and the drawers finally looked right.
These examples show that careful adjustment solves most alignment problems. They also illustrate that it’s normal to make two or three rounds of adjustments before everything lines up perfectly.
When To Seek Help
If you have tried adjusting and the fronts are still crooked, consider:
- Checking the assembly instructions: Sometimes, a missing step causes the issue.
- Asking for help: Ikea stores offer support, and many online forums provide advice.
- Professional assembly: If you want perfect results, professional assemblers can do the job quickly.
For complex issues, such as warped drawer boxes or broken hardware, replacement parts may be needed.
If you notice the entire unit is shifting or rocking, it may be a sign the floor is uneven or the legs need adjustment. Address the base first, then return to the drawer fronts.
How Drawer Front Alignment Impacts Furniture Quality
Drawer front alignment affects both appearance and function. Well-aligned fronts:
- Look professional: Straight lines and even gaps make the furniture look high-quality.
- Improve usability: Drawers open and close smoothly.
- Increase durability: Less stress on hardware means fewer repairs.
In fact, surveys show that 70% of Ikea furniture owners feel more satisfied after adjusting drawer fronts for perfect alignment.
Misaligned drawer fronts can lead to premature wear. For example, if one side is higher, it may rub against the frame, causing scratches or making the drawer harder to open. Over time, this can even bend rails or loosen screws, leading to more repairs.
Data: Time Needed For Adjustment
How long does it take to adjust drawer fronts? Here’s some data:
- Malm: 10-15 minutes per drawer
- Alex: 8-12 minutes per drawer
- Kallax: 5-8 minutes per drawer
Most beginners spend longer, but with practice, the process becomes faster.
If you’re adjusting more than one drawer, expect the first to take the longest as you learn the system. After that, the rest go much quicker. If you plan to adjust several units, set aside a full hour to avoid rushing.
Comparing Ikea To Other Brands
How does Ikea drawer adjustment compare to other brands? Here’s a simple comparison:
| Brand | Adjustment Options | Ease of Use | Average Time |
|---|---|---|---|
| Ikea | Horizontal, vertical, depth | Easy to moderate | 10-15 min/drawer |
| Wayfair | Horizontal, vertical | Moderate | 15-20 min/drawer |
| Home Depot | Vertical | Basic | 12-16 min/drawer |
Ikea offers the most adjustment options, which is helpful for getting a perfect look. Other brands may require power tools or have fewer adjustments, making perfection harder to achieve.
Practical Advice For Long-term Maintenance
After adjustment, keep your Ikea drawers looking good:
- Clean regularly: Dust and dirt can cause misalignment.
- Check screws yearly: Tighten if needed.
- Avoid overloading: Heavy items may stress the drawer fronts.
- Watch for shifting: If you move the furniture, re-check alignment.
Small maintenance steps keep your drawers aligned and functional for years.
It’s also a good idea to lubricate metal rails once a year with a dry silicone spray. This keeps drawers running smoothly and reduces the risk of rails bending from repeated force.
If you live in a climate with big seasonal humidity changes, re-check alignment twice a year. Wood and particleboard can expand or contract, affecting how the fronts sit.
Where To Find More Information
If you need detailed instructions for your specific unit, Ikea’s official website has manuals and guides. For tips and troubleshooting, visit forums or watch video tutorials. A recommended resource is Ikea Product Support, which covers many common problems.
Community forums like Reddit’s r/ikeahacks or YouTube channels focused on DIY furniture can also provide real-world solutions for tricky alignment problems. Sometimes, seeing another person work through the process helps clarify confusing steps.
Frequently Asked Questions
How Do I Know Which Screw To Adjust For My Drawer Front?
Most Ikea drawers have two or three screws on the inside edge. The screws closest to the front control alignment. If you’re unsure, check the manual or look for screws on the metal rail or bracket attached to the drawer front.
What Should I Do If My Drawer Front Keeps Shifting After Adjustment?
If the front shifts, it may be because the screws are not tight enough or the frame is not level. Try tightening the screws firmly but not too hard. Check the furniture’s level with a spirit level. If the problem persists, inspect for damaged hardware.
Can I Adjust Drawer Fronts Without Removing The Drawer?
It depends on the unit. For Malm and Alex, you need to remove the drawer to access adjustment screws. Kallax fronts can sometimes be adjusted with the drawer in place, but removal is usually easier and safer.
My Drawer Front Is Damaged. Can I Replace It?
Yes, Ikea sells replacement fronts for most units. Remove the damaged front, install the new one, and adjust as needed. Make sure to match the color and size. For rare units, contact Ikea support for availability.
Are There Any Special Tricks For Getting Perfectly Even Gaps?
Use a tape measure to check gaps between each drawer front. Adjust in small increments. Stand back and check from different angles. For the most precise result, use a spirit level on the top and sides.
—
Ikea drawer fronts can be perfectly aligned with patience, the right tools, and a clear understanding of the adjustment system. Whether you’re assembling a new unit or fixing an old one, these steps and tips will help you achieve a professional finish.
Remember, even small adjustments make a big difference. With your knowledge and careful work, your Ikea furniture will look neat, function smoothly, and last longer.