
Building your own kitchen cabinet base can seem complicated, but with the right guidance, you can make cabinets that fit your kitchen perfectly and last for years. Many homeowners today want to update their kitchens without spending a fortune. Learning how to build a kitchen cabinet base gives you control over quality, design, and cost.
This guide will walk you through each step, from planning and choosing materials to assembly and installation. You’ll find practical advice, simple explanations, and pro tips that even beginners can follow. You’ll also learn how to avoid common mistakes, customize your cabinets, and finish the project with confidence.
Planning Your Kitchen Cabinet Base
Before you pick up any tools, start with a clear plan. Good planning saves time and prevents mistakes later. A well-thought-out plan also helps you buy only what you need, reducing waste and extra costs.
Measuring Your Space
Use a tape measure to check the width, depth, and height of your kitchen area. Standard cabinet bases are usually 24 inches deep and 34.5 inches high (without countertop). The width depends on your kitchen layout and needs.
- Measure along the wall where cabinets will sit. Start from one corner and measure the full length.
- Note any windows, doors, or appliances. Mark the positions of sinks, stoves, and outlets.
- Check floor level; uneven floors mean shims may be needed. Place a long level on the floor at different spots to check for dips or bumps.
If your kitchen has odd angles, use a framing square or even a cardboard template to trace the space. This makes it easier to design cabinets that fit perfectly. Beginners often overlook wall irregularities, which can lead to gaps behind cabinets or tricky installations.
Deciding Cabinet Types And Sizes
Cabinet bases come in different types:
- Base cabinets: For general storage, under sinks, or for drawers.
- Corner cabinets: For tricky corners, often with a lazy Susan.
- Drawer bases: For utensils and smaller items.
Choose sizes that fit your kitchen and style. For example, a 36-inch base is common under sinks, while drawer bases can be 12-30 inches wide.
Also, consider your needs. If you cook a lot, you may want more drawer bases for utensils and pans. If you have big pots, make sure at least one cabinet is wide and deep enough for them.
Sketching Your Layout
Draw a simple layout on paper. Mark where each cabinet will go, including appliances and plumbing. This helps you visualize the project and spot any problems.
Use graph paper for more accuracy, where one square equals one inch. Mark distances between cabinets and appliances to make sure doors and drawers will open fully. If your kitchen is small, consider using online design tools to test different layouts before you start building.
Material Planning
Choose materials for:
- Cabinet box: Usually plywood or particle board.
- Face frame: Solid wood (like maple, oak, or poplar).
- Back panel: Thinner plywood or MDF.
- Toe kick: Same material as the cabinet box.
Plywood is stronger and lasts longer, but particle board is cheaper. For humid climates or heavy use, always pick plywood.
Don’t forget to plan for hardware—hinges, drawer slides, and handles. It’s easy to focus on wood and ignore the small items, but these parts are essential for a good finish and working cabinets.
Choosing Materials And Tools
Your cabinet’s quality depends on materials and tools. It’s wise to invest in good plywood and basic woodworking tools. Choosing the right materials also makes the build easier and the result more attractive.
Material Comparison
Here’s a quick comparison of common materials:
| Material | Strength | Cost | Moisture Resistance | Best Use |
|---|---|---|---|---|
| Plywood | High | Higher | Good | Cabinet box, face frame |
| Particle Board | Medium | Lower | Poor | Budget cabinets |
| MDF | Medium | Medium | Fair | Back panel, interior |
| Solid Wood | High | Highest | Excellent | Face frame, drawer fronts |
A non-obvious detail: Plywood comes in different grades (A, B, C, D). Grade A has the best surface for painting or staining. Beginners often buy the cheapest plywood, but it can have surface defects or weak spots.
Essential Tools
You don’t need expensive equipment. Basic tools include:
- Circular saw or table saw
- Drill and drill bits
- Clamps
- Screwdriver
- Tape measure
- Carpenter’s square
- Sander or sandpaper
- Wood glue
Optional tools like a pocket-hole jig or router can make assembly easier and more professional.
Don’t forget safety equipment: safety glasses, hearing protection, and a dust mask. Woodworking creates fine dust that can irritate your lungs.
Buying Materials
Purchase from local hardware stores or lumberyards. Always check for straightness and quality. Avoid warped plywood and cracked boards.
If you’re new to woodworking, ask staff for help choosing the right wood. Some stores will cut large sheets for you, making transport easier. Compare prices and quality—sometimes paying a little more saves a lot of frustration.
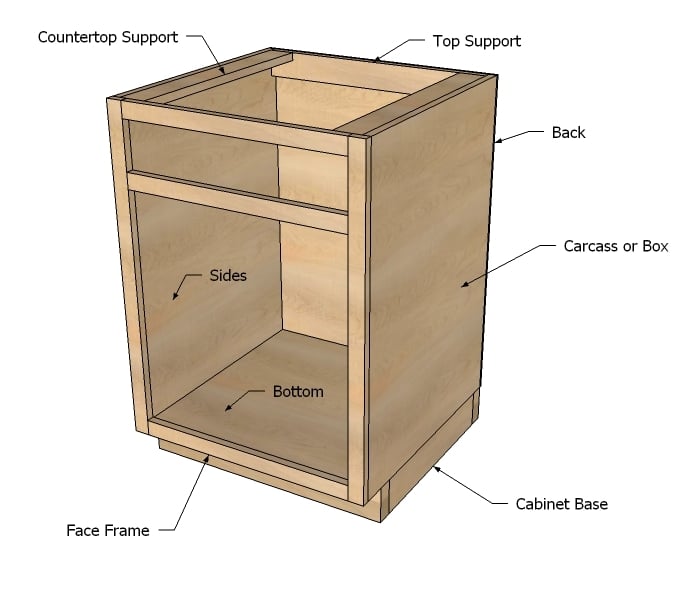
Credit: www.ana-white.com
Cutting And Preparing Your Cabinet Parts
Careful cutting and preparation are key to strong, neat cabinets. Work slowly and double-check measurements. Rushing this step leads to uneven cabinets and poor fit.
Cutting Cabinet Sides, Bottom, And Top
Most cabinet bases have two sides, a bottom, and sometimes a top panel. Here’s a standard set of dimensions:
- Sides: 34.5 inches high x 24 inches deep
- Bottom: 24 inches deep x cabinet width
- Top (optional): Same as bottom
Mark cut lines clearly before sawing. Use a circular saw with a guide for straight cuts.
When cutting, support plywood with sawhorses or a flat surface. Cutting on an uneven surface can cause splintering or binding. For best results, use painter’s tape over the cut line to reduce splinters, especially on plywood.
Back Panel
Cut a thin sheet (¼-inch plywood or MDF) to cover the back. This holds the cabinet square and protects contents.
Some builders make the back panel removable to reach plumbing or wires later. If you do this, attach the back with screws instead of nails.
Toe Kick
Toe kick is a recessed area at the bottom, usually 3 inches high and 3 inches deep. It makes standing at the cabinet more comfortable.
Cut the toe kick out of the bottom of each side panel. This step is often missed by beginners, leading to uncomfortable cabinets.
A practical tip: Use a jigsaw for curved cuts or corners. If you plan to add a separate toe kick cover, leave a groove in the side panels for easier installation.
Face Frame
Face frames cover the cabinet front edges and give strength. Use solid wood strips:
- Top rail: Width of cabinet
- Bottom rail: Width minus toe kick
- Stiles: 1.5–2 inches wide, height of cabinet
Cut these pieces after box parts are ready.
Sand the frame pieces before attaching. This makes finishing easier and prevents rough edges on the final cabinet.
Assembly: Building The Cabinet Box
Now it’s time to assemble your cabinet base. This stage requires patience and precision. Careful assembly means your doors and drawers will line up and work smoothly.
Dry Fitting
Before gluing or screwing, do a dry fit:
- Arrange all parts without fastening.
- Check for gaps and squareness.
- Make adjustments before final assembly.
This step shows you how everything fits together and lets you fix mistakes before they become permanent.
Joining Sides And Bottom
Use wood glue and screws to attach sides to the bottom panel. Clamp pieces tightly for a strong bond. Drill pilot holes to prevent wood splitting.
Countersink screws slightly below the surface, so you can fill holes with wood filler for a smooth finish.
Attaching The Back Panel
Glue and nail the back panel to the box. This helps keep the cabinet square. For heavy cabinets, use thicker plywood for the back.
Check for squareness again before the glue dries. If you wait too long, the box can set out of square and be hard to fix.
Adding The Toe Kick
Attach toe kick pieces under the cabinet. Some designs use a separate toe kick frame, which makes installation easier.
If using a separate frame, build it from the same plywood and screw it to the cabinet bottom. This lets you adjust the cabinet’s height during installation.
Installing The Face Frame
Glue and nail the face frame to the front edges. Use clamps to hold the frame until glue dries. Pocket-hole screws can make joints stronger and invisible.
If you want a modern look, skip the face frame and use edge banding instead. This is common in European-style cabinets.
Common Mistakes And How To Avoid Them
- Not checking for square: Cabinets must be square, or doors won’t fit.
- Using weak materials: Cheap particle board often fails in humid kitchens.
- Skipping toe kick: This makes the cabinet hard to use and look unfinished.
Another mistake: Not labeling parts. Mark each piece with its position and orientation. This prevents confusion during assembly, especially if you build several cabinets at once.
Installing The Cabinet Base
Once your cabinet box is built, installation is the next step. Proper installation ensures your cabinet lasts and works well. A wobbly or uneven cabinet will cause problems with doors, drawers, and countertops.
Preparing The Kitchen
Clear the area and check the floor for level. Uneven floors require shims under the cabinet base.
Remove any baseboards or trim where the cabinet will sit. If you skip this, your cabinet may not fit flush against the wall.
Placing The Cabinet
Set the cabinet in position. Use a carpenter’s level to check for flatness. Adjust with shims as needed.
If installing several cabinets, start in a corner and work outward. This keeps everything lined up.
Securing To The Wall
Drill holes through the back panel into wall studs. Use long screws (2–3 inches) for solid attachment. If you’re joining several cabinets, clamp them together before screwing.
Drive screws through the thickest part of the cabinet (usually the top rail) for strongest support. For brick or concrete walls, use masonry anchors.
Installing Toe Kick Cover
Some cabinets use a removable toe kick cover. Attach it after cabinets are installed. This hides gaps and gives a finished look.
You can add shoe molding at the floor for a custom appearance and to cover small gaps.
Checking Fit And Alignment
Open and close doors, check drawer movement, and make sure everything lines up. Small adjustments now prevent bigger problems later.
If doors rub or bind, adjust the hinges. Check for gaps between cabinets and fill with trim as needed.
Building Corner And Drawer Bases
Corner cabinets and drawer bases require special steps. Many beginners skip these details, leading to wasted space or poor function. Taking time with these cabinets improves storage and kitchen flow.
Corner Cabinets
Corner cabinets maximize space in kitchen corners. They often use a diagonal or L-shaped design.
Steps:
- Measure carefully, as corners are rarely perfect. Use a template or mock-up if possible.
- Build with extra supports for stability.
- Add a lazy Susan if desired.
Corner cabinets need strong joints, as they handle more weight and movement.
Non-obvious tip: Use adjustable shelves in corner cabinets. Fixed shelves are hard to reach, but adjustable ones let you customize the space.
Drawer Bases
Drawer bases require accurate sizing for drawers to slide smoothly.
Steps:
- Cut sides and bottom as for standard bases.
- Add vertical supports for drawer slides.
- Install slides according to manufacturer instructions.
- Check for alignment before attaching drawer fronts.
A common mistake is misaligned slides, which make drawers stick or wobble.
For deep drawers, use full-extension slides so you can reach everything inside. Shallow slides limit access and waste space.
Building Multiple Cabinets: Tips For Consistency
If you’re making several cabinets, consistency matters. Small errors add up, so follow these steps:
- Cut all similar parts at once for uniformity.
- Use a stop block or guide on your saw for repeat cuts.
- Assemble boxes side-by-side, checking for matching height and depth.
- Label parts clearly to avoid confusion.
Pro tip: Build a simple jig for repetitive tasks, like drilling shelf pin holes or cutting face frame pieces.
Another non-obvious tip: Stack assembled cabinets together when checking for squareness. This helps you see small differences and fix them before installation.
Cabinet Base Designs And Customization
Kitchen cabinet bases come in many designs. Personalizing your cabinets gives your kitchen a unique look and better function. Even small changes, like adding organizers or built-in features, can make your kitchen easier to use every day.
Popular Cabinet Designs
| Design | Features | Best For |
|---|---|---|
| Standard Base | Simple box, doors or drawers | General storage |
| Drawer Base | Multiple drawers | Utensils, small items |
| Corner Cabinet | L-shaped or diagonal, lazy Susan | Kitchen corners |
| Open Shelving Base | No doors, open shelves | Display, easy access |
| Pull-out Base | Pull-out trays or bins | Trash, recycling |
Customization Options
You can customize cabinets with:
- Adjustable shelves
- Pull-out trays
- Special hardware (soft-close hinges, drawer slides)
- Built-in lighting
Custom features improve storage and make the kitchen more comfortable.
Consider adding dividers for pans, spice racks, or recycling bins. These small upgrades make daily use easier and keep your kitchen organized.
Finishing Your Cabinet Base
Finishing protects wood and gives cabinets a professional look. Steps include sanding, painting, or staining. A good finish also makes cleaning easier and prevents water damage.
Sanding
Sand all exposed surfaces with 120–220 grit sandpaper. Remove dust before finishing.
Start with lower grit (120) for rough surfaces, then use higher grit (220) for smoothness. Sand with the grain to avoid scratches.
Vacuum or wipe with a tack cloth before painting or staining. Dust left behind can ruin your finish.
Painting Or Staining
Choose paint or stain based on your kitchen style:
- Use primer before painting for smooth finish.
- Apply stain with a cloth, then wipe off excess.
- Finish with clear coat (polyurethane) for protection.
Two or three coats are best for durability. Allow proper drying between coats.
If you want a glossy look, use high-gloss paint or multiple layers of polyurethane. For a rustic look, use matte finishes.
Installing Hardware
Attach hinges, drawer slides, and handles after finishing. Pre-drill holes to avoid splitting wood.
Take time to align handles and knobs. Use a template or jig for even spacing. Misaligned hardware is very noticeable and hard to fix once installed.
Safety And Practical Tips
Building cabinets involves sharp tools and heavy materials. Stay safe and work smart.
- Wear safety glasses and ear protection.
- Keep your workspace clean and organized.
- Lift heavy cabinets with help to avoid injury.
- Always unplug tools when changing blades or bits.
Non-obvious tip: Use painter’s tape along cut lines to reduce splintering on plywood.
Also, wear gloves when handling rough lumber to avoid splinters. Check cords and plugs on power tools before use.
Estimating Cost And Time
Building your own cabinet base is cheaper than hiring a professional, but plan carefully.
Typical Costs
- Materials: $100–$300 per cabinet (plywood, hardware, finish)
- Tools: $150–$400 (if you need to buy basic tools)
- Time: 6–12 hours per cabinet for beginners
Costs vary by location, material choice, and complexity. Buying pre-cut kits saves time but costs more.
Remember to budget for sandpaper, screws, glue, and any special tools. These small costs add up quickly if you’re making several cabinets.
Comparison: Diy Vs. Buying Cabinets
| Option | Cost | Quality | Customization | Time Needed |
|---|---|---|---|---|
| DIY | Lower | High (if good materials) | Full control | Higher |
| Store-bought | Higher | Medium | Limited | Lower |
| Custom-built (by pro) | Highest | High | Full control | Lowest (no DIY labor) |
Non-obvious insight: Many DIYers forget to include hardware and finishing costs, leading to budget surprises.
Another common mistake is underestimating time. Always add extra hours for unexpected problems and finishing steps.
Troubleshooting Common Problems
Even with careful planning, problems can happen. Here’s how to solve them:
Cabinet Not Square
Check with a carpenter’s square. If off, loosen screws, adjust, and re-tighten. Use clamps to force square.
If the box is glued and cannot be adjusted, add diagonal braces to pull it back into shape.
Doors Won’t Fit
Measure face frame and door opening. Adjust hinges or sand door edges as needed.
If doors overlap, check if the cabinet is out of square or if the face frame is misaligned.
Cabinet Wobbles
Add shims under the cabinet or check for missing screws. Secure to wall studs for stability.
For tall cabinets, attach the top to wall studs as well as the base.
Drawer Sticks
Check slide alignment. Lubricate slides or adjust supports.
If drawers are still tight, sand the sides lightly and check for obstructions.
Finish Looks Uneven
Sand again and apply another coat. Thin paint or stain if too thick.
Work in good light so you can see streaks or missed spots.

Credit: www.youtube.com
Practical Examples And Pro Tips
Learning from real situations helps avoid mistakes.
- Example: Sarah built her first cabinet with particle board. After one year, water damage ruined it. Next time, she used plywood and finished edges to prevent swelling.
- Example: Mike used a pocket-hole jig for face frames. His cabinets looked professional and doors fit perfectly.
Pro tips:
- Always check for square after each step.
- Label every piece before assembly to avoid confusion.
- Use a stop block on your saw for repeat cuts.
Another real-world tip: If you’re unsure about your design, build a small test cabinet first. This lets you practice cuts and assembly before starting on your real kitchen.
Frequently Asked Questions
What’s The Best Material For Kitchen Cabinet Bases?
Plywood is the best for most homes. It’s strong, resists moisture, and holds screws well. Avoid particle board in humid kitchens.
How Do I Make Sure My Cabinets Are Square?
Use a carpenter’s square after every step. Clamp parts and measure diagonally; both diagonals should match.
Can I Build Cabinets Without Expensive Tools?
Yes, you need basic tools like a drill, saw, and clamps. Fancy tools help but aren’t required.
How Much Does It Cost To Build A Cabinet Base?
Most projects cost $100–$300 per cabinet for materials. Tools may cost more if you don’t own them.
Where Can I Find Reliable Cabinet Plans?
Check trusted sites like Family Handyman for free plans and guides.
Building your own kitchen cabinet base is challenging but rewarding. You gain new skills, save money, and get cabinets that fit your kitchen exactly. With careful planning, quality materials, and patience, anyone can make durable, beautiful cabinets. Take your time, follow each step, and enjoy your new kitchen space.
Credit: www.youtube.com