
Decorating a hutch is more than just putting items on shelves. It’s about creating a display that feels personal, welcoming, and fits your home’s style. A hutch can be a focal point in a dining room, kitchen, living room, or even a hallway.
Yet, many people feel overwhelmed when they look at those empty shelves and wonder where to start. If you’ve ever stood in front of your hutch, unsure what to do, you’re not alone.
This guide will walk you through every part of hutch decoration—from planning your look to choosing items, arranging them, and adding finishing touches. You will learn not just the basics, but also the details that make a hutch display look polished and professional. Whether your style is modern, farmhouse, vintage, or something unique, you’ll find advice that fits. Let’s unlock the full potential of your hutch and turn it into a beautiful showpiece.
Understanding Your Hutch
Before you start decorating, take a close look at your hutch. Every hutch is different in size, shape, and style. Some have glass doors, others open shelves. Some are tall and narrow, others wide and low.
Ask yourself a few questions:
- How much space do you have on each shelf?
- Are there drawers or cabinets below?
- Is the back solid wood or glass?
- What is the color and finish of the hutch?
Knowing these details will help you decide what items to use and how to arrange them. For example, a dark wood hutch looks different with bright ceramics than a white painted one. Glass doors may need less clutter, while open shelves invite layering.
Non-obvious insight: Always check the weight limit of your shelves, especially if you have vintage or antique furniture. Heavy pottery or stacks of dishes can cause older shelves to sag or even break over time.
Defining Your Style
Your hutch should reflect your taste and match the style of your room. There are many directions you can go:
- Classic: Think of formal china, silverware, and crystal. Symmetrical arrangements work well here.
- Farmhouse: Use vintage dishes, mason jars, wood accents, and soft colors.
- Modern: Go for clean lines, bold colors, and minimal accessories.
- Eclectic: Mix and match items from different eras and styles.
If you’re unsure, start by looking at your room’s decor. If your dining room is full of rustic textures, a farmhouse or vintage hutch will fit better. For a sleek kitchen, modern displays make sense.
Practical tip: Save inspiration photos from magazines or websites. Notice what you like about them. Is it the color scheme? The way items are grouped? The types of objects?
Planning Your Hutch Layout
A good hutch display starts with a plan. You don’t have to be an artist—just sketch a rough layout or list what you’d like to show.
- Choose a focal point: Every hutch needs something that draws the eye. This can be a large platter, a piece of art, or a collection.
- Balance the display: Don’t put all big items on one side. Try to spread size, color, and shape across the shelves.
- Think in layers: Place taller items at the back, medium in the middle, and small pieces in front.
- Leave some space: Empty space helps your items stand out and makes the hutch feel less crowded.
Here’s a simple layout comparison for a typical three-shelf hutch:
| Shelf | Classic Style | Modern Style | Farmhouse Style |
|---|---|---|---|
| Top | Crystal vases, candlesticks | Bold art, geometric sculpture | Woven baskets, vintage tins |
| Middle | Fine china plates (centered) | Minimal plates, one accent bowl | Mason jars, creamware pitchers |
| Bottom | Serving platters, silver tray | Simple white dishes | Wooden cutting boards, enamelware |
Choosing What To Display
What you put in your hutch depends on its location and your lifestyle. Here are some popular choices:
- Dinnerware: Plates, bowls, and cups. Use matching sets for a formal look or mix for casual style.
- Glassware: Wine glasses, goblets, and pitchers add sparkle.
- Collectibles: Figurines, teacups, or other small items with meaning.
- Books: Old cookbooks or beautiful hardcovers can add color and interest.
- Baskets and Boxes: Useful for storage and add texture.
- Plants or Flowers: Small potted plants or fresh flowers bring life.
- Artwork or Photographs: Lean a framed piece against the back.
- Seasonal Decor: Rotate items for holidays or seasons.
Beginner mistake: Filling the hutch with only one type of item, like all plates or only glassware. Mix shapes, heights, and materials to keep it interesting.
Step-by-step: Decorating Your Hutch
Let’s break down the process into manageable steps:
1. Clear And Clean
Start with a completely empty hutch. Dust shelves and clean glass or mirrors. This blank slate helps you see the space with fresh eyes.
2. Add A Backdrop (optional)
If your hutch has a plain back and you want more color, add a backdrop. You can use wallpaper, fabric, or even paint. This is a quick way to change the look without damaging the hutch.
Insight: Removable wallpaper is a great option for renters or if you like to change your style often.
3. Place Large Items First
Begin with the biggest pieces. These usually go in the center or at the back. For example, set a large platter upright on the middle shelf.
4. Layer Medium And Small Items
Next, add medium items like bowls or vases, then fill gaps with smaller objects. Group items in odd numbers (3 or 5) for a natural look.
5. Balance Each Shelf
Step back and check if the shelves feel balanced. Move items as needed. If one side looks heavy, add something similar in size or color to the other side.
6. Add Texture And Greenery
Mix different materials—glass, wood, metal, and ceramics. Add a small plant or a sprig of greenery for a fresh touch.
7. Final Details
Place the smallest accents last: a favorite mug, a tiny sculpture, or a family photo.
8. Edit
Remove anything that feels too crowded or doesn’t fit. Less is often more.
Styling Tips For Every Room
A hutch can live in almost any room. Adjust your display to fit its space.
Dining Room
This is the classic spot for a hutch. Show off your best dishes, serving pieces, and glassware. Keep everyday items easy to reach.
Kitchen
Use the hutch for extra storage—bowls, cookbooks, baking tools, or even a small coffee station.
Living Room
Display books, framed photos, candles, and decorative boxes. Hide clutter in lower cabinets.
Entryway Or Hall
Use baskets for keys and mail, add a lamp, and display a few favorite objects.
Expert tip: Avoid putting too many fragile or valuable items in high-traffic areas like an entryway, especially if you have children or pets.
Mixing Function And Beauty
A hutch is not just for looks—it can also be practical storage. The best displays combine both.
- Use baskets or boxes to hide small items you don’t want visible.
- Store everyday dishes on lower shelves for easy access.
- Keep seasonal or special-occasion pieces up high.
Non-obvious tip: If you use your hutch daily, leave some space free to make it easier to take things out and put them back.
Creating Visual Interest
Even a small hutch can become interesting with a few tricks:
- Vary the heights of objects.
- Use color blocks—group items of similar color together.
- Add something unexpected, like a piece of art or a small lamp with a soft glow.
Here’s a quick comparison of ways to add visual interest:
| Technique | Effect | Best For |
|---|---|---|
| Stacking books horizontally | Adds height and texture | Modern, casual styles |
| Leaning plates or art | Creates depth | Classic, farmhouse, eclectic |
| Using plants | Brings life and color | All styles |
| Mixing materials | Prevents a “flat” look | Eclectic, modern |
Color And Lighting
Color can change the mood of your hutch completely.
- For a calm, classic look, stick to two or three colors (like white, blue, and silver).
- For a bold, eclectic look, mix bright colors and patterns.
- For a farmhouse feel, use soft, muted shades and natural textures.
Lighting also matters. If your hutch is in a dark corner, add a small lamp or battery-powered LED lights. Lighting highlights your favorite pieces and makes the whole space feel warmer.
Beginner mistake: Ignoring lighting. Even the prettiest display can look dull if it’s not well lit.
Rotating Displays Seasonally
One way to keep your hutch fresh is to change the display for different seasons. This doesn’t mean starting from scratch—just swap a few items.
- Spring: Add pastel dishes, fresh flowers, or bunny figurines.
- Summer: Use bright colors, beachy accents, or shells.
- Autumn: Bring in pumpkins, leaves, or warm metals like copper.
- Winter: Try pinecones, candles, and holiday dishes.
Practical tip: Keep a box for each season’s décor. When you change items, you always know where to find them.
Common Mistakes And How To Avoid Them
Even with the best intentions, it’s easy to make mistakes when decorating a hutch. Here are some to watch out for:
- Overcrowding: Too many items make the hutch look messy. Give objects room to breathe.
- Ignoring Scale: Tiny objects get lost on big shelves. Use larger items to fill space.
- No Focal Point: Every shelf needs something that stands out.
- Lack of Variety: Using only one color or material makes the hutch boring.
- Poor Lighting: Dark shelves hide your best pieces.
Expert advice: Take a photo of your finished hutch. Sometimes, you’ll notice things in a picture that you miss in person, such as an unbalanced shelf or too much clutter.
Adapting Your Hutch For Special Occasions
A hutch is a perfect spot to show off for holidays or celebrations. For example:
- Hang a small garland or wreath on the hutch doors for Christmas.
- Display birthday cards or photos for a family celebration.
- Use themed dishes or décor for Valentine’s Day, Easter, or Halloween.
Practical insight: Use removable hooks or tape to hang decorations without damaging the hutch.
Caring For Your Hutch
A beautiful display is only part of the story. Keeping your hutch clean and in good condition matters too.
- Dust shelves and items regularly.
- Wash display dishes or glassware occasionally to remove dust.
- Avoid direct sunlight if possible; it can fade wood and ceramics.
- Use shelf liners to protect wood from scratches or spills.
Non-obvious tip: If you have valuable antiques, check for signs of woodworm or other pests. Regular inspection can prevent serious damage.
Making It Personal
Anyone can copy a magazine photo, but the best hutches feel personal. Add items with meaning—a mug from your travels, a photo of your family, a piece made by a friend. These touches make your hutch unique to you.
Beginner insight: Don’t be afraid to break the “rules.” If you love something, display it proudly.
When To Rearrange
You don’t have to keep your hutch the same forever. Rearranging every few months keeps things interesting and lets you clean the shelves.
- Change displays for the seasons.
- Swap items when you get something new.
- Rearrange after a big family meal or holiday.
Pro tip: Involve family members—kids love helping choose what goes on display, and it’s a great way to share memories.
Advanced Styling Techniques
Once you’re comfortable, try these advanced ideas:
- Symmetry vs. Asymmetry: Symmetrical displays are formal, while asymmetrical ones feel relaxed and modern.
- Theme Grouping: Group by color, material, or theme (like all blue dishes, or all wooden objects).
- Using Negative Space: Leave some shelves half-empty for a modern look.
- Layering Art: Lean two pieces of art or plates, one in front of the other, for depth.
Insight: Professional stylists often mix old and new items, shiny and matte surfaces, and even add a “surprise” item—a quirky figurine or bold color—for interest.
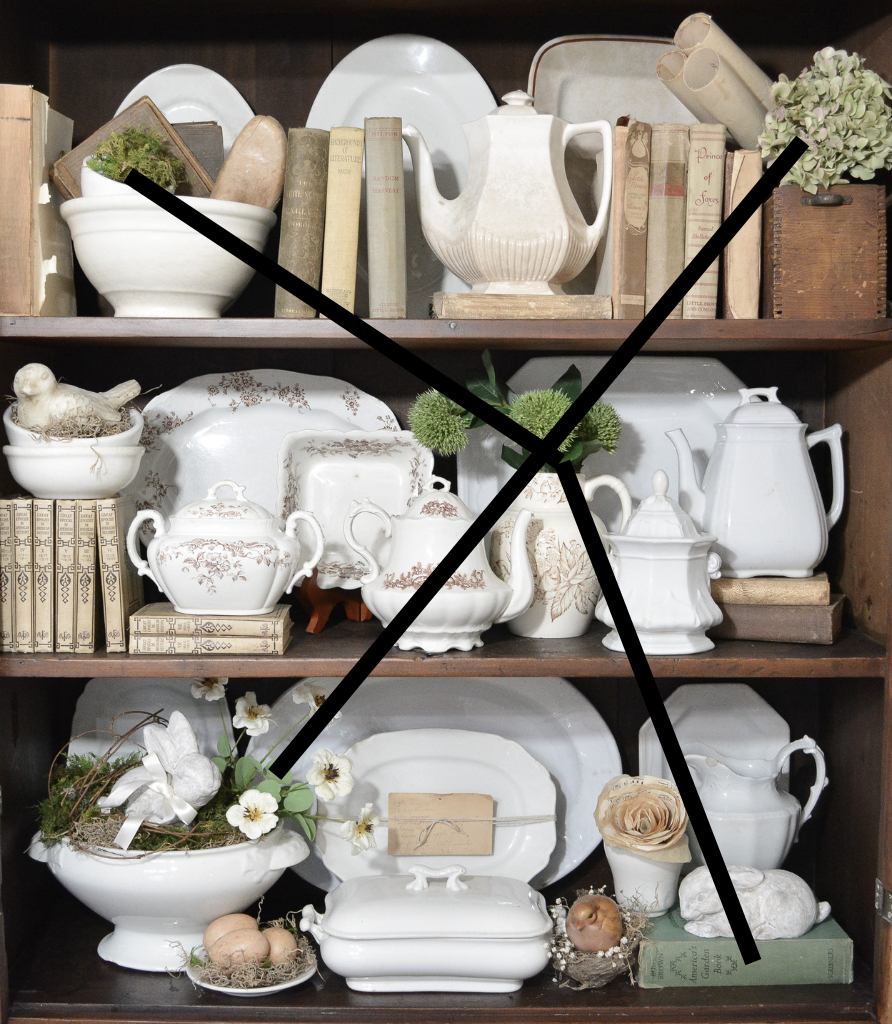
Credit: janetclarkathome.com
Decorating Small Vs. Large Hutches
Not all hutches are the same size, and your approach should fit the space.
Small Hutch
- Choose fewer, bolder pieces.
- Use vertical space—stack books or plates.
- Don’t crowd shelves; empty space is your friend.
Large Hutch
- Use larger items to fill space.
- Group small items in trays or baskets to avoid clutter.
- Add lighting to keep the whole display visible.
Here’s a quick size comparison:
| Hutch Size | Best Items | Common Pitfalls |
|---|---|---|
| Small | One collection, simple dishes, mini plants | Overcrowding, too many small items |
| Large | Platters, art, baskets, books, layered objects | Empty “dead” zones, lost small items |
Where To Find Items For Your Hutch
You don’t have to buy everything new. Some of the best hutch displays come from a mix of old and new.
- Thrift stores: Great for unique dishes and glassware.
- Antique shops: Find one-of-a-kind treasures.
- Home goods stores: Look for baskets, plants, and simple dishes.
- Your own home: Hunt for forgotten items in cabinets, closets, or the attic.
Practical advice: Set a budget before shopping. It’s easy to overspend, but you don’t need much for a great display.
Making Your Hutch Child- Or Pet-friendly
If you have kids or pets, you might worry about breakables. There are ways to decorate safely:
- Put fragile items on higher shelves.
- Use wooden or plastic dishes on lower shelves.
- Secure tall items with museum putty (a removable adhesive).
- Avoid sharp or heavy objects where children can reach.
Non-obvious insight: Use baskets with lids to hide toys, pet supplies, or other daily items while keeping your hutch looking neat.
Troubleshooting Common Problems
If your hutch doesn’t look right, try these fixes:
- Too busy? Remove half the items and try again.
- Too empty? Add a few larger pieces or group smaller items together.
- Unbalanced? Move items to spread color and size more evenly.
- Boring? Add a pop of color, a plant, or an unexpected item.
Confidence tip: Don’t be afraid to experiment. Sometimes you need to try several arrangements before you find one that feels right.

Credit: www.cottageonbunkerhill.com
Getting Inspiration
If you’re ever stuck, search for hutch styling ideas online, in magazines, or by visiting friends’ homes. Pinterest and Instagram have thousands of photos to spark your creativity. For more about interior decorating principles, visit the Architectural Digest website.
Frequently Asked Questions
How Do I Keep My Hutch From Looking Cluttered?
Focus on using fewer, larger items instead of many small ones. Group similar objects and leave space between collections. Editing is key—remove anything that doesn’t fit your style or that makes the shelves look crowded.
Can I Mix Different Colors And Patterns In My Hutch?
Yes, mixing colors and patterns can create a lively, interesting display. The key is balance. Use one color or pattern as your base, then add a few accents. Too many patterns can feel chaotic, so add solids to calm the look.
What If My Hutch Is Very Dark Inside?
Add lighting! Use small lamps, LED strips, or battery-powered puck lights. Mirrors or glass shelves can also help reflect light. Choose lighter-colored dishes and accessories to brighten the look.
How Often Should I Change My Hutch Display?
There’s no rule. Many people update their hutch seasonally or for holidays. Others leave it the same for years. If you enjoy change, swap things out every few months. If you prefer stability, only change when you buy something new or clean.
Is It Okay To Display Non-kitchen Items In A Dining Room Hutch?
Absolutely. Books, photos, plants, or even small sculptures can look great. Your hutch should fit your personality and needs—not just hold dishes. Mixing in personal items makes your hutch unique.
—
Decorating a hutch is a creative process. With the right approach, your hutch will be more than just furniture—it will tell your story and bring beauty to your home. Take your time, enjoy the process, and let your style shine through every shelf.

Credit: justagirlandherblog.com