
Measuring for a kitchen backsplash can feel overwhelming, especially if you’re handling the project for the first time. You want your new backsplash to fit perfectly, cover the right areas, and avoid wasting materials or money. Getting the measurements right is the first step to a smooth installation and a beautiful kitchen upgrade.
This guide will walk you through every detail, from understanding your wall layout to calculating tile quantities and considering tricky areas like windows and outlets.
Many people make mistakes when measuring, leading to extra trips to the store or awkward gaps on the wall. I’ll share tips that even experienced DIYers sometimes overlook, so you can plan your backsplash with confidence. Whether you’re installing classic subway tile, glass mosaics, or a bold patterned design, the principles stay the same.
Let’s break down the process, step by step, so you can measure accurately and prepare for a stunning kitchen transformation.
Why Accurate Measurement Matters
A kitchen backsplash is more than just decoration. It protects your walls from water, grease, and stains. But if your measurements are off, you might buy too many tiles or, worse, not enough. This can cause delays, mismatched tile lots, or visible seams.
It’s also easy to miscalculate around windows, outlets, or cabinets, resulting in awkward cuts or exposed wall sections.
By taking careful measurements, you will:
- Save money by buying only what you need
- Prevent delays from running short on materials
- Achieve a clean, professional look without gaps or odd tile cuts
- Make installation faster and less stressful
Tools And Materials Needed
Before you start, gather these simple tools:
- Measuring tape (at least 12 feet, flexible type)
- Pencil and notepad for writing numbers
- Level (helps with straight lines)
- Straightedge or ruler
- Calculator (or use your phone)
- Painter’s tape (optional, for marking areas)
- Graph paper (optional, for sketching the layout)
Using the right tools makes your measurements more precise. A flexible measuring tape is better than a rigid one for following the wall’s surface, especially if there are bumps or corners.
Understanding Your Kitchen Layout
Every kitchen is unique. Some have one straight wall, others have L-shapes, corners, windows, or open gaps. Start by looking closely at your space.
- Identify all areas you want to cover. Backsplashes usually run from the countertop up to the bottom of the upper cabinets. Sometimes, people extend them higher, such as behind the range hood.
- Check for obstacles. Notice outlets, switches, windows, and any unusual shapes.
- Decide the boundaries. Will you end the backsplash at the edge of the counter, wrap it around a corner, or stop at a natural break?
Sketch a simple diagram of your kitchen wall. It doesn’t need to be perfect art—just enough to show where each section starts and ends. Mark cabinets, windows, and major features. This makes the next steps much easier.
Measuring The Main Backsplash Area
Now it’s time to measure the main wall section. This is usually the space between the countertop and the upper cabinets.
- Measure the length (horizontal distance).
- Place the tape at one end of the counter, right up against the wall.
- Stretch it along the wall to the other end, following the line where the backsplash will go.
- Write down the number in inches or centimeters. If your wall is not perfectly straight, check in a few spots and use the longest measurement.
- Measure the height (vertical distance).
- Place the tape at the top of the counter and measure up to the bottom of the upper cabinets.
- Write down this number.
- Repeat in a few spots, especially if your cabinets or counter aren’t perfectly level. Use the shortest height to ensure the backsplash fits under the cabinets.
- Calculate the area.
- Multiply the length by the height. For example, if your wall is 120 inches long and 18 inches high:
- 120 x 18 = 2,160 square inches
- Divide by 144 to get square feet:
- 2,160 ÷ 144 = 15 square feet
Write down the total area for each wall section. If you have more than one area (like a separate coffee bar), measure each one and add them together.
Measuring Around Windows, Outlets, And Other Obstacles
Most kitchens have windows, electrical outlets, or switches in the backsplash area. You need to measure around these features for both planning and buying the right amount of tile.
Windows
- Measure the wall as if the window isn’t there. This gives you the total area to cover.
- Later, subtract the window area to avoid buying extra tiles.
- For the window:
- Measure the width and height of the window opening.
- Multiply to find the area, then subtract from your total.
Outlets And Switches
- Backsplash tiles go behind outlets and switches, so measure as if they’re not there.
- You will need to cut tiles to fit around them, so make notes on your sketch about their positions.
- Count how many outlets and switches you have. This helps you plan for extra tile cuts and possible breakage.
Other Obstacles
- For pipes, vents, or unusual shapes, measure their size and mark their location.
- These areas may require special tile cuts. Add a bit of extra tile to your order for these tricky spots.
Example
Suppose your main wall is 120 inches long and 18 inches high. There’s a window that’s 36 inches wide and 18 inches high.
- Wall area: 120 x 18 = 2,160 sq. In.
- Window area: 36 x 18 = 648 sq. In.
- Net area: 2,160 – 648 = 1,512 sq. In.
- In square feet: 1,512 ÷ 144 = 10.5 sq. Ft.
This is the area you need to cover with tile.
Measuring For Multiple Walls Or L-shaped Kitchens
Many kitchens have more than one backsplash wall, especially in an L-shaped or U-shaped layout.
- Measure each wall section separately.
- For corners, measure right up to where the walls meet.
- Add the areas together for your total.
Handling Corners
- Tiles usually overlap slightly in corners. Some people prefer to end one wall’s tile slightly short and overlap with the other for a clean look.
- When measuring, don’t subtract space for grout lines at the corner; it’s a small amount.
- If your tile pattern is complex (like a herringbone), sketch the corner area to see how the tiles will line up.
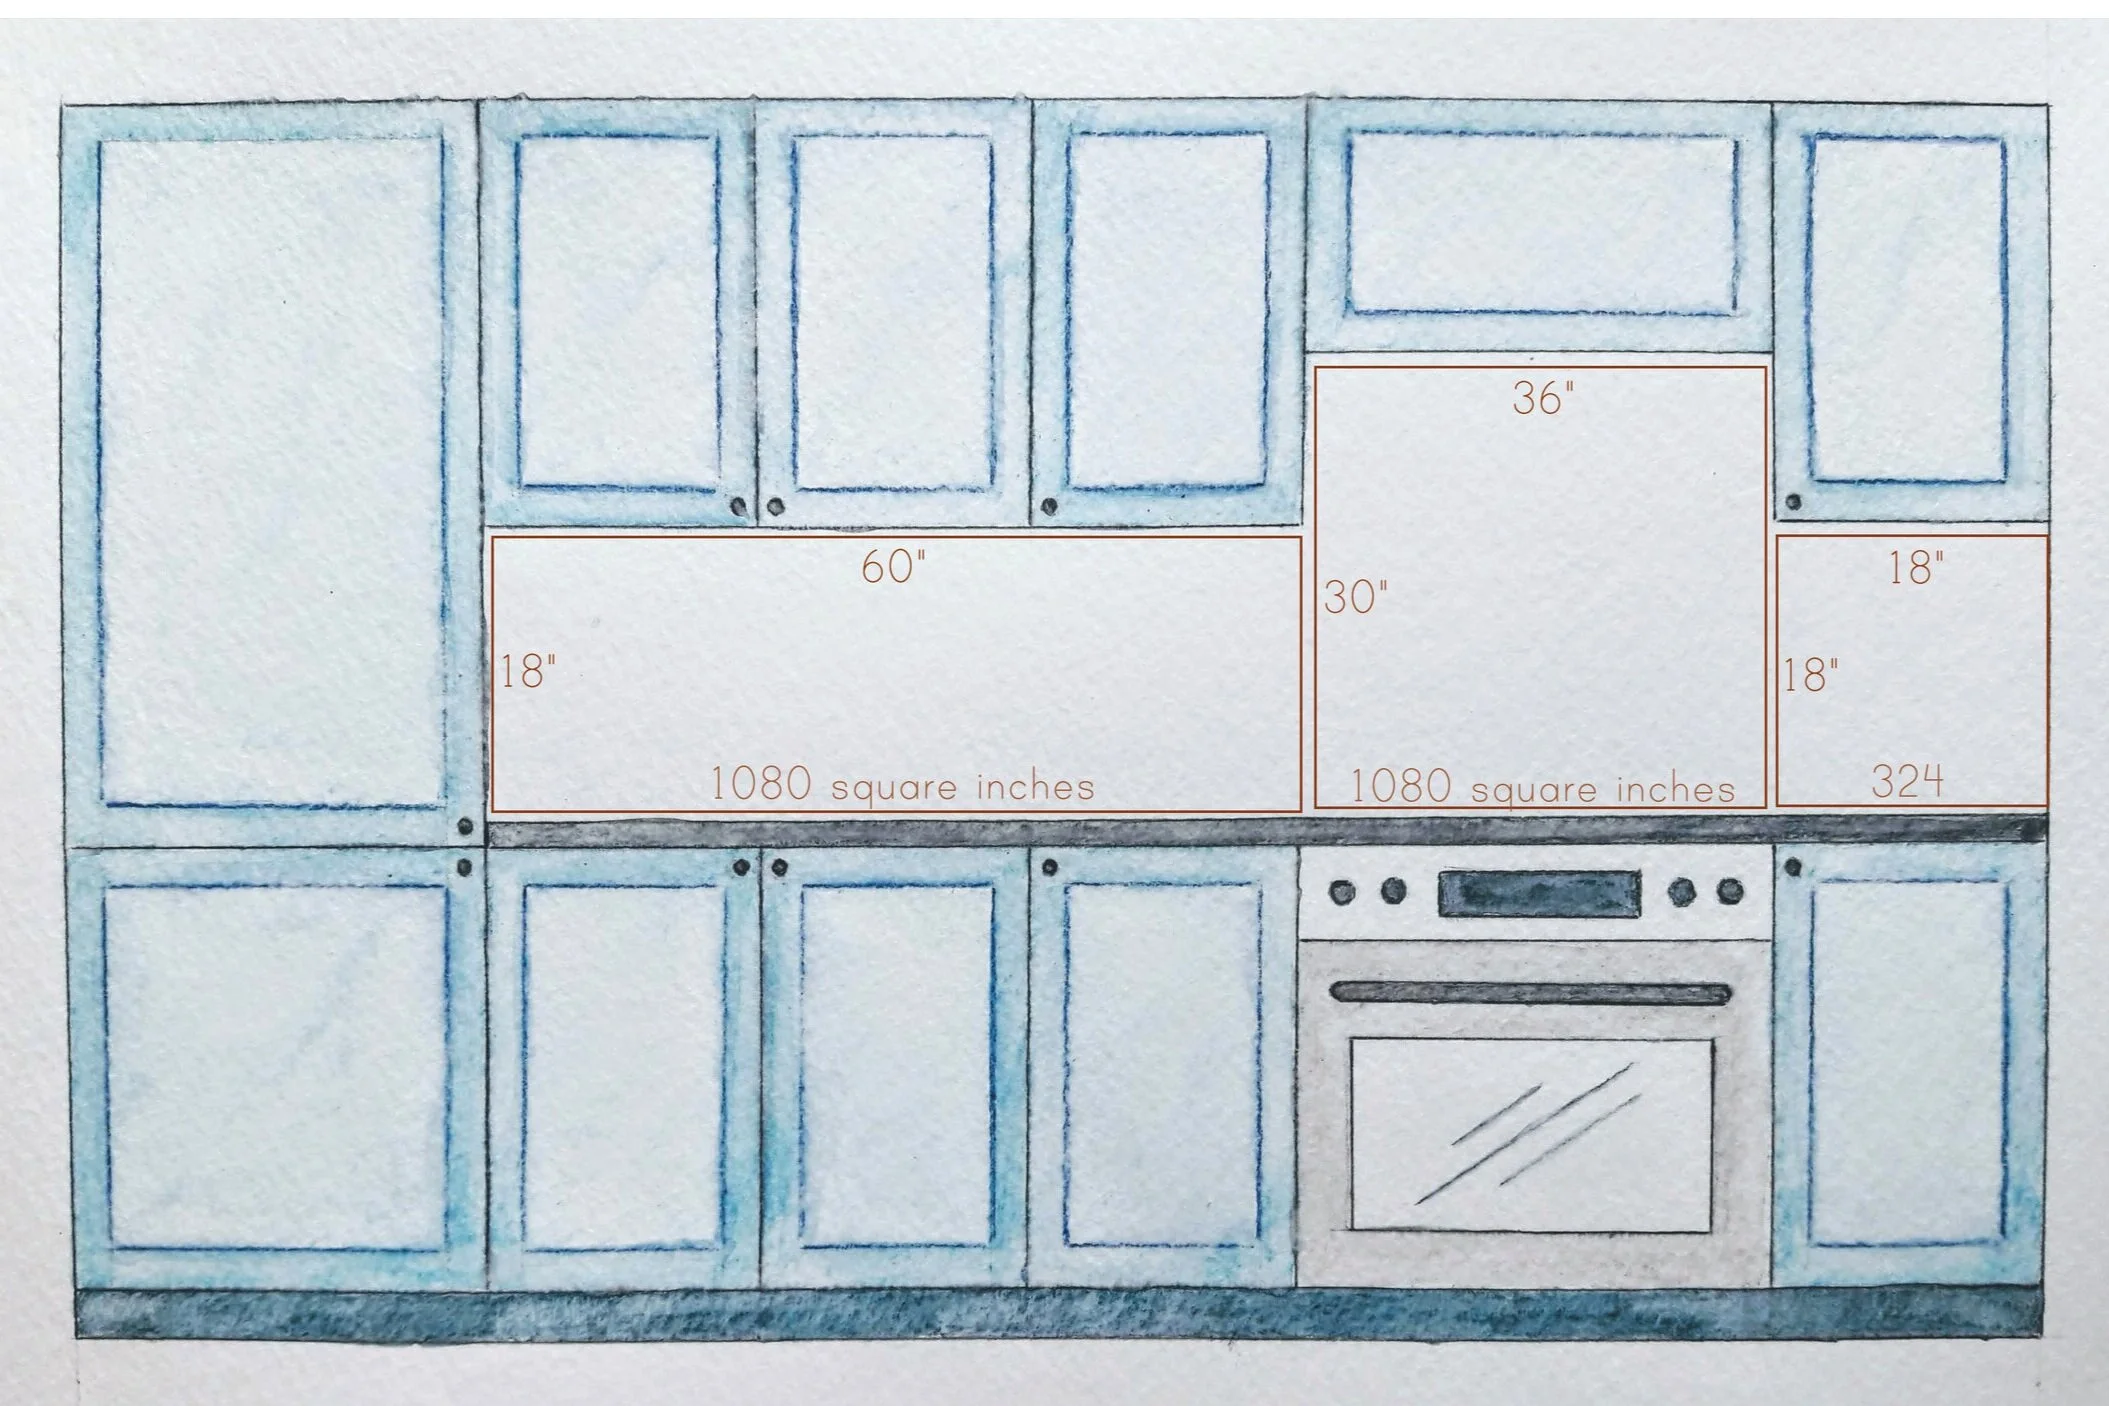
Credit: www.lilyworktile.com
Measuring For Full-height Backsplashes
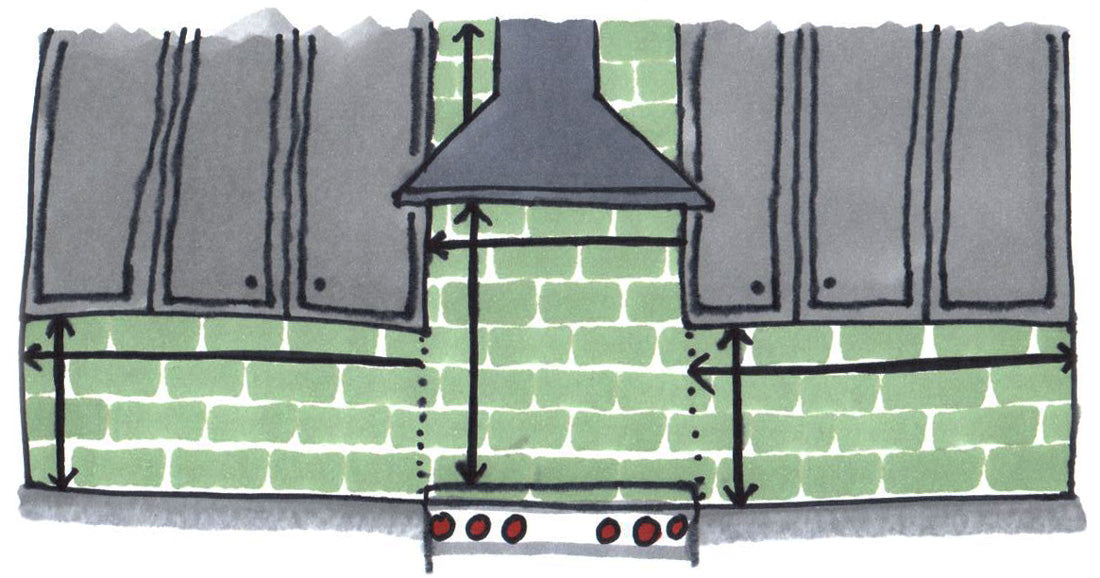
Some homeowners like to run the backsplash all the way to the ceiling, especially behind a range or open shelves. This changes your measurements.
- Measure from the countertop to the ceiling (or bottom of the hood, if you have one).
- Measure the width of the area.
- Multiply for the total square footage.
For example, if the wall behind your stove is 36 inches wide and the distance from the counter to the ceiling is 54 inches:
- 36 x 54 = 1,944 sq. In.
- 1,944 ÷ 144 = 13.5 sq. Ft.
Add this area to your total calculation.
Calculating Tile Quantity
Tiles are sold by the square foot, by the box, or sometimes by the piece. Once you know your total area, you need to decide how much tile to buy.
Step 1: Add For Waste And Cuts
Not every tile will fit perfectly. Tiles often need to be cut for edges, corners, outlets, or uneven walls. Some break during installation.
- Add 10% extra to your total area for waste.
- For complex patterns or many obstacles, add 15% extra.
Example: If your total backsplash area is 20 square feet:
- 20 x 1.1 = 22 square feet (with 10% waste)
Step 2: Check Tile Size And Packaging
Tiles come in many sizes:
- Subway tiles: Often 3” x 6”
- Large rectangles: Like 4” x 12” or 6” x 24”
- Mosaics: Usually on 12” x 12” sheets
Check the box or website for “coverage per box” or “per sheet. ” Divide your area by the coverage to find how many boxes or sheets you need.
Example
If your backsplash needs 22 square feet, and each box of tile covers 10 square feet:
- 22 ÷ 10 = 2.2 boxes
- Always round up, so buy 3 boxes.
Special Case: Patterned Or Diagonal Tiles
- Patterns like herringbone or diagonal layouts create more waste.
- Add 15% extra for these layouts.
Dealing With Uneven Walls Or Unique Features
Not all walls are perfectly flat or square. Some older homes have wavy walls, curved corners, or odd shapes. Here’s how to handle them:
- Measure in multiple spots (top, middle, bottom, and along the height).
- Use the largest width and the shortest height to make sure you have enough tile.
- For curved or slanted walls, break the space into smaller rectangles or triangles and measure each part.
If you have a kitchen island with a backsplash, measure each exposed side separately.
Drawing A Layout Sketch
A simple sketch helps you visualize your measurements and plan the tile layout. You don’t need fancy software—just use a pencil and paper.
- Draw the outline of your backsplash area.
- Mark the position of outlets, windows, and cabinets.
- Note measurements for each section.
- If you plan a special pattern, sketch a few rows of tiles to see how the cuts will fall.
A layout sketch helps you avoid surprises during installation. Many professionals recommend taping tile sheets to the wall before installing, to see how they fit around obstacles.

Credit: www.rokhardware.com
Common Mistakes To Avoid
Even experienced DIYers make mistakes when measuring for a backsplash. Watch out for these common errors:
- Measuring only once. Always double-check your numbers. Measure twice, cut once.
- Forgetting the window area. Don’t buy tiles for space you won’t cover.
- Ignoring obstacles. Outlets, switches, and pipes all require cuts. Plan for extra tile and work.
- Not adding enough for waste. Running out of tile mid-job can cause delays or mismatched lots.
- Mixing up units. Stick to one system (inches or centimeters) throughout the project.
- Not checking tile size. Some tiles are sold by the piece, others by the sheet or box. Know what you’re buying.
How To Measure For Special Backsplash Designs
Many kitchens use standard tile layouts, but some homeowners choose more creative patterns:
Diagonal Or Herringbone Patterns
- These layouts create more off-cuts, so you’ll need extra tile.
- Carefully plan the starting point. For herringbone, start at the center and work outward.
- Sketch the pattern on graph paper to see how the tiles will fall around obstacles.
Mosaic Sheets
- Mosaics come in mesh-backed sheets, usually 12” x 12”.
- Measure total square footage and divide by the area each sheet covers.
- If you need to cut sheets, plan for extra material.
Accent Strips Or Borders
- If your design includes a decorative strip or border, measure the length of the strip.
- Most accent tiles are sold by the linear foot, not square foot.
Credit: mercurymosaics.com
Real-life Example
Let’s walk through a full example. Imagine a kitchen with these features:
- Main wall: 120 inches long, 18 inches high
- Small side wall: 36 inches long, 18 inches high
- Window in main wall: 36 inches wide, 18 inches high
- 4 outlets and 1 light switch in total
Step-by-step
- Measure main wall: 120 x 18 = 2,160 sq. In.
- Measure side wall: 36 x 18 = 648 sq. In.
- Add together: 2,160 + 648 = 2,808 sq. In.
- Subtract window: 36 x 18 = 648 sq. In.
- Net area: 2,808 – 648 = 2,160 sq. In.
- Convert to square feet: 2,160 ÷ 144 = 15 sq. Ft.
- Add 10% for waste: 15 x 1.1 = 16.5 sq. Ft. (round up to 17 sq. Ft.)
- If tiles cover 10 sq. Ft. per box: 17 ÷ 10 = 1.7 boxes (buy 2 boxes)
This ensures you have enough tile, even if you make a few mistakes or break some pieces.
Using A Measurement Table For Planning
To stay organized, many people use a simple table. Here’s an example for your notes:
| Section | Length (inches) | Height (inches) | Area (sq. in.) | Area (sq. ft.) |
|---|---|---|---|---|
| Main wall | 120 | 18 | 2,160 | 15 |
| Side wall | 36 | 18 | 648 | 4.5 |
| Window (subtract) | 36 | 18 | -648 | -4.5 |
| Total | 2,160 | 15 |
This helps prevent mistakes and makes it easy to double-check your math.
Quick Comparison: Standard Vs. Full-height Backsplash
Some homeowners wonder if it’s better to install a standard backsplash (up to the cabinets) or full height (to the ceiling). Here’s a quick comparison:
| Type | Typical Height | Coverage Area | Material Needed | Visual Impact |
|---|---|---|---|---|
| Standard | 18 in. | Low to moderate | Less | Subtle, classic |
| Full-Height | Up to 54 in. | Large | More | Bold, dramatic |
This can help you decide which style fits your kitchen and your budget.
Practical Tips For Success
Here are a few extra tips that many beginners miss:
- Label your measurements with sticky notes on the wall. This makes installation smoother.
- Order all your tile at once. Lot numbers can vary, and colors can shift slightly between batches.
- Double-check cabinet heights. Some older kitchens have uneven cabinets, so measure under each one.
- Buy extra trim pieces or bullnose tiles. Edge pieces are often forgotten but finish the look.
- Bring your measurements to the store. Tile salespeople can help you verify quantities and suggest solutions for tricky spots.
These steps may seem small, but they make a big difference in the final result.
What If You’re Using Peel-and-stick Backsplash?
Peel-and-stick backsplash tiles are popular for fast updates. The measurement process is the same:
- Measure the area you want to cover.
- Subtract windows or large obstacles.
- Add 10% for trimming and mistakes.
- Check the package for “coverage per sheet.”
Peel-and-stick tiles are easier to cut, but accurate measurement is still critical for a neat finish.
How To Handle Backsplash With Open Shelving Or Floating Cabinets
If you have open shelves or floating cabinets instead of standard uppers:
- Decide if you want the tile to go behind and above the shelves, or just to shelf height.
- Measure the full wall height if you want a continuous look.
- For floating cabinets, measure both below and above the cabinet.
This creates a modern look, but can increase the tile needed.
When To Call A Professional
Some backsplash projects are more complex, such as:
- Unusually shaped walls
- Natural stone or heavy tile (requires special support)
- Large patterns that need precise alignment
If you’re unsure, a professional installer can check your measurements and help with challenging cuts.
Useful Resources
If you want to learn more about tile layouts, installation, or advanced measuring, check out this excellent guide from the This Old House website.
Frequently Asked Questions
How Much Extra Tile Should I Buy For A Kitchen Backsplash?
You should buy at least 10% extra tile to cover cuts, waste, and possible breakage. For complex patterns, increase this to 15%. Always round up to the next full box or sheet.
Do I Subtract Outlets And Switches From My Measurements?
No, you do not subtract outlets or switches. The tile goes behind these features, so measure the full wall area. Only subtract large features like windows or open spaces.
What’s The Best Way To Measure Around A Window?
First, measure the entire wall as if the window isn’t there. Then, measure the width and height of the window opening, multiply for area, and subtract this from your total. Mark the window location on your layout sketch.
Can I Use A Laser Measure For Backsplash Measurement?
Yes, laser measures are very accurate for straight walls. Make sure to double-check with a tape measure for small spaces or uneven walls, as lasers can sometimes miss curves or bumps.
How Do I Handle Measuring For A Backsplash With A Pattern, Like Herringbone?
Measure the total area as usual, but add 15% extra tile for waste. Patterned layouts require more cuts, so you’ll need more material. Sketch the pattern on paper to plan how tiles will line up around features.
Measuring for a kitchen backsplash may seem complicated, but with the right tools, careful planning, and these tips, you’ll get it right the first time. Take your time, double-check your numbers, and you’ll be rewarded with a backsplash that fits perfectly and looks stunning for years to come.