
If you use Stasher bags in your kitchen, you already know how useful these silicone pouches are. They help you reduce plastic waste, keep food fresh, and handle everything from storing leftovers to sous vide cooking. But after washing, one challenge remains: how to dry Stasher bags completely and quickly. If you leave them wet, you risk mold, odor, and even bacteria growth. Drying seems simple, but the design of reusable silicone bags makes it tricky—especially getting the inside dry.
This article will guide you through every method, tool, and trick to dry Stasher bags. You’ll learn why proper drying matters, discover smart drying solutions, and avoid common mistakes. Whether you’re new to eco-friendly kitchen tools or a seasoned zero-waste pro, you’ll find clear advice and practical tips here.
Why Drying Stasher Bags Matters
At first glance, drying a bag may not seem important. But residual moisture inside a Stasher bag can cause real problems over time. Silicone is non-porous, but if water stays inside, it creates a damp, closed space—perfect for mold and bacterial growth. This not only causes bad smells, but it can also affect your health and the taste of your food.
Incomplete drying also causes stains and cloudy spots, making your bags look old before their time. Plus, moisture trapped in the seams or corners can cause your bag to stick together or develop a slippery film. If you want your Stasher bags to last for years, careful drying is essential.
Understanding Stasher Bags: The Drying Challenge
Stasher bags are made from platinum-grade silicone. This material is food-safe, flexible, and heat-resistant. Unlike thin plastic, silicone is thicker and often holds its shape. This is great for sealing in freshness, but it also means the bag doesn’t easily stay open to air-dry inside.
The unique pinch-press seal is another challenge. It helps keep food in and air out—but after washing, the seal can trap water droplets. The sides often stick together, blocking airflow. The wide, flat shape can also puddle water at the bottom if not positioned correctly.
The Best Ways To Dry Stasher Bags
There is no single “right” way to dry Stasher bags. The best method depends on your time, kitchen tools, and how many bags you use daily. Below are the most effective ways, with real-life tips for each.
1. Air Drying: The Classic Approach
Air drying is the safest and most eco-friendly way. After washing, shake out as much water as possible. Then:
- Turn the bag inside out (if possible). Some Stasher bags can be flipped, making it easier to dry the interior.
- If the bag is too stiff, open it wide and prop it up. Place it over a bottle, cup, or wooden spoon handle so air can circulate inside.
- Leave it in a clean, dry place. A dish rack or over your sink works well.
Pro tip: If you have multiple bags, stagger them at different angles for better airflow.
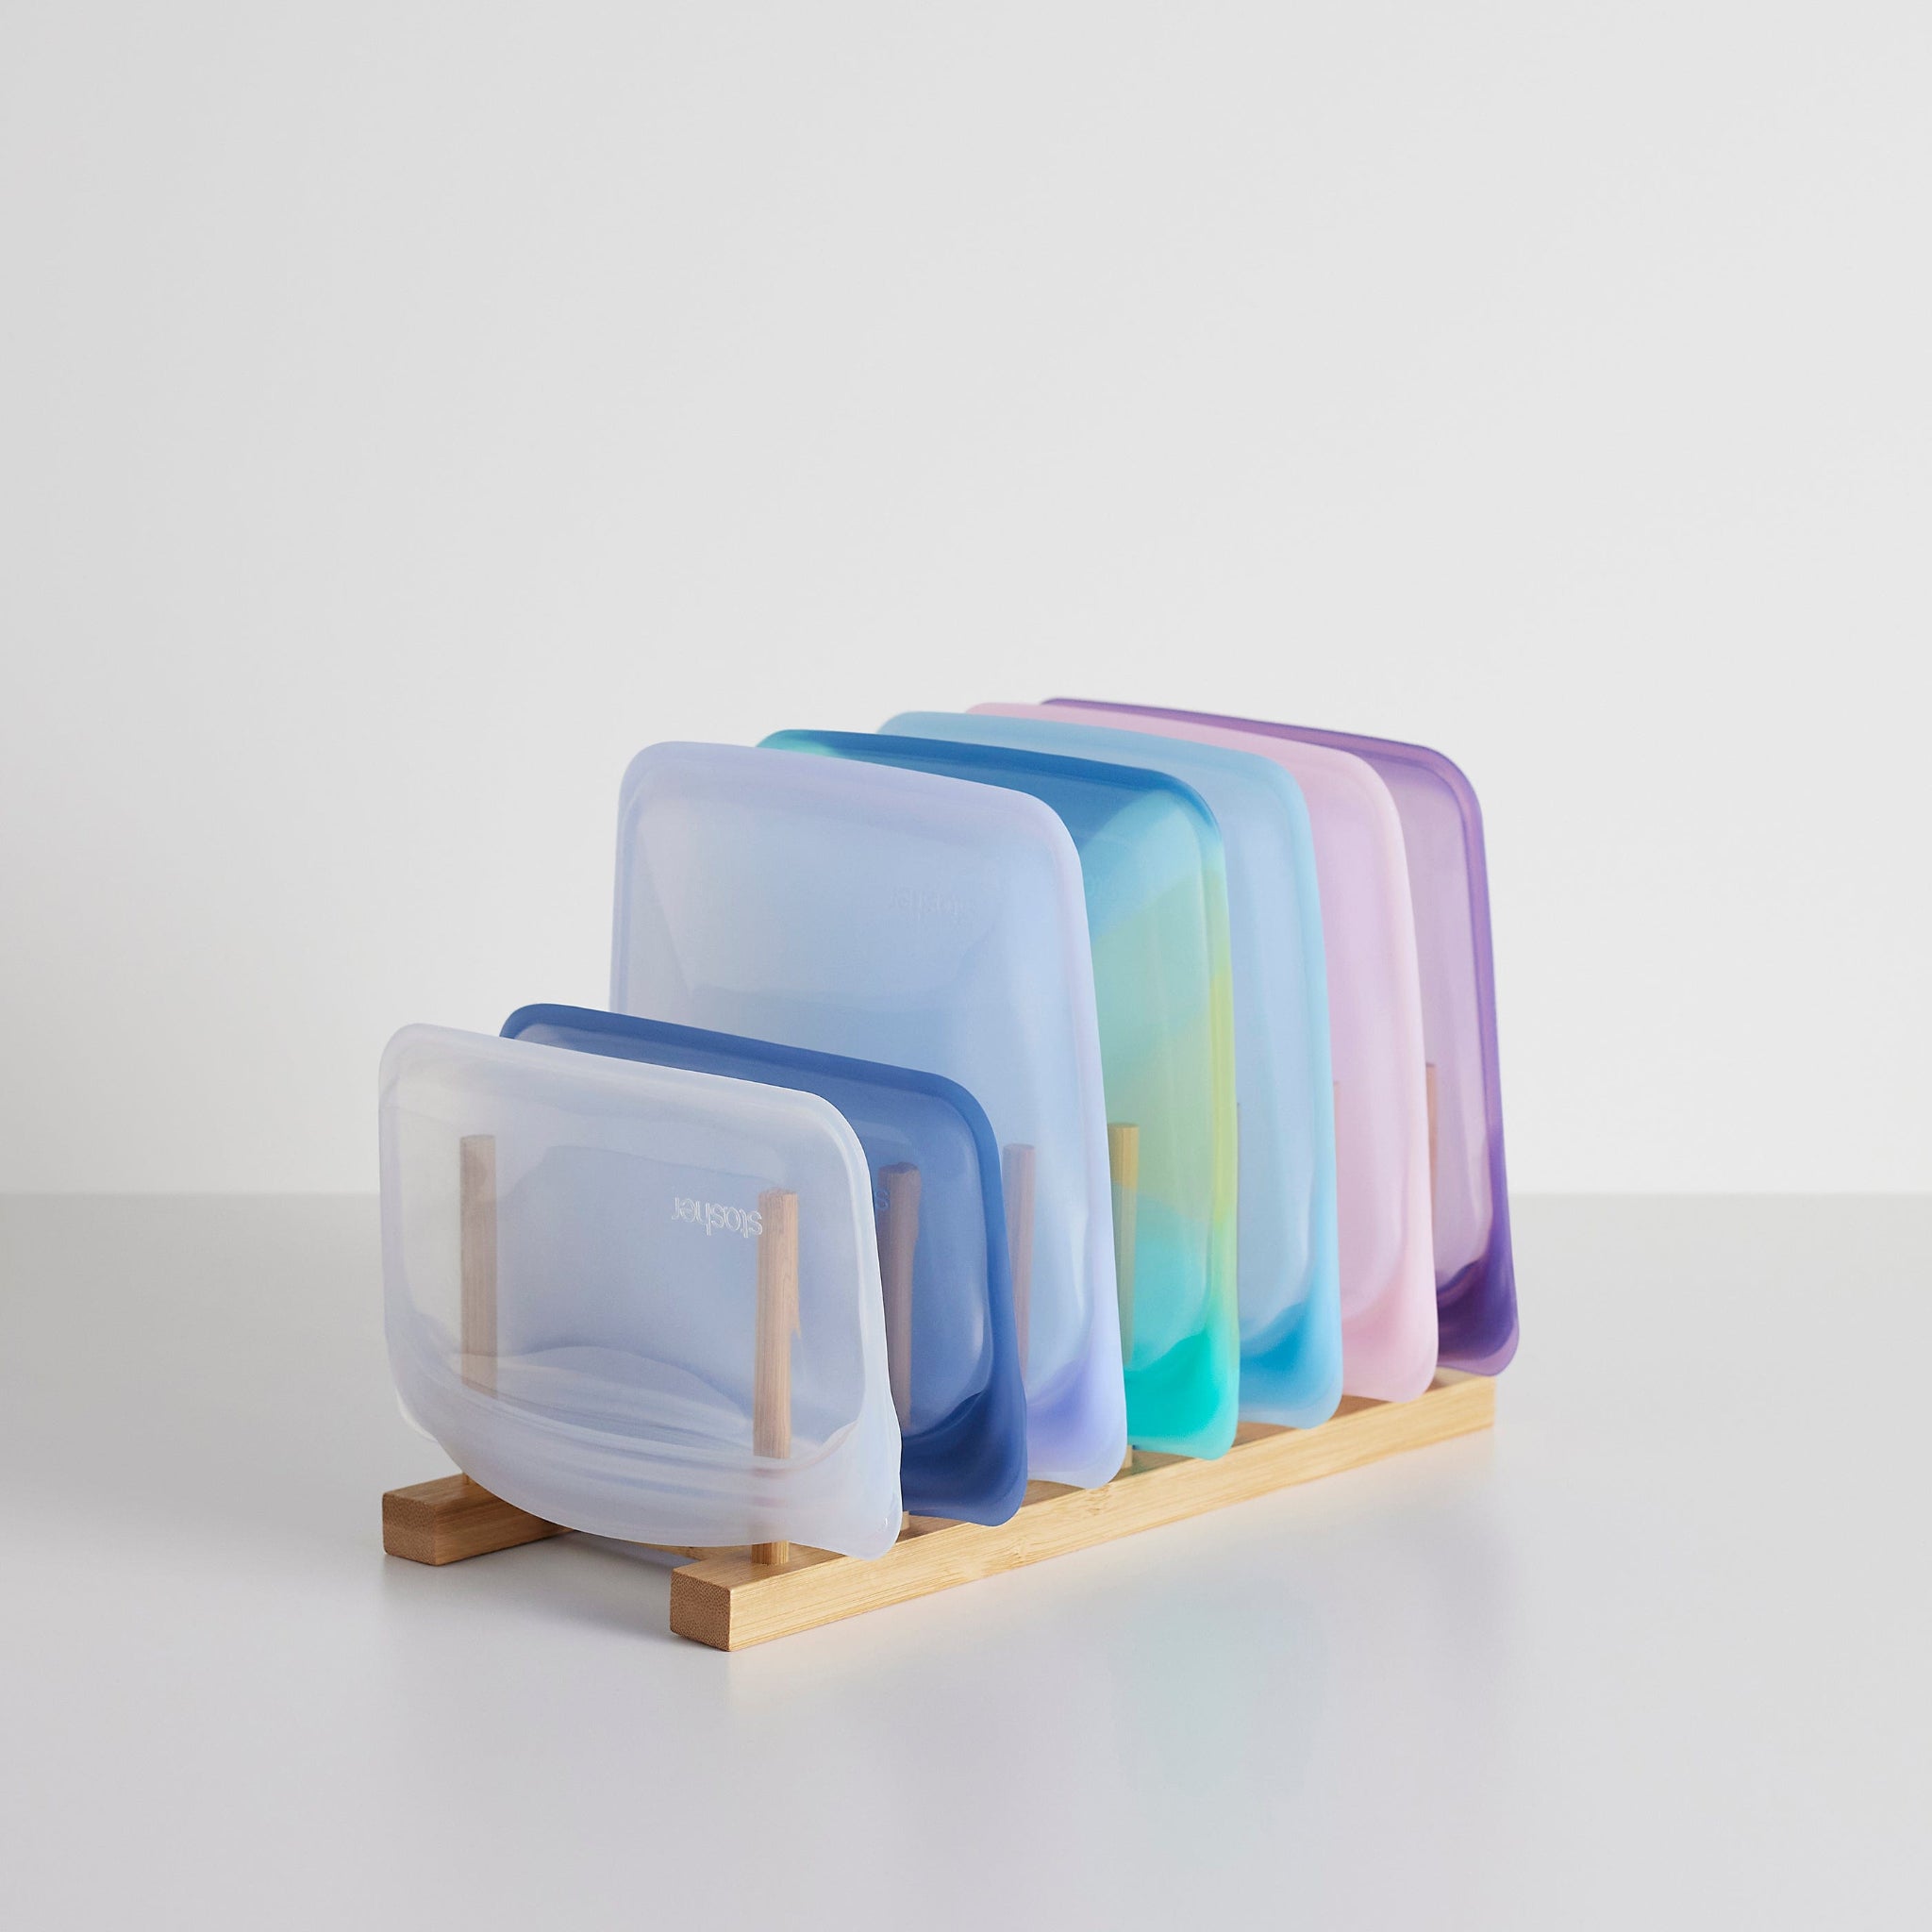
2. Using A Bag Drying Rack
A bag drying rack is a tool designed for reusable storage bags. These racks have prongs or arms to hold bags open and upright, allowing air to circulate inside.
Benefits:
- Dries several bags at once
- Keeps bags off countertops, reducing mess
- Some racks fold flat for easy storage
Drawbacks:
- Takes up space on the counter
- May not fit very large bags
Non-obvious tip: Place the rack near a fan or sunny window to speed up drying.
3. Diy Drying Methods
If you don’t own a drying rack, try these household solutions:
- Chopsticks or utensils: Insert a chopstick or wooden spoon into the bag to keep it open. Lean it in a jar or mug to hold it upright.
- Glass jars: Place the open bag over a tall jar. The bag stays wide open for airflow.
- Pot lid holders: These kitchen organizers can double as bag dryers.
These DIY solutions are cheap and work with what you already have at home.
4. Towel Drying For Speed
If you need your Stasher bag dry right away, use a clean kitchen towel:
- Wipe the outside and inside with the towel, focusing on corners and seams.
- For extra moisture, use a second dry towel.
Be careful not to use a towel with lint, as fibers can stick to silicone.
5. Air Circulation And Fans
Placing your open bag under a ceiling fan or next to a portable fan can cut drying time in half. Moving air helps evaporate water trapped in corners.
- Open the seal as wide as possible
- Place bags on a rack or utensil, facing the airflow
Bonus insight: Avoid placing bags directly on a heater or radiator, as excess heat can warp silicone over time.
6. Oven Drying (for The Impatient)
Stasher bags can handle oven heat up to 400°F (204°C). To dry quickly:
- Preheat oven to the lowest setting (ideally below 200°F/93°C)
- Wipe off excess water
- Place bag open and upside down on the rack (not touching metal)
- Leave the oven door ajar for airflow
Check every 5 minutes—this method is fast, but overheating can damage bags. Never use a toaster oven, as heat is less controlled.
7. Dishwasher Drying Cycle
Many people wash Stasher bags in the dishwasher, but drying is trickier.
- After the wash, open the bag as wide as possible
- Place it upside down on the top rack for the drying cycle
- Check for water in the seal and corners
Some dishwashers don’t fully dry silicone, so you may need to finish with air drying or towel drying.
8. Sunlight Drying
Sunlight is a natural sanitizer. Place bags open side up in direct sun for a few hours. The UV rays help kill bacteria and evaporate moisture. However, avoid leaving bags in the sun too long, as repeated exposure can weaken silicone color.
9. Hanging Methods
Hang bags upside down using clothespins, binder clips, or hooks. Attach to a dish rack, cabinet handle, or even a string stretched across your kitchen.
Practical note: Hanging works best for smaller Stasher bags. For larger bags, support the bottom to prevent stretching.
10. Drying Multiple Bags At Once
If you use several bags daily, drying can pile up. Use a combination of racks, fans, and hanging methods. Stack bags at angles so air can move between them. Rotate bags every hour to expose new surfaces.
Common Mistakes To Avoid
Even experienced users make drying mistakes. Here are some errors to watch for:
- Not opening the seal fully: Water hides in the pinch-press seal and corners. Always open the bag as wide as possible.
- Stacking damp bags: Never pile damp bags together. This traps moisture and encourages mold.
- Leaving bags on a flat surface: Water pools at the bottom, slowing drying and leaving spots.
- Using high heat: Silicone can handle heat, but repeated exposure to high temperatures (over 350°F) may cause warping or discoloration.
- Ignoring small droplets: Even tiny water drops can lead to odors if left in a closed bag.

Credit: www.stasherbag.com
How Long Does It Take To Dry A Stasher Bag?
Drying time depends on the method and environment. Here’s a comparison:
| Method | Average Drying Time | Best For |
|---|---|---|
| Air drying (open, upright) | 4–8 hours | Daily use |
| Fan-assisted drying | 1–2 hours | Faster drying |
| Oven drying (low heat) | 10–20 minutes | Immediate use |
| Dishwasher dry cycle | 30–90 minutes | Multi-bag drying |
| Towel drying | 5–10 minutes | On-the-go |
Non-obvious insight: Humidity in your home has a big impact. On a humid day, drying can take twice as long.
Tools And Accessories To Make Drying Easier
You don’t need to buy special tools, but some accessories can make drying Stasher bags simpler and faster.
Bag Drying Racks: Features And Comparison
These racks come in different shapes and sizes. Here’s how popular options compare:
| Rack Type | Holds | Best Feature | Drawback |
|---|---|---|---|
| Wooden peg rack | 4–8 bags | Eco-friendly, sturdy | Bigger footprint |
| Stainless steel folding rack | 4–6 bags | Folds flat | More expensive |
| DIY chopsticks in jar | 2–4 bags | Low cost, flexible | Less stable |
Other Useful Tools
- Silicone spatula: Use to hold bag open during drying
- Paper towel rolls: Place inside bag to absorb moisture, then remove for air drying
- Clothespins or chip clips: Hang bags upside down easily
How To Clean Bags For Best Drying
Drying is easier when your Stasher bags are properly cleaned. Wash with warm soapy water and rinse well. Avoid greasy residue, as it can slow evaporation and attract dust. After washing, shake out as much water as you can—this simple step reduces drying time by half.
Extra tip: If you notice water spots after drying, polish the bag with a dry microfiber cloth for a clear finish.
Stasher Bag Care Tips For Long Life
Proper drying is just one part of caring for Stasher bags. Here are more ways to keep them in top shape:
- Store bags open if possible. This prevents trapped moisture and odors.
- Rotate usage so all bags wear evenly.
- Avoid harsh chemicals or abrasive sponges that can scratch silicone.
- Check seals and corners for leftover moisture before storing.
- Deep clean monthly with baking soda and vinegar if you notice any odor.
Credit: www.stasherbag.com
Troubleshooting: When Drying Problems Happen
Sometimes, despite your efforts, bags stay damp or develop smells. Here’s how to solve common issues:
- Persistent moisture: Place a dry rice pack or silica gel packet inside the bag for a few hours to absorb water.
- Lingering odors: Wash with a mix of water and baking soda. Leave open to dry in sunlight.
- Stuck-on residue: Scrub gently with a baking soda paste.
If mold appears, soak the bag in a solution of 1 part vinegar to 3 parts water for 30 minutes, then rinse and dry as usual. Don’t use bleach, as it can break down silicone over time.
Drying Stasher Bags On The Go
If you travel or use Stasher bags for snacks and lunch, drying on the go can be a challenge. Fold a small microfiber cloth in your bag to wipe moisture. If you can’t fully dry, leave the bag open in your car or on a desk until you get home.
Mistakes Beginners Make (and How To Avoid Them)
Many first-time users assume Stasher bags dry like ordinary plastic bags. Here are two mistakes beginners often miss:
- Assuming “dishwasher safe” means “dishwasher dry”: Many dishwashers don’t fully dry heavy silicone. Always check the bag after the cycle.
- Not opening the bottom corners: Water often hides in the bottom gusset. Pinch open the bottom and wipe with a towel or shake out moisture.
Making Drying Part Of Your Kitchen Routine
The easiest way to keep your Stasher bags dry and clean is to make drying part of your dishwashing routine. After washing dishes, always open and set up your bags for drying. Assign a drying spot in your kitchen—over the sink, next to a fan, or on a dedicated rack.
This habit helps prevent last-minute frustration when you need a dry bag for leftovers or snacks.
How Stasher Bags Compare To Other Reusable Bags
Not all reusable bags dry the same way. Many plastic bags collapse or melt in high heat, while fabric bags can absorb water and take much longer to dry. Stasher bags’ thick silicone means they hold shape and resist stains, but require more airflow for full drying. Here’s a quick look:
| Bag Type | Drying Challenge | Best Drying Method |
|---|---|---|
| Stasher (silicone) | Thick, holds water in corners | Open upright, air/fan drying |
| Plastic reusable | Floppy, can melt in heat | Air drying on rack |
| Fabric (zippered) | Absorbs water, slow to dry | Hang in sunlight |
Key takeaway: Stasher bags are durable and long-lasting, but you must dry them carefully for best results.
When To Replace A Stasher Bag
Even with great care, all kitchen tools wear out. Signs you need to replace your Stasher bag:
- Persistent odor after repeated cleaning and drying
- Cracks or tears in the silicone
- Seal no longer closes
- Mold stains that won’t wash out
Proper drying slows this process and extends your bag’s life.
Eco-friendly Reasons To Dry And Reuse Stasher Bags
One of the main reasons people choose Stasher bags is to reduce plastic waste. By drying your bags well and making them last, you help lower the number of single-use bags in landfills. According to the Environmental Protection Agency, Americans throw away over 100 billion plastic bags each year. Every well-cared-for Stasher bag can replace hundreds or even thousands of disposable bags.
For more on eco-friendly kitchen habits, visit the EPA’s recycling page.
Frequently Asked Questions
How Do I Dry The Inside Corners Of My Stasher Bag?
Open the bag as wide as possible. Use a clean towel, a chopstick, or a spatula wrapped in a cloth to reach deep into the corners. If air drying, prop the bag open over a utensil or rack to let air circulate into the corners.
Is It Safe To Dry Stasher Bags In The Oven?
Yes, but only at low temperatures (below 200°F/93°C) and for short periods. Check the bag every few minutes and never leave it unattended. High heat can warp or damage silicone.
Can I Use A Hair Dryer To Dry My Stasher Bags?
You can, but keep the dryer on a low or cool setting and hold it at least a foot away from the bag. Hot air close up can damage the silicone. Air drying with a fan or in sunlight is usually safer.
What If My Bag Still Smells After Drying?
Try washing the bag with baking soda and water, then air dry in sunlight. If odor remains, soak in vinegar and water, rinse, and dry again. Persistent smells may mean it’s time for a replacement.
How Do I Store My Stasher Bags To Keep Them Dry?
Store bags open or loosely closed, in a dry area with good airflow. Avoid sealing damp bags or stacking them tightly. Hanging them or placing them in a utensil holder keeps air moving and prevents moisture build-up.
Drying Stasher bags may take a little extra effort, but it’s worth it for clean, odor-free storage and a kitchen that’s both practical and eco-friendly. With the right tools and habits, your bags will last for years—saving money and the planet, one dry bag at a time.
Credit: www.stasherbag.com