Marble adds a touch of elegance and luxury to any space. Whether it’s a kitchen countertop, bathroom vanity, or a grand hallway floor, marble surfaces stand out with their classic, timeless beauty. But as stunning as marble is, it’s also quite delicate. Everyday acids—like lemon juice, vinegar, or even some cleaning products—can cause dull, light-colored marks called etching. If you’ve ever noticed a mysterious cloudy spot on your marble, you’ve likely seen etching in action.
Many homeowners panic, worried their expensive stone is ruined forever. The good news? Most marble etching can be fixed at home, especially if you act quickly and use the right approach. This guide will walk you through everything you need to know about how to fix marble etching—from understanding what causes it to step-by-step solutions for both minor and deep etch marks. You’ll also get practical advice, pro tips, and important cautions to help you restore your marble’s shine without causing more harm.
What Is Marble Etching?
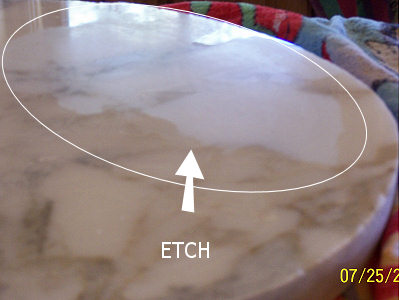
Marble is made mostly of calcite, a soft mineral that reacts with acids. When an acidic substance touches marble, it eats away at the surface, leaving a dull, whitish mark. Unlike a stain (which changes marble’s color by soaking in), etching changes the surface texture. It feels rougher or less glossy than the rest of the stone.
Common examples of acidic substances that cause etching:
- Citrus juices (lemon, orange)
- Vinegar
- Wine
- Soda
- Tomato sauce
- Bathroom cleaning sprays
Etching can happen in seconds if the acid is strong or the marble is unsealed. Sometimes, a spot isn’t even noticed until the light hits it just right. If you see a cloudy patch that won’t wipe away, you’re dealing with an etch.
Important: Etching is not the same as staining. Stains are usually darker and can be removed with different methods. Trying to fix an etch with a stain remover will not work.
How To Identify Marble Etching
Before you try to fix a marble mark, you need to know if it’s an etch or a stain. Here’s how to tell:
- Appearance: Etching looks dull or lighter than the rest of the marble. Stains are usually darker, like a coffee or oil spot.
- Texture: Run your finger over the mark. Etching feels rougher, while stains feel smooth like the rest of the marble.
- Light Test: Look at the marble from different angles. Etching is most visible in certain lights because it disrupts the stone’s shine.
If you’re not sure, try this: Put a drop of water on the spot. If the water sits on top, it’s likely etched. If it sinks in and darkens, it’s probably a stain.
Credit: www.mygranitecare.com
Tools And Supplies You’ll Need
Fixing marble etching at home is possible, but you need the right tools and materials. Here’s a list to have ready:
- Marble polishing powder (sometimes called etch remover or marble polishing compound)
- Clean, soft cloths (microfiber is best)
- PH-neutral cleaner (never use acidic or abrasive cleaners)
- Spray bottle (filled with clean water)
- Gloves (optional, but protects your hands)
- Buffing pad (white, non-scratch type)
- Masking tape (to protect surrounding areas)
- Plastic spatula (for deeper etches, optional)
- Marble sealer (to finish and protect)
Some DIY solutions use baking soda or toothpaste, but these are less effective and can sometimes scratch marble. For best results, use products made specifically for marble.
Step-by-step Guide: Fixing Light Marble Etching
Light etching is shallow, affecting only the surface polish. You can usually fix these marks with a polishing powder. Here’s how:
- Clean the Area
- Wipe the marble with a pH-neutral cleaner to remove dirt, oils, or sticky residue.
- Dry thoroughly with a soft cloth.
- Apply Masking Tape
- If the etch is near grout or a wall, protect those areas with tape.
- Dampen the Surface
- Spray a small amount of water on the etched spot. It should be damp, not soaking wet.
- Sprinkle Polishing Powder
- Use only as much as the package recommends—usually a teaspoon for a small spot.
- Buff the Etch
- Using a clean, soft cloth or white buffing pad, rub the powder in a circular motion over the etch.
- Apply gentle but firm pressure for 30–60 seconds.
- Wipe and Inspect
- Remove the powder with a damp cloth.
- Check the spot in different lights. If the etch is still visible, repeat the process up to 2 more times.
- Clean and Dry
- Once the etch is gone, clean the area again and dry.
- Seal the Marble
- After fixing, apply a marble sealer according to the instructions. This helps prevent future etching.
Practical Example
Let’s say you spilled orange juice on your kitchen counter and wiped it up quickly, but a dull mark appeared the next day. After cleaning, you used a marble polishing powder and a microfiber cloth, buffed for a minute, and saw the shine return.
You finished by sealing the surface, and the etch was gone.
Pro Tip: Always test your polishing powder on a hidden area first to be sure it won’t make the problem worse.
How To Fix Deep Marble Etching
Sometimes, etching is so deep that home polishing powders don’t work. This can happen if acid sits for hours or days, or if the marble is very soft. Deep etches need more aggressive polishing or even professional help.
Steps For Deeper Etches
- Assess the Depth
- If you can feel a depression with your fingernail, the etch is deep.
- Try a Second Polishing
- Use the marble powder and buffing pad as before, but buff longer—up to 2 minutes.
- If the etch improves but does not disappear, you may need to repeat this process several times.
- Sand the Etched Area (Advanced)
- For deep damage, use very fine sandpaper (such as 1200 or 1500 grit). Wet the sandpaper and gently sand the etch in a circular motion.
- Wipe clean, then follow up with polishing powder to restore shine.
- Call a Professional If Needed
- If sanding and polishing do not fix the etch, or if the area is large, hire a marble restoration expert. They use special machines and diamond abrasives to grind and polish marble to a perfect finish.
Warning: DIY sanding can make things worse if not done carefully. Always test on a small spot first, and stop if you see scratches or more dullness.
Example Scenario
A homeowner left a vinegar-soaked cloth on a marble vanity overnight. The next day, a rough, dull patch was left behind. After trying polishing powder with no improvement, a professional was called. The expert used a floor machine with diamond pads and restored the marble’s gloss in under an hour.
Home Remedies For Minor Etching: Do They Work?
Many websites suggest home remedies for marble etching, like baking soda, toothpaste, or even car polish. Here’s the truth:
- Baking soda is alkaline, not acidic, so it won’t cause more etching. However, it’s not abrasive enough to polish marble unless you rub for a very long time.
- Toothpaste (non-gel, plain white) can sometimes remove very slight etches, but it often contains small abrasive particles that might scratch the marble.
- Car polish is made for paint, not stone. It might temporarily add shine, but can leave a residue or even cause discoloration.
Non-obvious insight: While these methods sound tempting, they often leave uneven results or create micro-scratches that make the marble look worse over time. It’s best to use products designed for stone.
Preventing Future Marble Etching
Once you fix an etch, you’ll want to prevent it from happening again. Marble is beautiful, but it’s not as forgiving as granite or quartz. Here’s how to protect it:
- Seal Marble Regularly
- Use a high-quality marble sealer every 6–12 months.
- Sealing won’t stop etching, but it gives you more time to wipe up spills before damage happens.
- Clean Spills Immediately
- Blot (don’t wipe) acidic spills like juice, wine, or tomato sauce right away.
- Use Trays and Coasters
- Place trays under bottles (oil, vinegar, soap) and always use coasters for drinks.
- Avoid Acidic Cleaners
- Never use vinegar, lemon cleaners, or general bathroom sprays on marble.
- Stick to pH-neutral cleaners labeled safe for stone.
- Use Cutting Boards and Mats
- Never cut or prepare food directly on marble surfaces.
Important: Even with perfect care, some etching is almost impossible to avoid over many years. This is normal and part of marble’s character in homes.
When To Call A Professional
Not all marble etching can be fixed at home. Here’s when you should consider hiring a pro:
- The etch is deep and feels like a groove.
- The area is larger than your hand or covers multiple spots.
- Polishing powder and home methods don’t work.
- The marble is rare, colored, or has a special finish (like honed or brushed).
Professionals use machines with diamond abrasives and can blend the repair perfectly with the rest of your stone. They can also apply a high-quality sealer for long-term protection.
Cost And What To Expect
Professional marble restoration costs vary:
- Small spot repair: $100–$250
- Large area (kitchen countertop or floor): $300–$800+
Most pros finish in a few hours, and the results are often better than new. Make sure to choose a company with experience and good reviews.
Mistakes To Avoid When Fixing Marble Etching
Many beginners make mistakes when trying to fix marble etching. Avoid these common errors:
- Using Vinegar or Lemon to Clean
- These acids make etching worse, not better.
- Scrubbing With Abrasive Pads
- Green scouring pads and steel wool scratch marble, creating more dull spots.
- Applying Too Much Pressure
- Polishing powders need gentle pressure. Too much can gouge the stone.
- Skipping the Sealing Step
- Unsealed marble is much more likely to etch again.
- Not Testing in a Hidden Spot
- Always try products or sanding methods in an out-of-sight area first.
Non-obvious insight: Some “all-in-one” stone cleaners sold in supermarkets contain mild acids to remove mineral deposits. Always read the label and avoid any product not specifically marked “safe for marble.”
Comparing Marble Etching With Other Surface Problems
It’s easy to confuse etching with other marble issues. Here’s a quick comparison to help:
| Problem | Appearance | Cause | Best Fix |
|---|---|---|---|
| Etching | Dull, light, rough | Acidic liquid | Polishing powder or pro polishing |
| Staining | Darker, smooth | Oils, coffee, wine | Poultice or stain remover |
| Scratches | Lines, light or dark | Sharp object | Polishing powder, sanding |
| Etch + Stain | Dull + dark | Acidic, colored liquid | Poultice first, then polish |
Tip: Always identify the problem before trying a fix. The wrong method can make things worse.

Credit: www.roserestoration.com
Recommended Marble Polishing Powders And Products
Many brands make products for fixing marble etching. Here’s a comparison of some popular options:
| Brand | Type | Best For | Average Price |
|---|---|---|---|
| Tenax Marble Polishing Powder | Powder | Light etching | $18 (8 oz) |
| MB Stone Care Etch Remover | Paste | Light to moderate etching | $25 (8 oz) |
| Stone Pro Polishing Compound | Powder | Honed or polished marble | $20 (6 oz) |
| Granite Gold Polish | Spray | Routine shine, not deep etching | $10 (24 oz) |
Advice: Always follow manufacturer instructions and never mix products unless directed.
Realistic Expectations: Polished Vs. Honed Marble
There are two main types of marble finishes:
- Polished marble is glossy and reflective. Etching stands out more but is easier to polish.
- Honed marble is matte or satin. Etching is less obvious, but restoring shine can be harder.
If your marble is honed, use a product made for honed finishes. Polishing powders for glossy marble may leave a shiny patch on a matte surface. Some homeowners prefer to leave minor etching on honed marble as part of its natural look.
Step-by-step For Large Areas (countertops, Floors)
If you have etching on a large surface, like a kitchen counter or floor, the process is similar but needs more time and care.
- Clear the Area
- Remove all objects, mats, and appliances.
- Clean Thoroughly
- Wash with a pH-neutral cleaner and dry.
- Divide into Sections
- Work in small areas (2×2 feet) to avoid drying out the polishing powder.
- Apply Powder and Buff
- Use a damp, soft cloth or a low-speed buffer.
- Rub in circles for 1–2 minutes per section.
- Rinse and Repeat
- Wipe away residue with a clean, damp cloth.
- Move to the next section.
- Final Polish and Seal
- After the whole area is done, give a final wipe and apply sealer.
Tip: For floors, consider renting a floor buffer for more even results.
Frequently Asked Questions
What Is The Difference Between Marble Etching And Staining?
Etching is caused by acids that react with marble’s surface, making it dull and rough. Staining is caused by liquids soaking into the marble, changing its color. Fixing etching needs polishing, while stains need a poultice or stain remover.
Can I Use Baking Soda To Fix Marble Etching?
Baking soda might help with tiny, shallow etch marks, but it’s usually not strong enough to restore shine. It’s safe to try, but for best results, use a marble polishing powder made for stone.
How Long Does It Take To Fix Marble Etching?
Small, light etch marks often take 5–10 minutes to fix. Deeper etches or large areas can take 30 minutes to a few hours. If the etch is very deep, a professional may need several hours with special equipment.
Will Sealing My Marble Prevent Etching?
Sealing marble helps protect against stains, but it does not stop etching from acids. It gives you more time to clean up spills, so always wipe up acidic liquids quickly.
Where Can I Find More Information On Marble Care?
For more details on marble maintenance and restoration, visit Natural Stone Institute, which provides guidelines and tips for homeowners.
Marble etching can be frustrating, but it’s rarely permanent. With the right approach and some patience, you can restore your stone’s beauty and enjoy it for years to come. Remember to act quickly, use the right products, and protect your marble to keep it looking its best.

Credit: stone-repairs.com