
Pull out trash cans are a smart way to keep your kitchen organized and clean. Instead of leaving a trash bin in plain sight, you can hide it inside a cabinet and simply pull it out when you need it.
If you are thinking about making this upgrade, you might worry that the installation is too difficult or complicated. The good news is, installing a pull out trash can is a project that many homeowners and renters can do themselves with basic tools and a little patience.
This guide will walk you through everything you need to know. You will learn about the different types of pull out trash cans, what tools and materials you need, how to measure your space, and the step-by-step process to get it done.
Along the way, you will find helpful tips, common mistakes to avoid, and answers to questions that often confuse beginners. Whether you have a small kitchen or a large one, this guide will help you make the right choices and avoid frustration.
Installing a pull out trash can can make your kitchen feel more modern and convenient. It can also help with odor control and free up floor space. Let’s get started and see how you can install one in your own kitchen with confidence.
Why Install A Pull Out Trash Can?
A pull out trash can is more than just a kitchen upgrade. It solves several common problems and adds real value to your home.
First, it keeps your trash hidden from view. This is especially useful if you have an open kitchen or want your space to look neat. Second, a pull out system helps control odors better than an open bin, especially if you choose a model with a lid.
Third, it saves floor space, which is important in smaller kitchens. You can even use the area above the trash can for other storage.
Another benefit is convenience. You can open the cabinet door and toss items directly into the bin. If your hands are full, you can install a system with a foot pedal or soft-close feature. Pull out trash cans also make recycling easier, since many models offer two bins for sorting waste.
Finally, many home buyers see pull out trash cans as a modern kitchen feature. If you ever decide to sell your house, this small upgrade can help your kitchen stand out.
Types Of Pull Out Trash Can Systems
Before you buy a pull out trash can, it’s important to understand the different types. Each type fits a different space and budget. Here are the main options:
- Single-bin pull out: This system has one trash bin. It is good for small kitchens or if you only need one bin for waste. Most single-bin systems fit inside a standard 15-inch or 18-inch cabinet.
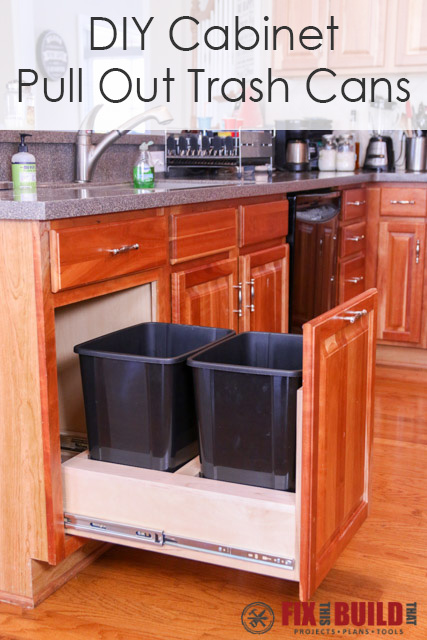
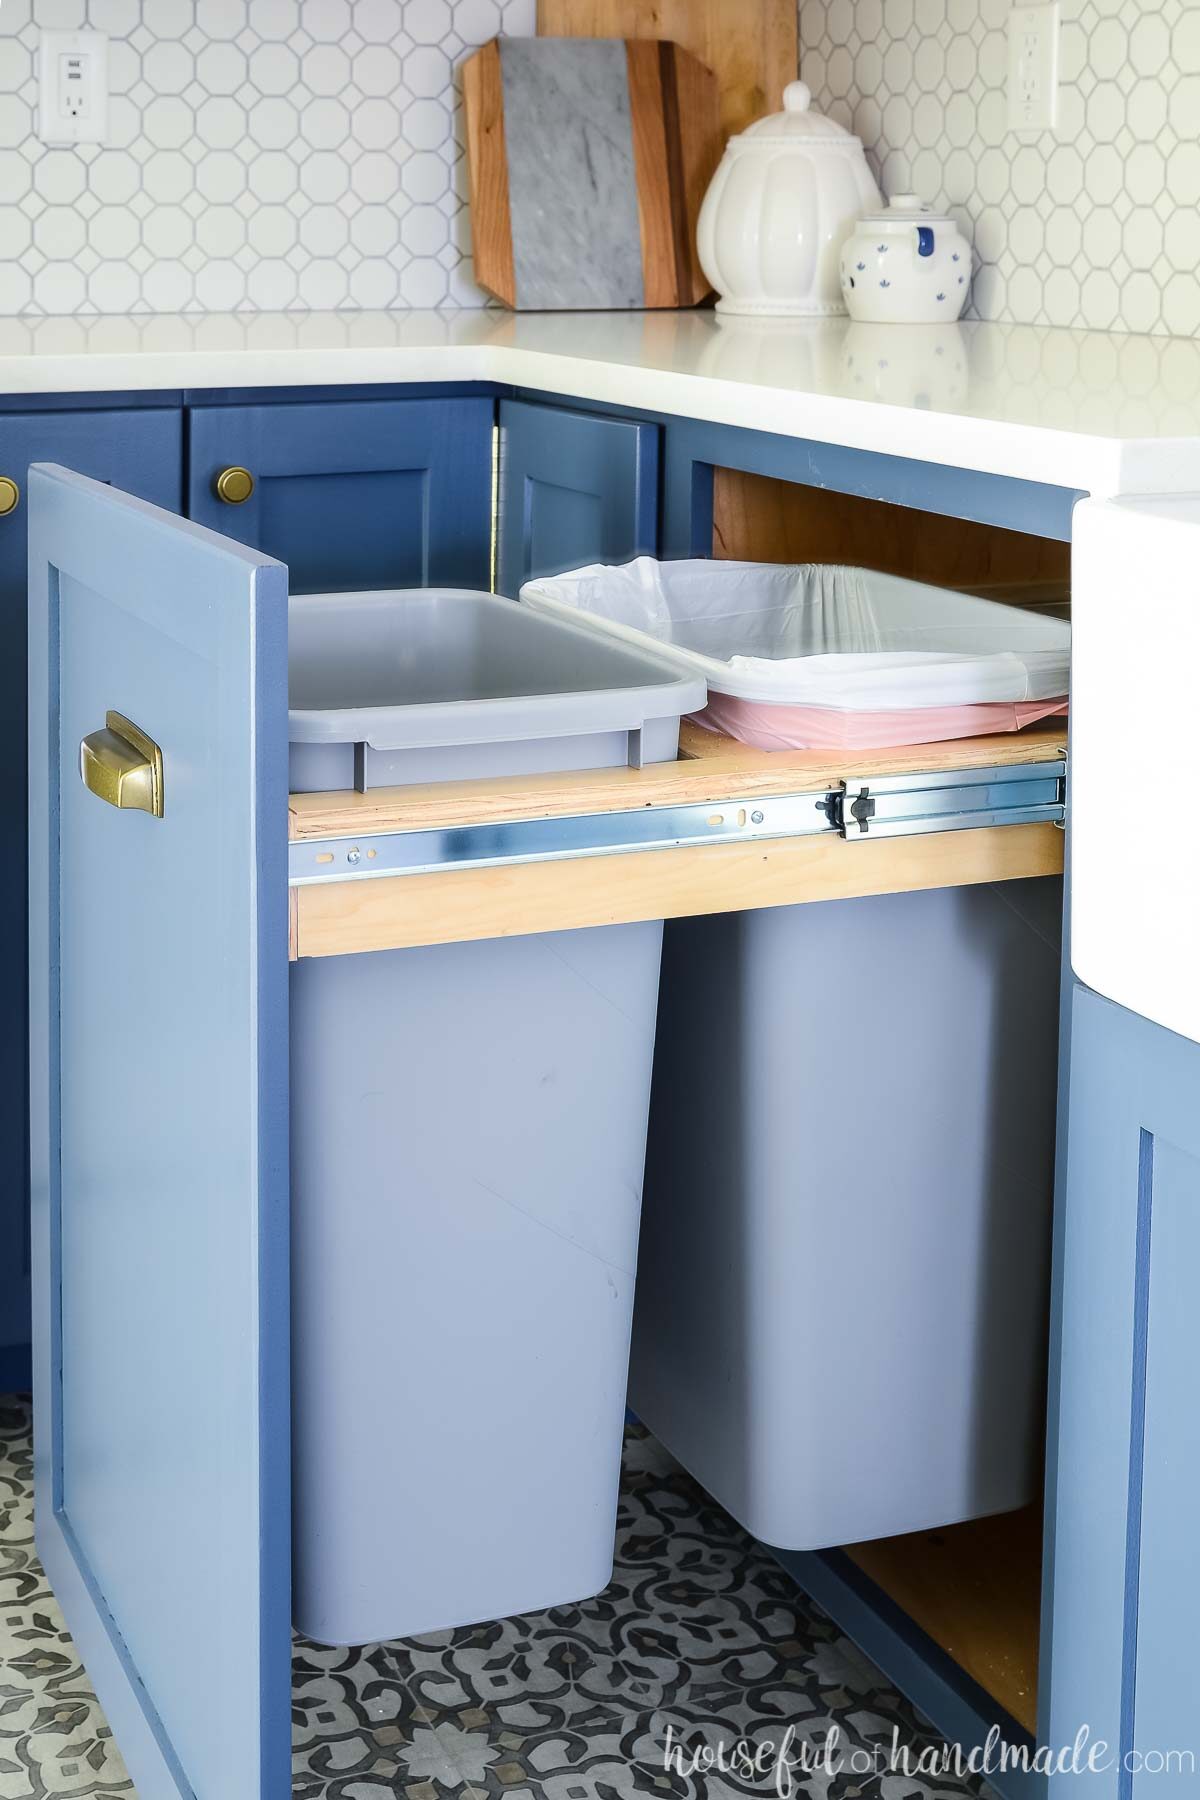
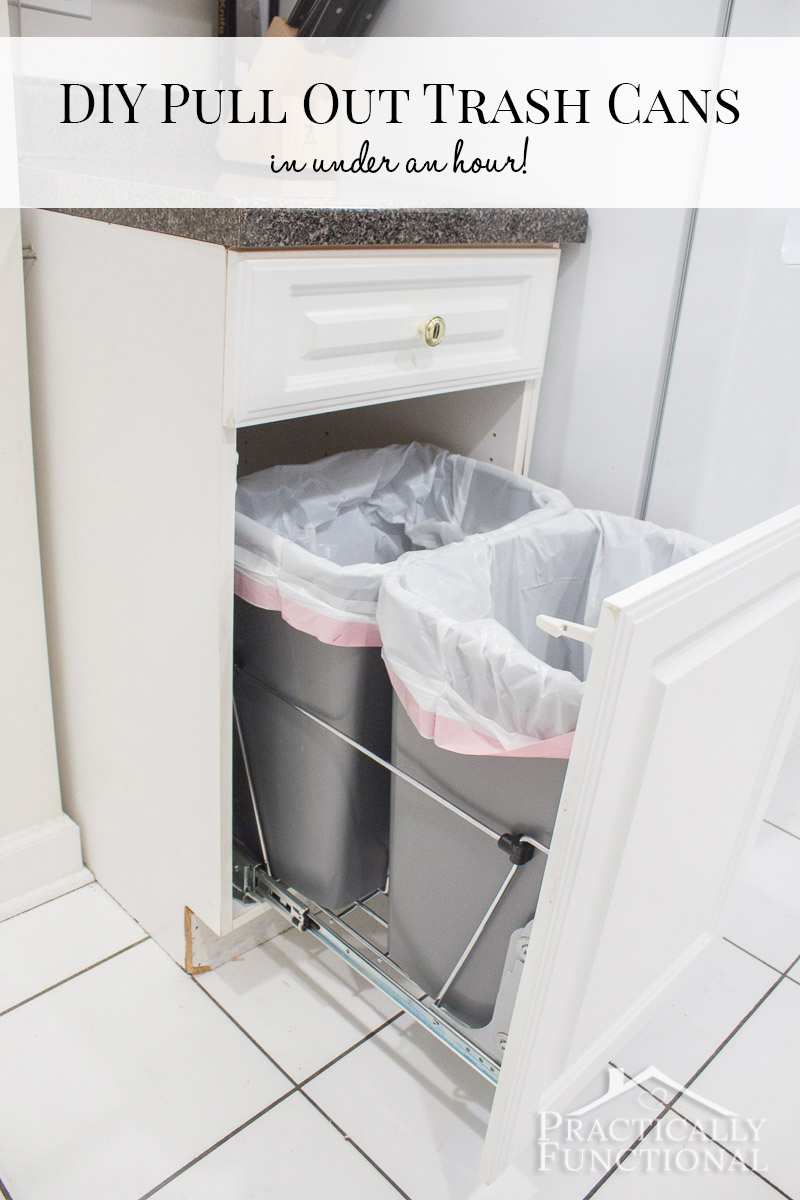
- Double-bin pull out: This system has two bins, usually side by side. One bin is for trash, and the other can be for recycling or compost. Double-bin systems need a wider cabinet, usually 18 inches or more.
- Bottom-mount slide-out: In this design, the trash can sits on a sliding platform attached to the cabinet floor. You pull the bin out using a handle. This is the most common type and is easy to install.
- Side-mount slide-out: Here, the slides are attached to the cabinet sides instead of the floor. This type can be more stable but may require more precise measurements.
- Door-mount kit: Some systems let you attach the cabinet door directly to the pull out frame. When you pull the door, the trash can slides out with it. This creates a seamless look but needs careful alignment.
- Soft-close and self-close: Some pull out systems come with soft-close or self-closing slides. These features prevent slamming and make the system feel higher quality.
- Custom-built pull outs: If you have an unusual cabinet size, you can get a custom pull out system. These are more expensive but can fit any space perfectly.
Non-obvious insight: Many beginners do not realize that not every cabinet can fit a pull out system. If your cabinet has plumbing or a thick frame, you may need a low-profile or custom solution.
Tools And Materials Needed
Before you begin, gather all your tools and materials. Having everything ready will make the process smoother and prevent delays.
Tools:
- Tape measure (for accurate measurements)
- Pencil or marker
- Drill (preferably cordless)
- Screwdriver (Phillips and flat-head)
- Level (small torpedo level is enough)
- Safety glasses
- Utility knife (optional, for trimming)
- Adjustable wrench (for tight spaces)
Materials:
- Pull out trash can kit (make sure it fits your cabinet size)
- Screws (usually included in kit, but check before starting)
- Wood shims (helpful for uneven cabinet floors)
- Cabinet door mounting brackets (if using a door-mount system)
Pro tip: Before you remove any packaging, check that the kit includes all parts and instructions. Missing screws or brackets can slow you down.
Measuring Your Cabinet For A Pull Out Trash Can
Measurement is the most important step. The wrong size will not fit, or the bin will not slide out properly. Here is how to measure your space:
- Cabinet width: Measure the inside width of your cabinet from side to side. Most pull out systems list the minimum width required.
- Cabinet depth: Measure from the back of the cabinet to the inside edge of the front frame. Make sure to account for pipes or hinges that might block the bin.
- Cabinet height: Measure from the floor of the cabinet to the top inside edge. This tells you how tall a bin you can fit.
- Door clearance: If you want a door-mounted system, measure the thickness of the door and make sure there is enough room for the frame and slides.
- Obstacles: Look for anything inside the cabinet that could get in the way, such as plumbing, electrical outlets, or shelf supports.
Below is a sample comparison of common pull out trash can sizes and what cabinets they fit:
| System Type | Cabinet Width Needed | Bin Capacity | Best For |
|---|---|---|---|
| Single-bin | 12–15 inches | 35 quarts | Small kitchens |
| Double-bin | 18–21 inches | 2 x 35 quarts | Recycling + trash |
| Custom | Any size | Varies | Odd-shaped cabinets |
Non-obvious insight: Do not forget to check the opening of the cabinet, not just the inside. Sometimes the frame is narrower than the cabinet’s interior.
Credit: fixthisbuildthat.com
Step-by-step Guide To Installing A Pull Out Trash Can
Installing a pull out trash can is easier if you follow these clear steps. The process is similar for most bottom-mount and side-mount kits.
1. Prepare Your Cabinet
Remove everything from inside the cabinet. Clean the floor and sides with a damp cloth. Check for nails, screws, or bumps that could affect the installation.
If your cabinet has a fixed shelf or divider, you may need to remove it. Some kits work with shelves, but most need an open space.
2. Mark The Placement
Open your pull out trash can kit. Place the frame or sliding base inside the cabinet to check the fit. Use a pencil to mark where the front of the frame should sit. Most systems are installed just behind the cabinet face frame, but not touching it.
Use your tape measure to center the frame from side to side. Mark the mounting holes with your pencil.
3. Drill Pilot Holes
Using a drill and a small drill bit, make pilot holes for the mounting screws. Pilot holes help prevent the wood from splitting and make it easier to drive in screws.
If your cabinet floor is made from particle board, drill carefully to avoid damage.
4. Attach The Slide-out Frame
Set the frame back in place, aligning it with your pencil marks. Use a screwdriver or drill to drive the screws into the pilot holes. Tighten each screw, but do not overtighten — this could strip the holes.
Double-check that the frame is straight using a level. If the cabinet floor is uneven, use wood shims to level the frame.
5. Install The Trash Bin(s)
Slide the trash bin(s) into the frame. Make sure the bin fits easily and can move in and out without rubbing the cabinet sides.
If your kit includes a lid, attach it according to the instructions. Some lids are attached to the bin, while others are fixed to the cabinet.
6. (optional) Mount The Cabinet Door
If you bought a door-mount system, follow these extra steps:
- Attach the mounting brackets to the inside of the cabinet door. The kit should include screws and templates for alignment.
- With the bin pulled out, hold the door against the brackets and mark the screw holes.
- Remove the door, attach the brackets, then reattach the door.
- Test the movement. The door should pull the bin out smoothly and close fully.
7. Test And Adjust
Pull the trash can in and out several times. Check for smooth movement and that the bin does not hit the cabinet frame. If the system feels stiff, check if the slides are straight and level.
For soft-close or self-close systems, test the closing action. Adjust the position of the frame or brackets if needed.
8. Clean Up
Vacuum up sawdust and wipe down the area. Put a trash bag in the bin and test it with some light use. Make sure the bag fits and does not slip down inside the bin.
Pro tip: Many beginners skip the leveling step. An uneven frame can cause the bin to slide open on its own, or not close all the way.
Common Problems And How To Fix Them
Even with good instructions, you might run into a few issues. Here are solutions to the most common problems:
- Trash can hits the door frame: This usually means the frame is not centered. Loosen the screws, shift the frame, and retighten.
- Slides feel rough or noisy: Check for dirt or sawdust in the slides. Clean them and add a little silicone spray if needed.
- Trash bag slips down: Choose a bin with a bag holder ring, or use a rubber band to hold the bag in place.
- Bin does not slide all the way out: Make sure nothing is blocking the slides. If you installed the frame too far back, move it forward.
- Cabinet door does not close: Check that the door brackets are not too high or low. Adjust as needed.
Extra tip: If your bin is too small for your needs, some kits let you swap in a larger bin later if your cabinet space allows.
Comparing Different Pull Out Trash Can Systems
Choosing the right system means balancing price, features, and fit. Here’s a quick comparison of the main types you might find in stores:
| Type | Average Price Range | Ease of Install | Main Benefit |
|---|---|---|---|
| Bottom-mount | $50–$120 | Easy | Works in most cabinets |
| Side-mount | $70–$150 | Medium | More stable |
| Door-mount | $90–$200 | Medium/Hard | One-step operation |
| Soft-close | $120–$250 | Medium | No slamming |
| Custom | $200+ | Hard | Fits any space |
Non-obvious insight: Some systems are designed for face-frame cabinets (a frame around the opening), while others are for frameless cabinets. Always check which type you have.
Practical Tips For A Trouble-free Installation
Installing a pull out trash can is easier if you follow these practical tips:
- Read the manufacturer’s instructions fully before starting. Each kit is a little different.
- Take your time measuring. Double-check all dimensions.
- Use a level at every step, not just at the end.
- Keep all screws and small parts in a cup or dish so they don’t get lost.
- If you hit a problem, search for your kit’s model number online. Many brands have video guides.
- If drilling near plumbing, go slowly and check behind the wood first.
Beginner mistake: Installing the slides upside down or backwards. Look for markings like “left” and “right” on the parts.
Maintaining Your Pull Out Trash Can
Once installed, your pull out trash can will need a little care to stay working smoothly.
- Clean the slides with a damp cloth every few weeks.
- Check screws every few months and tighten if needed.
- Lubricate the slides with silicone spray if they start to squeak.
- Clean the bin regularly to prevent odors.
If you notice the bin starting to tilt or wobble, check that the frame is still tight. Over time, heavy loads can loosen screws.
Upgrading Or Changing Your System Later
If you want to change your pull out trash can system in the future, most kits can be upgraded. For example, you might start with a single-bin system and later switch to a double-bin frame if your cabinet is wide enough.
Some brands sell accessories like soft-close slides or recycling bins that fit into the same frame. Always check compatibility before buying upgrades.
If you plan to remodel your kitchen, save the measurements and installation instructions. This will make it easier to reinstall the system or move it to a new cabinet.
Credit: housefulofhandmade.com
Environmental Benefits Of Pull Out Trash Cans
Pull out trash cans make it easier to separate waste and recycling. Many double-bin systems come with labels or color-coded bins, which helps everyone in the home sort correctly.
By keeping waste hidden, you are less likely to attract pests or leave food scraps out. This helps keep your kitchen cleaner and healthier.
Some cities offer composting programs. A pull out system with three bins lets you sort trash, recycling, and compost in one place. This can reduce the amount of waste you send to the landfill.
For more information about recycling and composting best practices, you can visit the EPA’s recycling page.
Cost Breakdown: Diy Vs. Professional Installation
You might wonder if you should do it yourself or hire a pro. Here’s a simple cost breakdown:
- DIY installation: The main cost is the pull out trash can kit ($50–$250). You may need to buy a drill or level if you do not already have them, but most people have the basic tools. The total cost is usually under $300.
- Professional installation: Hiring a handyman or carpenter can cost $100–$200 for labor. This is in addition to the price of the kit. Professional installation is faster and may be more precise, but for most people, DIY is possible.
Important: If your cabinet has plumbing or wiring nearby, or if you are not comfortable with tools, hiring a pro is a good idea.
Pull Out Trash Can Installation For Renters
If you are renting your home, you may still be able to install a pull out trash can, but check with your landlord first. Some systems can be installed without drilling or can be removed when you move out.
Look for “no-drill” or “tool-free” pull out kits. These usually use strong adhesive strips or tension rods instead of screws. They are less sturdy but good for temporary solutions.
Save all the original cabinet hardware and fill any screw holes when you move out. This will help you get your deposit back.
Safety Tips When Installing A Pull Out Trash Can
Safety is always important, even for small projects. Here are some key tips:
- Wear safety glasses when drilling or using power tools.
- Keep children and pets away from the work area.
- Check for wires or pipes behind cabinet walls before drilling.
- Use a stable step stool if you need to reach high or deep cabinets.
- Do not overtighten screws, as this can damage the cabinet.
If you are unsure about any part of the process, ask for help or look for video tutorials for your kit model.
Credit: www.practicallyfunctional.com
Creative Uses For Pull Out Trash Can Systems
Pull out systems are not only for trash. With a few adjustments, you can use them for:
- Recycling bins: Sort glass, paper, and plastic.
- Pet food storage: Keep large bags of food hidden.
- Cleaning supplies: Store bottles and brushes in a pull out bin.
- Laundry rooms: Use for dirty clothes or cleaning rags.
A pull out system can help organize any area where you want easy access and a tidy look.
Frequently Asked Questions
What Cabinet Size Do I Need For A Pull Out Trash Can?
Most single-bin systems need at least a 12–15 inch wide cabinet. Double-bin systems usually need 18 inches or more. Always measure the inside of your cabinet before buying a kit, as sizes can vary.
Can I Install A Pull Out Trash Can If My Cabinet Has A Shelf?
Some systems are designed to fit under or around a fixed shelf, but most need an open space from floor to top. If your shelf is removable, take it out before installing the frame. Check your kit’s instructions for special requirements.
Are Pull Out Trash Cans Hard To Clean?
They are usually easy to clean. You can remove the bin and wash it with soap and water. Clean the slides and frame with a damp cloth. For tougher odors, sprinkle baking soda in the bottom of the bin before adding a new bag.
Can I Install A Pull Out System In A Bathroom Or Laundry Room?
Yes. Pull out systems work in any cabinet with enough space. They are useful for storing cleaning supplies, laundry baskets, or pet food. Just check the bin size and cabinet measurements as you would in the kitchen.
Is It Worth Paying More For A Soft-close Pull Out System?
A soft-close system prevents the bin from slamming shut, which can protect the cabinet and make the system feel smoother. If you want a quieter kitchen or have small children, it is a good upgrade, but a regular system works well for most people.
Installing a pull out trash can is a smart way to make your kitchen (or any space) more organized and modern. By following these steps and tips, you can do it yourself and enjoy the benefits for years to come.
Make sure to measure carefully, choose the right system for your cabinet, and take your time during installation. With a little effort, you will have a neat, hidden solution for managing waste and recycling every day.