Baking is a wonderful way to fill your kitchen with delicious smells and create treats for family and friends. But even the best recipes can turn into a mess if you can’t get your loaf out of the pan. Many bakers—both beginners and experts—struggle with this simple problem: loaves that stick, break, or leave crumbs behind when you try to remove them. The secret weapon? Parchment paper. Lining your loaf pan with parchment paper is a small step that makes a big difference. It ensures your bread, cake, or meatloaf slides out easily and looks perfect every time.
Yet, if you’ve ever fought with a roll of parchment, trying to make it fit smoothly into the corners of your pan, you know it’s not always so simple. There are tricks to getting a neat, crease-free fit, and mistakes that can lead to leaks or sticking.
This guide will show you exactly how to line a loaf pan with parchment paper, explain why it matters, and give you professional tips to make the process easy and effective. Whether you’re baking banana bread for the first time or making artisan sourdough, mastering this basic skill will save you time and frustration.
Let’s dive in and make parchment paper your new best friend in the kitchen.
Why Line A Loaf Pan With Parchment Paper?
Understanding why you should use parchment paper helps you appreciate its real value. Here’s what happens when you line your loaf pan:
Easy Release: Parchment paper acts as a non-stick barrier. Even sticky batters or dense breads won’t cling to the pan. When the loaf is done, you simply lift it out, keeping its shape and crust intact.
No More Broken Loaves: Without parchment, you might need to dig or pry the loaf out, which can cause it to break or crumble. Parchment supports the loaf and lets you remove it in one smooth motion.
Less Cleanup: Any drips or spills are caught by the parchment. This keeps your pan cleaner and reduces scrubbing after baking.
Even Cooking: Parchment paper can help distribute heat more evenly, especially with metal pans that sometimes cause edges to bake faster than the center.
Professional Finish: Baked goods lined with parchment often look neater and more uniform. This is especially helpful if you plan to gift or sell your bread.
Non-obvious insight: Many people don’t realize that parchment also protects against over-browning. It can prevent the bottom or sides of the loaf from getting too dark, especially in older or thin pans.
Types Of Parchment Paper And Alternatives
Not all parchment paper is the same. Picking the right type can affect your baking results.
Bleached Vs. Unbleached
- Bleached parchment paper is white and treated with chemicals. It’s safe for food but may not be eco-friendly.
- Unbleached parchment paper is brown and untreated. It’s more natural but functions the same way.
Pre-cut Sheets Vs. Rolls
- Pre-cut sheets are convenient, especially if you bake often. They save time and ensure you always have the right size.
- Rolls are economical and flexible. You can cut exactly what you need, but it may take extra effort to flatten the paper.
Silicone Parchment
Some parchment paper is coated with silicone, making it extra non-stick and reusable for several bakes.
Alternatives
- Wax paper: Not safe for baking. It melts at high heat and can catch fire.
- Aluminum foil: Can be used, but is not non-stick unless greased. It also doesn’t release loaves as easily.
- Reusable baking mats: Good for flat trays, but difficult to fit into loaf pans.
Non-obvious insight: Some cheap brands of parchment paper can scorch or become brittle at high temperatures. Always check the maximum temperature rating on the box (usually 420–450°F/215–230°C).

Credit: www.youtube.com
Tools And Materials You’ll Need
Before you begin, gather these items for a smooth lining process:
- Loaf pan: Metal, glass, or ceramic
- Parchment paper: Pre-cut sheet or roll
- Scissors: Sharp for clean cuts
- Pencil or marker: Optional, for tracing the pan
- Measuring tape or ruler: Helps ensure a perfect fit
- Cooking spray or butter: Just a light layer to help the parchment stick to the pan (optional)
Step-by-step Guide: How To Line A Loaf Pan With Parchment Paper
Let’s break it down into clear steps. This method works for standard 8×4-inch or 9×5-inch loaf pans. Adjust as needed for other sizes.
1. Measure Your Pan
Place your loaf pan on the parchment paper. Use a ruler or measuring tape to get the length, width, and height (depth) of the pan. You’ll need enough paper to cover the bottom and two long sides, with extra overhang for lifting.
2. Cut The Parchment Paper
Cut a piece of parchment paper that’s long enough to fit the bottom of the pan and rise up both long sides, leaving a few inches extra on each side. For an 8×4-inch pan, about 14–16 inches long and 8 inches wide is usually right.
If you want a perfect fit, lay the pan on the paper and use a pencil to trace around the base, then add a few inches on each end for the sides.
3. Fit The Paper Into The Pan
Press the parchment into the loaf pan. Gently crease the paper at the bottom and along the sides so it hugs the pan’s shape. The ends of the paper should stick out above the pan on both sides; these will be your handles for lifting later.
4. Secure The Parchment
If your parchment won’t stay in place, lightly grease the inside of the pan first with cooking spray or butter. This helps the paper stick and prevents it from sliding around when you pour in the batter.
5. Repeat For The Short Sides (optional)
For extra coverage, especially with sticky batters, cut a second piece of parchment to fit the pan’s two short ends. Lay it across the first sheet, making a cross shape. The corners will overlap slightly, giving you full coverage and easy release.
6. Pour And Bake
Once your pan is lined, pour in your batter as usual. Smooth it evenly and bake according to your recipe.
7. Lift Out The Loaf
When baking is done, let the loaf cool for a few minutes. Then, grab the parchment handles and gently lift the loaf out of the pan. Peel away the paper before slicing.
Visual Comparison: Parchment Paper Lining Methods
To help you see the difference between lining methods, here’s a simple comparison:
| Method | Coverage | Ease of Removal | Best For |
|---|---|---|---|
| Single Sheet (Long Sides) | Bottom + Long Sides | Very Easy | Breads, pound cakes |
| Double Sheet (Crosswise) | Full Coverage | Extremely Easy | Sticky batters, cheesecakes |
| No Parchment | None | Difficult | Sturdy breads, meatloaf |
Tips For Perfect Parchment Lining
Even though the process is simple, a few pro tips can make it even better:
- Crease the edges: Firmly crease the parchment at each corner to help it sit flat and snug.
- Trim excess paper: Extra-long overhang can burn or get in the way. Leave just enough to grip, about 1–2 inches.
- Smooth out wrinkles: Use the bottom of a glass or your hand to press the paper into the corners.
- Check for gaps: Make sure the paper fully covers the bottom and sides. Exposed spots can cause sticking.
- Reuse sheets: If the paper isn’t too stained or greasy after baking, you can reuse it once or twice for similar recipes.
Common Mistakes To Avoid
Lining a loaf pan isn’t difficult, but there are pitfalls to watch for:
- Cutting the paper too small: If the parchment doesn’t reach above the rim, you’ll struggle to lift the loaf out.
- Using wax paper by mistake: Wax paper is not heat-safe and can cause a mess.
- Forgetting to crease: Paper that isn’t creased won’t fit tightly, leading to batter leaks or misshapen loaves.
- Letting parchment fold into the batter: If the paper flops over, it can bake into the loaf. Secure it well.
- Not greasing enough: While parchment is non-stick, a tiny bit of grease helps it stay put, especially for sticky doughs.
Troubleshooting: When Things Go Wrong
Despite your best efforts, things can still go wrong. Here’s how to solve common problems:
- Parchment won’t stay put: Try using a little oil or butter to anchor the paper before adding batter.
- Paper burns in the oven: Make sure the overhang isn’t touching the oven walls or heating element.
- Loaf sticks to paper: Allow the loaf to cool slightly before peeling off the parchment. Hot bread can stick more.
- Paper tears: Use quality, thicker parchment. Very thin or cheap brands can rip under heavy loaves.
Non-obvious insight: If your loaf develops a crease or dent where the paper folded, next time, cut small slits at the corners of the parchment. This allows the paper to overlap neatly and fit the pan’s shape.
How Lining A Pan Affects Different Types Of Loaves
You might be wondering if every loaf needs parchment. Here’s how it helps with different recipes:
Quick Breads (banana Bread, Zucchini Bread)
These batters are wet and sticky. Parchment is a must for easy release.
Yeast Breads
Some yeast breads form a crust that pulls away from the pan, but parchment still helps with even baking and prevents damage to soft bottoms.
Pound Cakes And Tea Loaves
Dense cakes can break if stuck. Lining the pan protects the cake’s shape and makes for prettier slices.
Meatloaf
Meatloaf can leave behind fat and stick to the pan. Parchment makes cleanup easy and helps lift the cooked loaf out whole.
Cheesecake And Bars
Some loaf-style cheesecakes or layered bars are extra delicate. Full parchment coverage allows you to remove them without cracking.
Comparing Parchment Paper With Other Lining Methods
You might consider other ways to line your loaf pan. Here’s how they stack up:
| Lining Method | Non-Stick Quality | Ease of Use | Reusable? |
|---|---|---|---|
| Parchment Paper | Excellent | Easy | Sometimes |
| Cooking Spray/Butter Only | Good | Very Easy | No |
| Aluminum Foil | Fair (if greased) | Moderate | No |
| Silicone Baking Mat | Good | Difficult in loaf pans | Yes |
How To Cut Parchment Paper For Different Pan Sizes
Standard loaf pans come in several sizes. Here’s how to estimate the right parchment dimensions for each:
- 8×4-inch pan: Cut paper about 14 inches long by 8 inches wide.
- 9×5-inch pan: Cut paper about 16 inches long by 9 inches wide.
- Mini loaf pans: Cut paper about 8 inches long by 4 inches wide.
- Extra-deep pans: Add 2–3 inches to the length for higher sides.
For odd-shaped or decorative pans, trace the pan’s base onto parchment, then add enough for sides and handles.
Pro Tips For Advanced Bakers
If you bake often, these advanced tips will save you time and improve your results:
- Make a parchment sling: For very heavy or delicate loaves, fold parchment into a wide “sling” that covers the bottom and both long sides. This adds support and helps avoid breakage.
- Use parchment to shape loaves: For wet doughs, use the paper to help shape and transfer the loaf into the pan without sticking to your hands.
- Pre-cut sheets: Buy a pack of pre-cut sheets sized for your favorite pan. This saves time and ensures a neat fit.
- Keep a template: Cut a piece of cardboard to the size of your pan’s bottom. Use it as a guide for future parchment sheets.
Cleaning And Reusing Parchment Paper
Parchment paper isn’t always single-use. For some bakes, especially those with lower fat and sugar, you can reuse sheets:
- After baking, wipe off crumbs and grease with a clean towel.
- If the paper isn’t torn or too stained, store it flat for your next bake.
- Avoid reusing parchment for strongly flavored foods (like meatloaf), as smells and oils can transfer.
For eco-friendly options, look for compostable or recyclable parchment brands. Some companies make parchment from sustainable forests and use natural coatings.
How Lining A Loaf Pan Impacts Baking Results
Some bakers worry that using parchment paper might change their recipe’s outcome. Here’s what actually happens:
- Texture: Loaves baked with parchment often have a more even crust, as the paper prevents direct contact with hot metal.
- Moisture: The paper traps some steam, which can keep the loaf moist. This is good for cakes and quick breads.
- Shape: Parchment supports the loaf as it rises, preventing it from sticking or collapsing.
- Color: The bottom and sides may be slightly lighter in color. For a darker crust, you can remove the loaf from the pan and bake it a few extra minutes directly on the oven rack.
Credit: www.youtube.com
When You Shouldn’t Use Parchment Paper
While parchment is great for most recipes, there are rare cases where it’s not the best choice:
- Super high-heat baking: Most parchment can’t handle temperatures above 450°F (230°C).
- Very wet or runny batters: If batter is extremely liquid, it may seep under the parchment and cause sticking.
- Crusty, rustic breads: Some artisan breads benefit from direct contact with the pan for a crunchy crust.
If in doubt, check your recipe or test with a small batch first.
Parchment Paper And Food Safety
Parchment paper is generally considered safe for baking. Make sure to:
- Use food-grade, reputable brands.
- Never use parchment that’s torn, scorched, or contaminated with old food.
- Avoid wax paper or plastic-coated papers for oven use.
If you’re interested in the science, you can read more about food safety and parchment on the Wikipedia Parchment Paper page.
Cost And Availability
Parchment paper is available in most supermarkets, online, and specialty kitchen stores. Prices vary, but generic brands work well for most home baking. Expect to pay $3–$8 per roll, or $6–$12 for a pack of pre-cut sheets. Buying in bulk saves money if you bake often.
Environment And Sustainability
Eco-conscious bakers should look for parchment paper labeled:
- Unbleached
- Compostable
- FSC-certified (from sustainable forests)
Some brands offer fully compostable parchment, which can be added to your green bin after use. Avoid parchment with plastic or non-biodegradable coatings.
Frequently Asked Questions
What Is The Difference Between Parchment Paper And Baking Paper?
Parchment paper and baking paper are usually the same thing. Both are heat-resistant, non-stick papers used for baking. In some countries, “baking paper” is the common term. Always check the packaging to make sure it’s oven-safe and food-grade.
Can I Use Parchment Paper At High Temperatures?
Most parchment paper is safe up to 420–450°F (215–230°C). Using it above this temperature can cause it to brown, curl, or even catch fire. Always check the box for the maximum recommended temperature.
Is It Safe To Reuse Parchment Paper?
Yes, you can reuse parchment paper if it’s not too greasy or torn. It’s best for similar recipes, like baking multiple loaves of bread. Avoid reusing for recipes with strong flavors or meat juices, as these can transfer to the next bake.
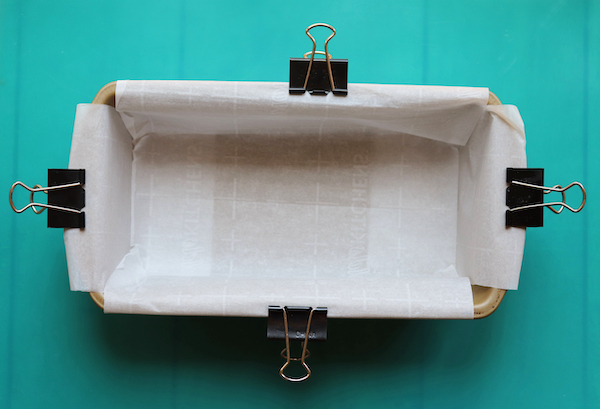
What Should I Do If My Parchment Paper Won’t Stay In Place?
Try lightly greasing the pan first, then pressing the parchment into place. The grease acts like glue and keeps the paper from sliding. You can also use small binder clips to hold the paper, but remember to remove them before baking.
Can I Bake Bread Without Parchment Paper?
Yes, you can bake bread without parchment paper by greasing and flouring the pan well. However, parchment makes it much easier to remove the loaf and ensures a neater result, especially for sticky or delicate batters.
Using parchment paper to line your loaf pan is a smart habit that makes baking easier, cleaner, and more successful. Once you try it, you’ll wonder how you ever baked without it. With a few simple steps and these expert tips, you can enjoy perfect loaves with less fuss and more fun every time you bake.
Credit: www.jennycancook.com