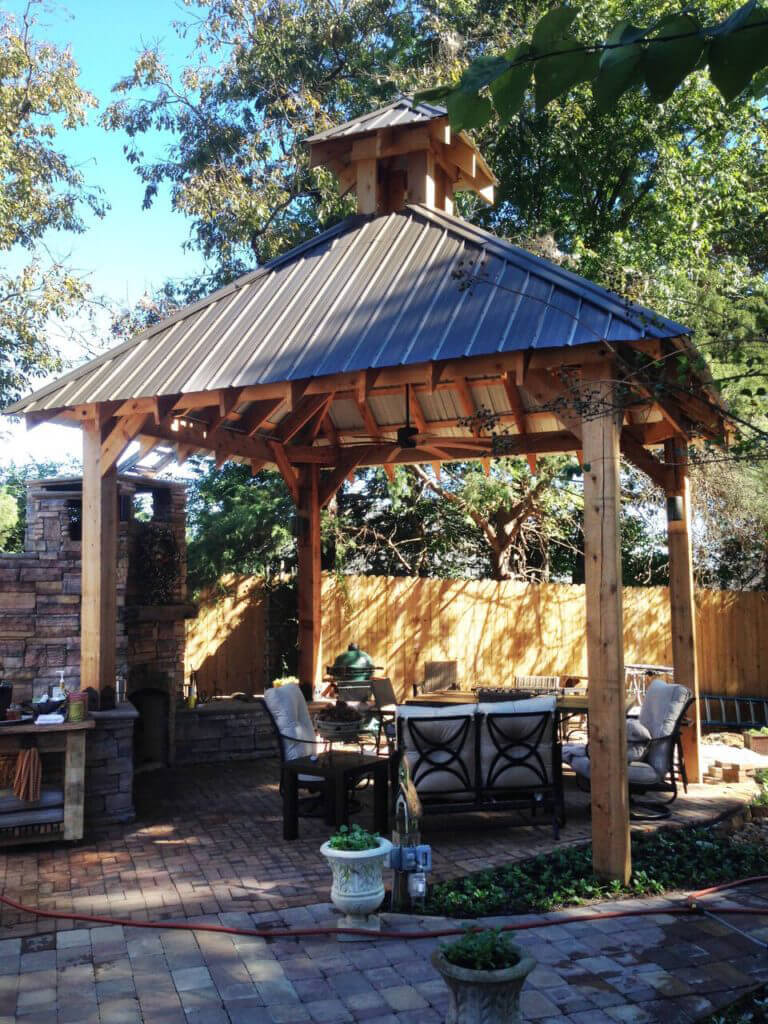
Building a gazebo is a satisfying project, but finishing it with the right roof cap is what truly makes it stand out. The gazebo roof cap is a small but crucial detail. It keeps rain out, adds a polished look, and helps your gazebo last longer. Many people focus on the main structure and forget this part, but a well-made cap can prevent leaks and serious damage. Even if you are new to DIY, you can make a solid, attractive roof cap with the right guidance.
This article will walk you through everything about making a gazebo roof cap. You will learn about materials, design choices, step-by-step building instructions, weatherproofing tips, and common mistakes to avoid. We’ll also look at how a roof cap affects ventilation and style.
Whether you want a simple wooden cap or a more decorative metal one, you will find practical advice here. Let’s start by understanding why the roof cap matters so much.
Why The Gazebo Roof Cap Matters
The roof cap is more than a decoration. It covers the joint where all roof panels meet at the top—an area that can leak if left exposed. Without a cap, rainwater seeps in, damaging the roof and the gazebo’s frame. Over time, moisture can cause mold, wood rot, or rust. Small animals may even try to nest in the open space.
A good roof cap also improves the look of your gazebo. It creates a neat finish and can even match your garden style. Some caps have built-in vents to help release hot air, making the gazebo cooler in summer. Others are purely decorative, with finials or weather vanes.
Many gazebo owners don’t realize how much a poor cap can cost. Repairing water damage is far more expensive than doing the cap right from the start. It’s a detail that pays off for years.
Choosing The Right Materials
Picking the right material for your roof cap is one of the most important steps. The material affects how well the cap protects your gazebo, how long it lasts, and how it looks. Here are some common options:
1. Wood
Wood is classic and matches most gazebos. Cedar and redwood are popular because they resist insects and decay. However, wood must be sealed or painted regularly to prevent rot. Untreated wood can warp and crack.
2. Metal
Metal roof caps—such as aluminum, galvanized steel, or copper—are durable and often come pre-formed for easy installation. Metal resists weather well and can add a modern or traditional touch, depending on the finish. Copper develops a beautiful green patina over time.
3. Pvc Or Vinyl
PVC/vinyl caps are lightweight and low-maintenance. They do not rust or rot, and they’re often used for simple, flat designs. However, they may not look as natural as wood or metal.
4. Composite Materials
Some companies offer composite roof caps made from a mix of wood fibers and plastic. These resist weather and need less maintenance, but they can be more expensive.
5. Shingles Or Roof Tiles
If you want the cap to match your roof, you can use shingles or tiles. This method is common for large gazebos with full shingle roofs. The downside is that it’s harder to build a watertight seal at the peak.
Here’s a quick comparison of the main materials:
| Material | Durability | Maintenance | Appearance | Cost |
|---|---|---|---|---|
| Wood | Medium | High | Classic/Natural | Medium |
| Metal | High | Low | Modern/Classic | Medium-High |
| PVC/Vinyl | Medium | Low | Simple/Modern | Low-Medium |
| Composite | High | Low | Modern/Classic | High |
| Shingles/Tiles | High | Medium | Varies | High |
Most DIY builders choose wood or metal for their first cap. These are easy to shape and install with common tools.
Credit: ozcobp.com
Essential Tools And Supplies
Before you start, gather all the tools and materials you will need. Having everything ready saves time and helps avoid mistakes.
Basic Tools
- Tape measure
- Saw (hand or circular saw for wood, tin snips for metal)
- Drill and drill bits
- Screwdriver
- Hammer
- Ladder (tall enough to reach the gazebo roof safely)
- Caulking gun
Materials
- Your chosen cap material (wood planks, metal sheet, etc.)
- Exterior-grade screws or nails
- Weatherproof sealant or caulk
- Paint or wood sealer (if using wood)
- Roof vent (optional)
- Decorative finial or weather vane (optional)
Safety Gear
- Work gloves
- Eye protection
- Dust mask (for cutting wood or metal)
- Non-slip shoes
If working with metal, use gloves and goggles—sharp edges can cause serious cuts.
Planning Your Roof Cap Design
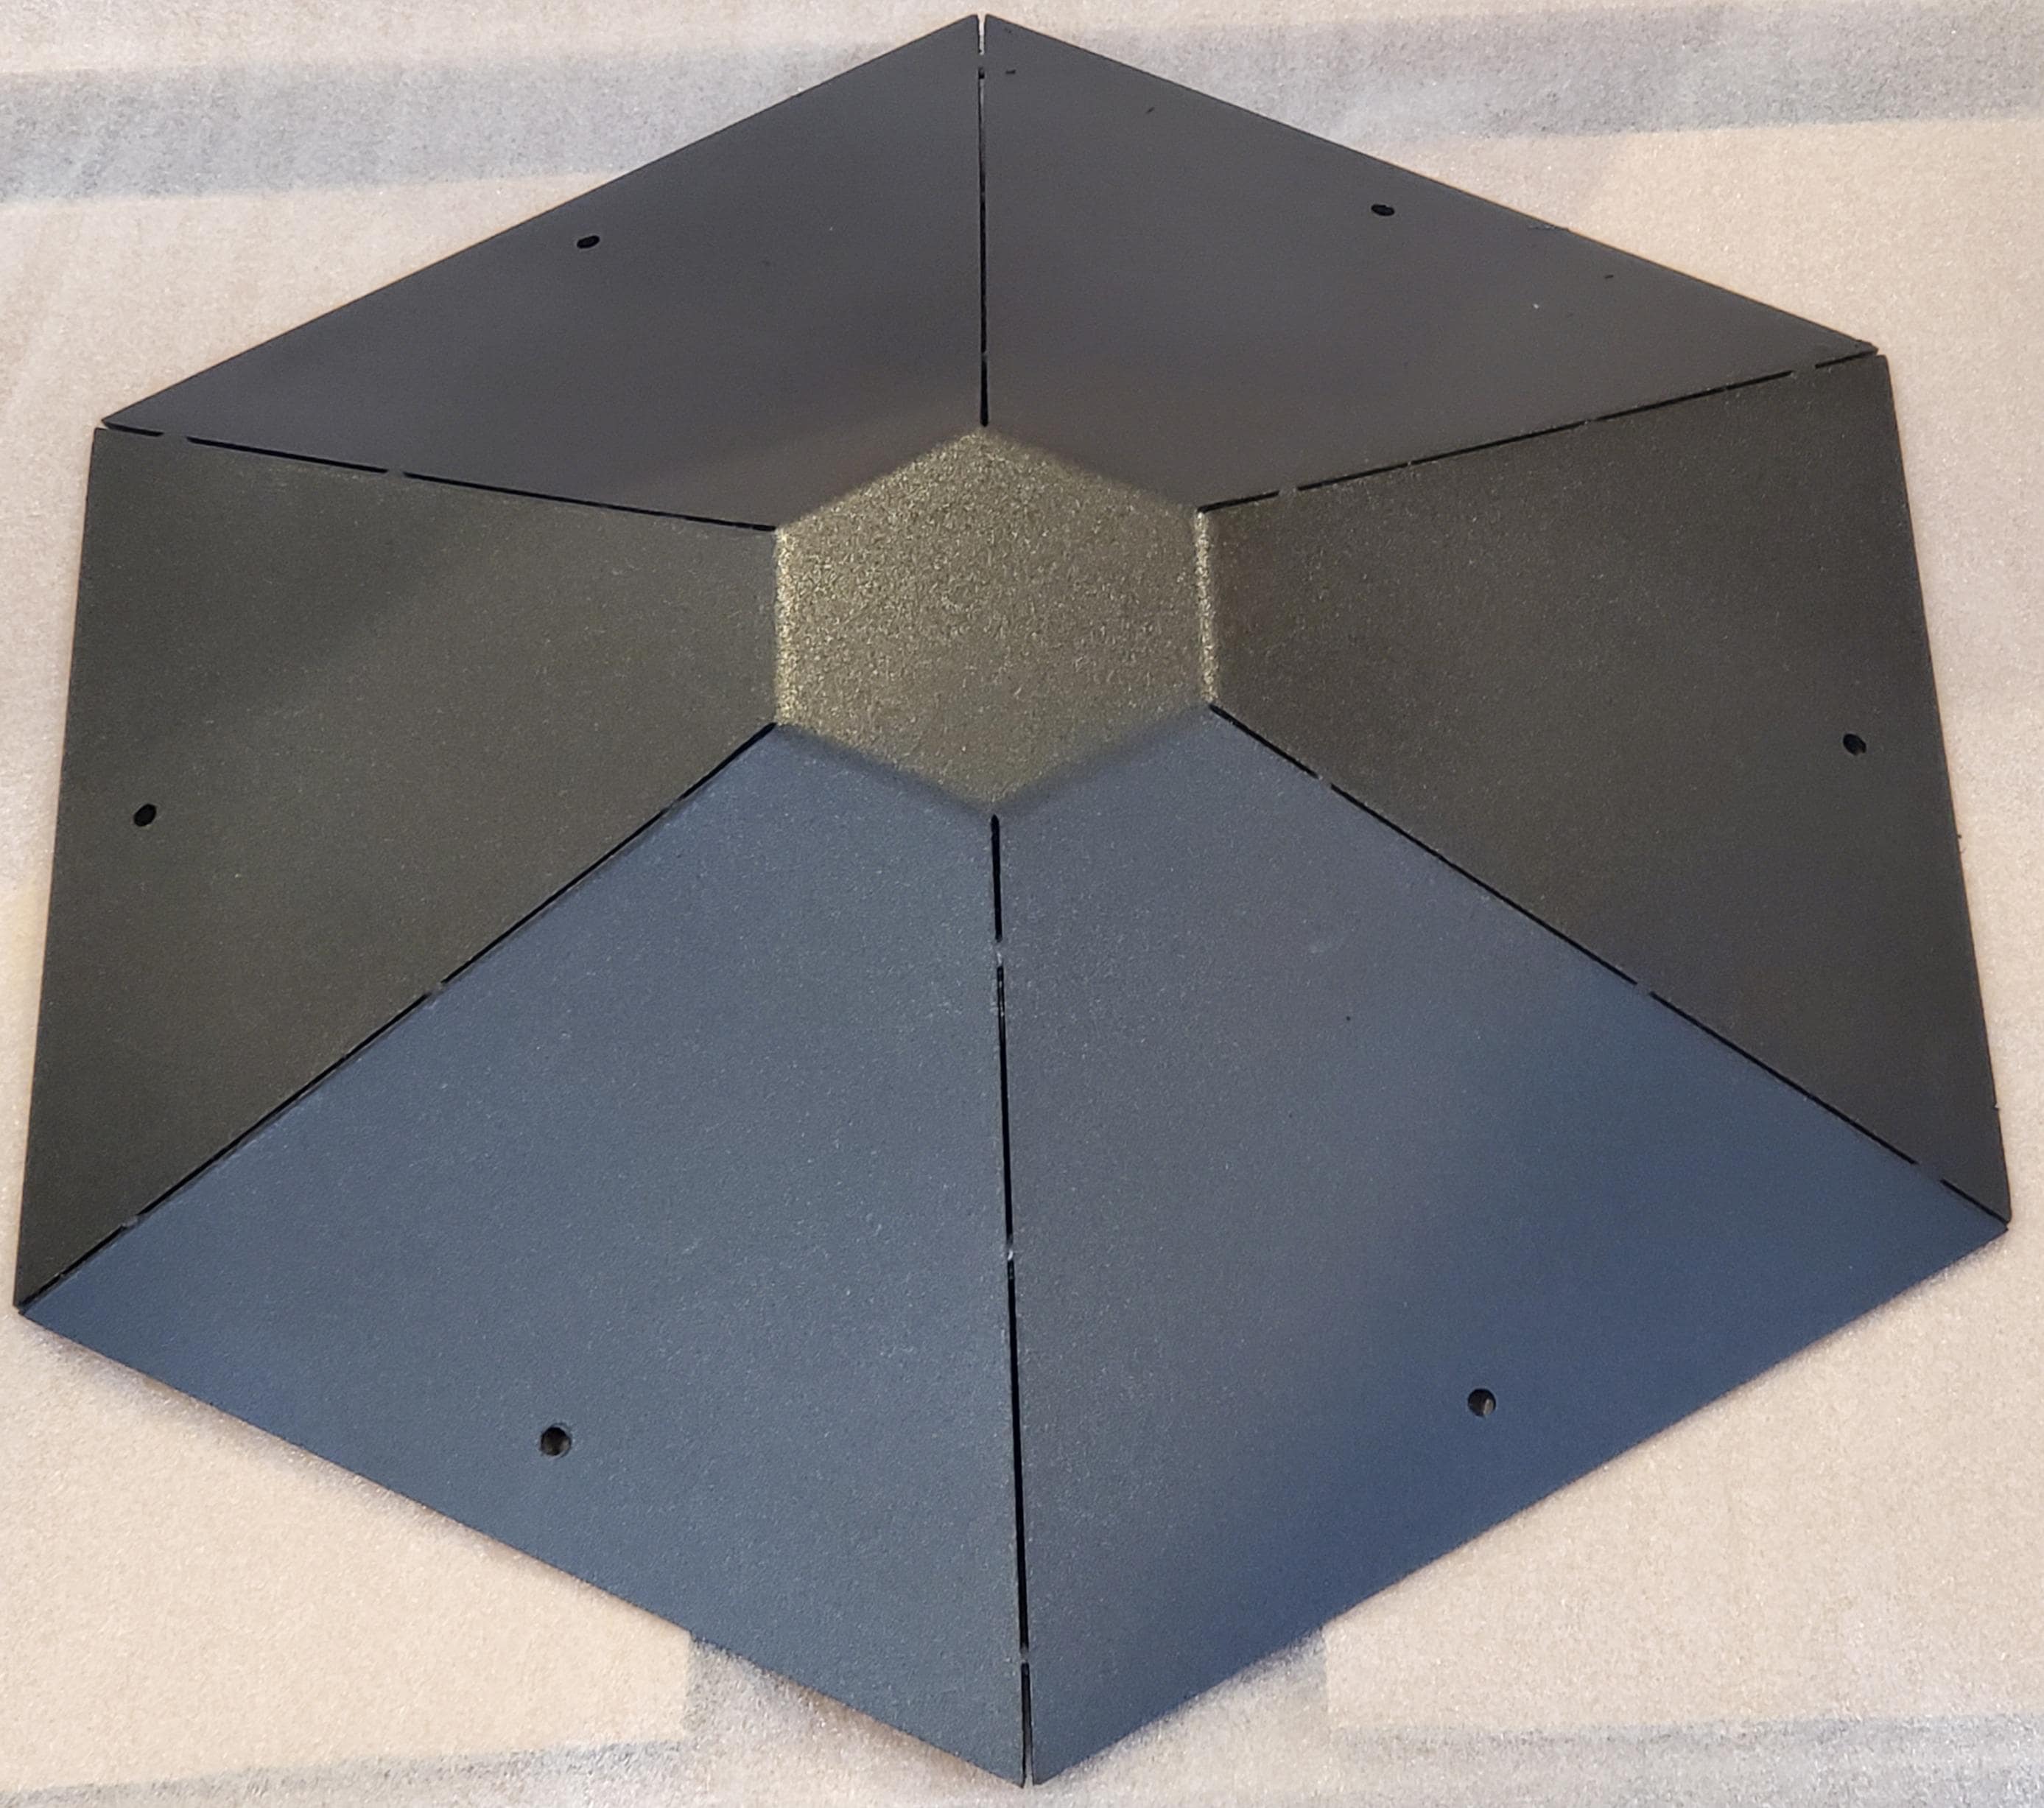
A good roof cap fits the gazebo’s shape and style. Most gazebos have a polygonal roof (hexagonal or octagonal), but some are square or round. The cap must cover the very top where all panels meet.
Measuring The Peak
- Use your tape measure to find the diameter or width across the top of the roof.
- Allow for a small overhang—usually 1 to 2 inches—so water drips off the edge.
- If your roof has a vent hole, measure its size to ensure the cap will fit over or around it.
Cap Styles
You have several options:
- Flat Cap: A simple disk or square covers the top. Easiest to build, but may trap heat.
- Pyramid or Cone: Sloped sides help shed water and look elegant. Requires angled cuts.
- Ventilated Cap: Has side vents or a raised center to let hot air escape.
- Decorative Cap: Includes extras like a finial, weather vane, or latticework.
A flat cap is best for beginners, while more advanced builders may want to try a pyramid or vented style. If you live in a hot climate, consider a ventilated cap to prevent the gazebo from overheating.
Credit: www.etsy.com
Step-by-step Instructions For Building A Wooden Roof Cap
Let’s walk through the process of making a basic wooden cap with a slight pitch. This design works for most hexagonal or octagonal gazebos.
Step 1: Measure And Cut The Base
- Measure the distance across the roof peak.
- Add 2 inches for overhang.
- Cut a piece of 1-inch thick exterior plywood to this size. For octagonal roofs, cut the plywood in an octagon shape; for square roofs, use a square.
Step 2: Add A Pitch
A flat cap can hold water, so it’s better to add a slope. You can do this by attaching wedge-shaped wood strips around the edges.
- Cut four or more wedges from scrap wood.
- Attach them to the top of the base with screws.
- The wedges should be thicker at the outside and thinner near the center.
Step 3: Attach The Top
- Cut another piece of plywood, slightly smaller than the base.
- Place it on the wedges to form a gentle slope.
- Screw it down securely.
Step 4: Seal All Edges
- Use exterior-grade caulk to seal the seams between the base and the top.
- Pay special attention to corners—these are common leak points.
Step 5: Weatherproof
- Paint or seal all wood surfaces, including the underside.
- Let the finish dry completely before installing.
Step 6: Add Decorative Elements
- If you want, attach a finial or small weather vane in the center.
- Drill a hole for the base of the decoration and secure it with screws.
Step 7: Install The Cap
- Climb up safely with a helper.
- Place the cap over the roof peak.
- Secure it with exterior screws through the base into the gazebo’s roof panels.
- Seal around the bottom edge with caulk to prevent water entry.
Practical Example
Suppose your gazebo has an octagonal roof, with a 12-inch diameter at the peak. You would cut a 14-inch octagon from plywood, make wedges that are 1 inch thick at the edge and taper to zero, then top it with a 12-inch octagon.
After sealing, you would attach the cap with four screws, one on each side.
How To Build A Metal Roof Cap
Metal roof caps are durable and offer good weather protection. You can buy ready-made caps or make your own from sheet metal.
Step 1: Measure And Cut
- Measure the peak as before.
- Use tin snips to cut a circle, square, or polygon from a sheet of galvanized steel or aluminum.
- Add 1–2 inches for overhang.
Step 2: Bend The Edges
- For a pitched cap, gently bend the edges downward using a rubber mallet.
- You can also make a simple cone by cutting a slit and overlapping the edges.
Step 3: Seal And Paint
- If desired, paint the metal with outdoor enamel.
- Seal any seams with silicone caulk.
Step 4: Install
- Secure the cap with screws through pre-drilled holes.
- Use rubber washers under the screws to prevent leaks.
Tip
When cutting metal, wear gloves to avoid sharp edges. File any rough spots before installing.
Adding Ventilation To Your Roof Cap
Many gazebo owners forget about ventilation, but it makes a big difference in summer comfort. Hot air rises and can get trapped under the roof, making the space stuffy.
How To Add A Vent
- Cut a small opening in the center of the cap top.
- Cover the vent with a screen to keep out insects.
- Build a small “hat” or extra cover above the vent, raised by 1–2 inches, to keep rain out.
- For a metal cap, buy a pre-made vented cap or use a louvered design.
Example
A 4-inch round vent with a cap set 1. 5 inches above allows air to escape but blocks rain. You can use hardware cloth (wire mesh) as a screen.
Ventilated caps are especially helpful if your gazebo has curtains, solid walls, or is in a sunny spot.
Weatherproofing Tips
A roof cap must handle all kinds of weather—rain, snow, wind, and sun. Some extra steps can help it last longer:
- Seal Every Seam: Use high-quality exterior caulk or silicone around all joints.
- Use Treated Wood: For wooden caps, choose lumber rated for outdoor use.
- Paint or Stain: Protect wood with two coats of paint or water-repellent stain.
- Check Fasteners: Use galvanized or stainless steel screws to avoid rust.
- Inspect Regularly: Check the cap every season for cracks or loose fasteners.
Below is a quick guide to weatherproofing:
| Action | Material | Benefit |
|---|---|---|
| Caulking seams | Exterior silicone/caulk | Prevents leaks |
| Painting/sealing | Outdoor paint/stain | Stops rot and UV damage |
| Using correct fasteners | Galvanized/stainless screws | Prevents rust |
| Seasonal inspection | Visual check | Finds early problems |

Credit: www.copper-by-design.com
Common Mistakes And How To Avoid Them
Even experienced DIYers can make errors when building a roof cap. Here are some frequent problems and how to prevent them:
- Cap Too Small: A cap that just covers the peak will not keep water out. Always allow for a slight overhang.
- Poor Sealing: Gaps in seams let in water, leading to rot or rust. Seal every joint, especially on wood.
- Wrong Fasteners: Using indoor screws leads to rust and loose caps. Always choose exterior-rated screws or nails.
- Ignoring Ventilation: A solid cap with no vent traps heat. If your area gets hot, add a vent or use a raised cap.
- Weak Attachment: If the cap is not fastened securely, strong winds can blow it away. Use enough screws, and check tightness each year.
- Skipping Paint or Sealant: Unfinished wood will not last outdoors. Even pressure-treated lumber needs a finish.
- Dangerous Installation: Never work on a wet or icy roof. Always use a sturdy ladder and have someone help.
Many beginners forget the overhang or choose the wrong sealant. For wooden caps, use a flexible exterior caulk, not indoor latex. For metal, silicone is best.
Advanced Design Ideas
If you want your gazebo to stand out, consider these advanced roof cap styles:
1. Copper Caps
Copper is expensive but beautiful. It starts shiny and develops a green patina over time. This look suits traditional gardens.
2. Custom Finials
Add a carved wood or metal finial—a pointed, decorative piece—to the top. You can buy ready-made finials or make your own.
3. Integrated Lighting
Install a small solar light or LED under the cap. It shines down softly, making the gazebo usable at night.
4. Painted Designs
Paint the cap with a color that matches your house or garden. Some people add patterns or even a family monogram.
5. Weather Vanes
A small weather vane can turn your gazebo into a focal point. Choose one that matches the style of your yard.
These ideas need more skill and time but can turn your gazebo into a unique garden feature.
Maintenance Tips For A Long-lasting Roof Cap
Once your roof cap is installed, a little care goes a long way:
- Check After Storms: Look for loose screws, missing caulk, or damage.
- Clean Annually: Brush off leaves, dirt, and nests.
- Touch Up Paint: Repaint or reseal wood every 2–3 years.
- Replace Worn Parts: If you see rust on metal or rot in wood, replace affected areas right away.
- Keep Vents Clear: If you have a vent, make sure it stays open and free of spider webs or leaves.
These steps take just a few minutes each season but can double the life of your gazebo cap.
Cost Considerations
The price of making a roof cap depends on your material choice and design. Here’s a rough guide:
- Wooden cap: $30–$70 for materials (plywood, screws, sealer)
- Metal cap: $40–$100 (sheet metal, screws, caulk)
- Custom or vented cap: $60–$150
- Finials or weather vanes: $20–$80 extra
If you hire a carpenter, labor can add $100–$300. DIY is usually much cheaper and lets you customize the design.
Environmental And Local Weather Factors
Where you live affects your roof cap choices:
- In rainy climates, use metal or sealed wood, and add a good overhang.
- In snowy areas, a steep-pitched cap sheds snow better.
- In hot regions, ventilation is key—use a cap with a vent or raised design.
- For coastal areas, use stainless steel screws and avoid untreated steel, which rusts quickly.
Real-world Examples
Some gazebos in public parks use vented metal caps for durability and airflow. These often last decades with little care. Private gardens may use painted wooden caps with decorative finials to match the landscape.
A community garden in the Midwest switched from wood to a metal cap after three years of rot and leaks. The new cap cost $90 but solved their problems for good.
When To Replace Your Roof Cap
Even the best roof caps wear out. Signs it’s time to replace:
- Water stains under the cap
- Loose or missing screws
- Rotten wood or rusted metal
- Cracked or missing caulk
- Cap blown off after a storm
If you see these signs, don’t wait. A quick replacement saves bigger repairs later.
Where To Buy Ready-made Roof Caps
If you don’t want to build your own, you can buy pre-made caps at hardware stores, garden centers, or online. Make sure to measure your roof peak first. Some companies offer custom sizes and styles.
For more information about roofing and caps, you can check resources like this Family Handyman guide.
Frequently Asked Questions
How Big Should A Gazebo Roof Cap Be?
The cap should be at least 1–2 inches larger than the roof peak in all directions. This overhang helps water drip away from the joint and keeps the roof dry.
Can I Use Leftover Shingles Or Roofing Tiles For The Cap?
Yes, you can use shingles or tiles for a matching look. However, make sure the cap is watertight. Shingles alone may leak at the peak unless sealed well.
How Do I Add Ventilation To My Roof Cap?
You can add a vent by cutting a hole in the cap top and covering it with mesh or a louvered vent. Raise a small cover above the vent to block rain but let air escape.
What Is The Best Wood For A Roof Cap?
Cedar and redwood are best because they resist rot and insects. Pine or fir can work if treated and sealed well.
How Often Should I Check Or Maintain My Roof Cap?
Inspect your roof cap at least twice a year—after winter and after summer storms. Re-seal or repaint as needed to prevent water damage.
—
Making a gazebo roof cap is a rewarding project that protects your structure and adds style. With careful planning and simple tools, you can create a cap that lasts for years. Pick the right materials, follow the steps, and add your own touches for a unique finish. A little maintenance keeps your cap strong and your gazebo beautiful—so you can enjoy it through every season.