
Keeping your kitchen clean and beautiful is not always easy, especially around the sink. The wall behind your kitchen sink is one area that gets dirty fast. Water splashes, soap, cooking grease, and even mold can damage the wall. Over time, stains and moisture can make the wall look old and unhealthy.
Many people don’t realize how important it is to protect this spot until they see peeling paint or black spots. But with the right steps, you can keep your kitchen looking great and make cleaning much easier.
This guide shows you how to protect the wall behind your kitchen sink. You’ll learn about the best materials, installation tips, design ideas, and even how to fix common problems. Whether you own your home or rent, you’ll find practical solutions that fit your budget and style.
By the end, you’ll know exactly how to keep that wall safe from water damage and stains, and you’ll understand how to make this small change improve your whole kitchen.
Why The Wall Behind The Kitchen Sink Needs Protection
Many people ask, “Why does this part of the wall get damaged so quickly?” The answer is simple: the sink area is where most water work happens. Washing dishes, cleaning vegetables, or just using the tap all send water and soap splashing on the wall. If the wall is not protected, here’s what usually happens:
- Water stains: These marks can be hard to remove and often become permanent.
- Mold and mildew: Moisture helps mold grow, which can cause health problems.
- Peeling paint or wallpaper: Water gets under the surface, making it bubble and peel.
- Damage to drywall or plaster: Over time, water can break down the wall itself.
Most kitchen walls are made from drywall, which soaks up water easily. Even tiles with grout lines can get dirty and grow mold if not sealed well. That’s why protecting this area matters for both looks and health.
Common Mistakes People Make
Before we explore solutions, it’s helpful to know what mistakes to avoid:
- Ignoring small splashes: Even little drops add up and cause damage over time.
- Using regular paint: Standard wall paint is not water-resistant and will peel.
- Relying only on cleaning: Wiping the wall is not enough if it’s unprotected.
- Choosing the cheapest option: Low-quality backsplashes or sealants often fail quickly.
- Not sealing edges: Water can sneak behind unsealed tiles or panels.
Many beginners also miss the importance of checking for leaks under the sink, which can affect the wall from behind.
Best Materials To Protect The Wall
Choosing the right material can make a big difference. Each option has its pros and cons, and some are better for renters, while others are more permanent.
1. Ceramic Or Porcelain Tile
Tiles are a classic choice. They are waterproof, easy to clean, and come in many styles. Glazed tiles resist stains and mold. Grout lines need to be sealed to prevent water from getting behind them.
2. Glass Tile
Glass tiles look modern and reflect light, making the kitchen feel bigger. They don’t stain, and mold can’t grow on them. They can be expensive and require careful installation.
3. Stainless Steel Panel
A stainless steel backsplash is very durable and gives a professional look. It is easy to wipe clean and won’t rust if installed well. It can show fingerprints but is ideal for heavy use.
4. Acrylic Or Pvc Panels
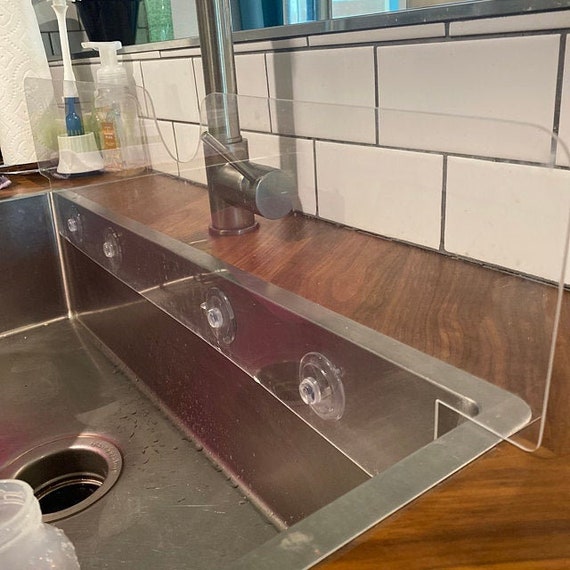
Acrylic or PVC panels are lightweight, waterproof, and simple to install. They come in many colors and can even look like glass. These are good for renters because they are removable.
5. Peel-and-stick Backsplashes
These peel-and-stick tiles are popular for DIY projects. They’re easy to apply and remove, making them perfect for temporary protection. They might not last as long as real tile but are great for quick upgrades.
6. Waterproof Paint
Waterproof or kitchen-specific paint is a simple, budget-friendly option. It creates a barrier that resists water and stains. It’s not as strong as tile or panels but works for light-use kitchens.
7. Laminate Sheets
Laminate sheets are affordable and come in many patterns. They are water-resistant if installed and sealed well. They can peel if water gets behind them.
8. Natural Stone
Granite, marble, or quartz backsplashes are beautiful and durable. They are expensive and need sealing, but they last a long time and add value to your home.
9. Epoxy Coating
Epoxy resin creates a smooth, waterproof surface over the wall. It can be clear or colored, and it’s easy to clean. Installing epoxy takes skill and safety care.
10. Tempered Glass Panel
Large glass panels give a seamless, modern look. They are custom-made to fit your wall and are very easy to clean. They are heavy and need strong support.
Comparison Table: Common Backsplash Materials
Here’s a quick look at how some popular options compare:
| Material | Waterproof | Easy to Install | Durability | Cost | Style Range |
|---|---|---|---|---|---|
| Tile | Yes | Medium | High | Medium-High | Wide |
| Stainless Steel | Yes | Medium | Very High | High | Modern |
| Acrylic Panel | Yes | Easy | Medium | Low-Medium | Wide |
| Peel-and-Stick | Yes | Very Easy | Low-Medium | Low | Wide |
| Waterproof Paint | Somewhat | Easy | Medium | Low | Limited |
| Natural Stone | Yes | Hard | Very High | Very High | Luxurious |
How To Choose The Right Solution For Your Kitchen
There is no “one size fits all” answer. The best choice depends on your kitchen style, budget, and how much effort you want to spend. Here’s how to decide:
Think About Your Budget
- Low budget: Peel-and-stick, waterproof paint, or acrylic panels.
- Medium budget: Ceramic tile, glass tile, or laminate.
- High budget: Natural stone, large glass panels, or stainless steel.
Consider How Long You’ll Stay
- Renters: Look for options that are easy to remove, like peel-and-stick or light panels.
- Homeowners: Permanent materials like tile or stone are better investments.
Match Your Kitchen Style
- Modern: Glass, stainless steel, or epoxy.
- Classic: Ceramic tile or stone.
- Minimalist: Solid glass panels or simple waterproof paint.
How Much Maintenance?
- Low maintenance: Glass, stainless steel, or acrylic.
- High maintenance: Natural stone (needs sealing), tile (grout cleaning).
Comparison Table: Suitability By Situation
| Situation | Best Material | Reason |
|---|---|---|
| Renter | Peel-and-Stick / Acrylic | Easy to install and remove |
| Busy Family | Glass / Stainless Steel | Easy cleaning, high durability |
| Low Budget | Waterproof Paint | Most affordable, simple application |
| Luxury Look | Marble / Glass Panel | High-end style, adds home value |
Step-by-step: Installing Protection Behind Your Sink
The installation process depends on the material you choose. Here are the most common methods, with tips for each.
Installing Tile
- Clean the wall: Remove grease and old paint. The wall must be dry.
- Mark your area: Use a level to draw straight lines.
- Apply tile adhesive: Use a notched trowel for even coverage.
- Lay the tiles: Press tiles into the adhesive, using spacers.
- Let it set: Wait at least 24 hours.
- Grout the joints: Fill gaps with grout and wipe off excess.
- Seal the grout: Keeps water out and prevents stains.
Pro tip: Always seal the edge where tile meets the countertop with silicone caulk, not just grout.
Installing Peel-and-stick Panels
- Wipe the wall: It must be clean and dry.
- Measure and cut: Trim panels to fit your space.
- Peel off backing: Start at one corner.
- Stick to wall: Press firmly and smooth out bubbles.
- Seal edges: Use clear caulk along the bottom and sides if possible.
Painting With Waterproof Paint
- Prep the wall: Sand any rough spots and clean.
- Prime if needed: Some paints need a primer.
- Apply paint: Use a roller for smooth finish.
- Let dry: Apply a second coat if needed.
Insider tip: Check the paint can for “scrubbable” or “kitchen” labels for best durability.
Installing Glass Or Acrylic Panels
- Order custom size: Measure carefully and order the panel.
- Clean wall: Remove all dust and grease.
- Apply adhesive: Use strong construction adhesive or the method recommended by the supplier.
- Position panel: Press into place and use spacers at the bottom.
- Seal edges: Use clear silicone caulk all around to stop water.
How To Keep The Wall Clean And Protected
Choosing the right material is only part of the solution. Taking care of the wall will help it last longer. Here’s how to keep it looking new:
- Wipe daily: Use a damp cloth to clean splashes right away.
- Avoid harsh chemicals: They can damage some surfaces.
- Reseal grout or stone: Do this once a year to block moisture.
- Check caulk lines: If you see cracks, replace the caulk before water gets behind the wall.
- Fix leaks fast: Water from under the sink can ruin even the best backsplash.
Non-obvious tip: Hard water can leave white stains on tiles and glass. Use a vinegar solution to clean these marks before they build up.
Credit: www.etsy.com
Smart Design Ideas For A Stylish And Protected Wall
Protecting the wall doesn’t have to look boring. You can make this area a design highlight in your kitchen.
Go Bold With Color
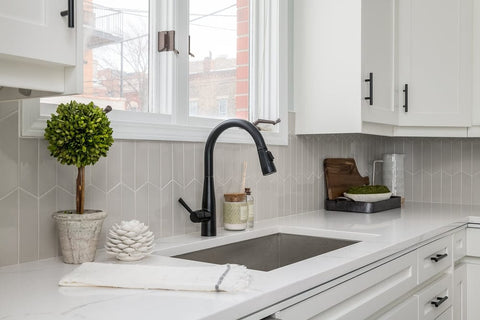
Bright tiles or panels can make the sink area pop. Deep blue or emerald green glass tiles are trendy and hide water spots better than white.
Use Patterns
Herringbone, chevron, or mosaic patterns add interest. Mixing matte and shiny tiles creates depth and hides minor stains.
Add A Shelf
A small shelf above the sink keeps soap and sponges off the counter. Choose a material that matches your backsplash for a seamless look.
Integrate Lighting
Under-shelf or under-cabinet lighting makes cleaning easier and shows off your backsplash. LED strip lights are simple to install and energy-efficient.
Go Full Height
Instead of stopping at the bottom of the cabinets, run your backsplash all the way up. This protects more wall and makes a small kitchen look taller.
What To Do If Your Wall Is Already Damaged
Sometimes you notice the problem too late. Here’s what you can do:
- Peeling paint: Scrape off loose areas, let the wall dry completely, then repaint with waterproof paint.
- Mold or mildew: Clean with a mix of water and bleach (1:10 ratio). Dry the wall fully before repairing.
- Soft or crumbling drywall: Cut out the damaged section and patch with new drywall. Prime and protect with tile or panels.
- Stained grout: Scrub with a baking soda paste and reseal.
Extra insight: If you find mold, check under the sink for leaks. Mold often grows from hidden water, not just splashes.

Credit: www.amazon.com
When To Call A Professional
Some repairs and installations are too hard or risky to DIY. Call a pro if:
- The wall feels soft or smells musty (sign of deep water damage)
- You want to install a heavy glass panel or stone
- You find electrical wires or plumbing in the wall area
A professional can make sure your wall is safe and your new backsplash will last for years.
The Hidden Benefits Of A Good Backsplash
Protecting the wall behind your sink does more than just look nice:
- Increases home value: Kitchens sell houses, and a clean backsplash is a selling point.
- Saves cleaning time: You’ll spend less time scrubbing stains.
- Improves air quality: Less mold means healthier air.
- Prevents big repairs: Fixing drywall or mold is expensive and time-consuming.
Non-obvious insight: A colorful or stylish backsplash can change how you feel about your kitchen, making cooking and cleaning more enjoyable.
Credit: oasistile.com
Common Questions About Wall Protection
Here are some fast facts and answers to questions people often ask.
How Much Does It Cost To Protect The Wall Behind The Sink?
The price depends on the material and installation method. Peel-and-stick panels or waterproof paint can cost as little as $20-$50 for a small area. Ceramic tile or glass can range from $100 to $500 for DIY, or more with professional installation.
Natural stone or custom glass panels can be $500–$2,000 or more. Remember to add the cost of tools, caulk, and sealant.
Can I Install Protection Myself, Or Do I Need A Contractor?
Many options are DIY-friendly, especially peel-and-stick panels, acrylic sheets, and waterproof paint. Tile or glass installation takes more skill but is possible with patience and careful measuring. Large glass panels, stone, or anything involving cutting the wall may need a contractor.
Always check the manufacturer’s instructions before starting.
How Long Will A Backsplash Last?
Most backsplashes last 10 years or more if installed and cared for properly. Tile and stone can last decades. Peel-and-stick panels might need replacing after 2–5 years in busy kitchens. The key to long life is sealing edges and cleaning splashes quickly.
Is It Safe To Use Waterproof Paint Near The Sink?
Yes, as long as the paint is made for kitchens or bathrooms. Look for labels like “scrubbable,” “moisture-resistant,” or “bathroom paint. ” These are designed to handle water, grease, and frequent cleaning. Do not use basic wall paint; it will peel quickly.
What If I Want To Change The Backsplash Later?
Most modern backsplashes can be changed without too much trouble. Peel-and-stick panels remove easily. Acrylic or glass panels can be unscrewed or pried off if installed with clips. Tile is harder to remove and may damage the wall, but it is possible with the right tools.
If you rent, ask your landlord before making changes.
Frequently Asked Questions
How High Should The Protection Go Behind The Kitchen Sink?
Most experts recommend at least 18 inches above the countertop, or up to the bottom of the cabinets. Some people run the backsplash all the way to the ceiling for extra protection and style. The higher you go, the more the wall is protected from splashes.
Can I Put A Backsplash Over Old Wallpaper Or Damaged Paint?
It’s best to remove loose wallpaper or peeling paint first. The wall must be smooth, dry, and clean for adhesive or tile to stick well. If you cover old damage, moisture may get trapped and cause bigger problems later.
What Is The Best Way To Clean A Backsplash?
For tile, glass, or acrylic, a damp cloth and mild soap work best. Avoid abrasive cleaners that can scratch. For grout, use a baking soda paste or a grout cleaner. For stainless steel, wipe with the grain and use a microfiber cloth.
Will Protecting The Wall Stop All Mold And Water Problems?
Protection reduces risk but doesn’t make your kitchen 100% waterproof. Always fix leaks quickly, use caulk to seal edges, and clean up water right away. Good ventilation also helps keep the area dry.
Where Can I Find More Ideas And Inspiration?
There are many online resources, including design websites, DIY forums, and home improvement stores. You can see real kitchen examples at Houzz for more inspiration.
Protecting the wall behind your kitchen sink is a small change with big results. With the right material and care, you’ll keep your kitchen looking fresh and avoid costly repairs. Don’t wait until you see stains or mold—choose the right protection today and enjoy a cleaner, healthier kitchen for years to come.