
Removing a wall oven can seem like a big job, especially if you have never done it before. Many people worry about damaging their kitchen, hurting themselves, or making a mistake with the wiring. But with the right steps, some patience, and careful planning, you can remove your wall oven safely and efficiently.
Whether you want to upgrade your appliance, fix electrical problems, or remodel your kitchen, this guide will walk you through everything you need to know.
Wall ovens are usually heavy and connected to electrical wiring or gas lines. They are often installed inside special cabinets, making their removal different from standard ovens. Some homeowners try to rush the process, but this can lead to costly errors.
Taking your time, using the correct tools, and following safe procedures will help avoid common mistakes.
Before you start, you should understand the risks and plan your work. This article will help you prepare, explain each step, show you what tools you need, and highlight tips that most beginners miss. By the end, you’ll feel confident about removing your wall oven without stress or confusion.
Understanding Wall Ovens
A wall oven is a kitchen appliance built into a cabinet or wall, instead of standing on the floor. Unlike freestanding ranges, wall ovens save space and make cooking easier for many people. They come in electric and gas versions, with single, double, or even triple oven setups.
Most wall ovens weigh between 100–200 pounds (45–90 kg). The electrical connections are often hidden behind the oven, sometimes under a metal cover. Gas models have a flexible gas line, usually with a shutoff valve nearby. Knowing your oven’s type and how it’s installed will help you plan the removal.
Why Remove A Wall Oven?
There are several reasons to remove a wall oven:
- Replacing a broken or outdated oven
- Upgrading to a new model with better features
- Remodeling the kitchen layout
- Repairing electrical or gas issues
- Selling or renting out the property
Removing the oven yourself can save money, but always check local regulations. Some areas require a licensed electrician or gas technician for disconnection.
Safety First: Precautions And Preparation
Your safety is the most important thing. Wall ovens are heavy, and the wiring can be dangerous. Before you start, follow these steps:
- Turn off the power: Find the circuit breaker for your oven and switch it off. If you have a gas oven, shut off the gas valve.
- Protect the kitchen: Remove items from nearby counters. Lay down a drop cloth or cardboard to protect the floor and cabinets.
- Wear safety gear: Use gloves, safety glasses, and closed-toe shoes. If you have allergies or dust problems, wear a mask.
- Check for help: Wall ovens are not easy to lift alone. Ask a friend or family member to help, or hire a professional.
- Read the manual: If you have the oven’s manual, review the removal instructions. If not, look up your oven’s model online.
Many people forget to turn off the power or gas, leading to shocks or leaks. Double-check before you begin. Also, clear enough space so you can move freely and avoid tripping.
Credit: blog.fixyourboard.com
Tools And Materials Needed
Having the right tools makes the job easier and safer. Here’s a list of what you’ll need:
- Screwdrivers (Phillips and flathead)
- Drill (for stubborn screws)
- Adjustable wrench
- Pliers
- Voltage tester (for electric ovens)
- Utility knife
- Work gloves
- Safety glasses
- Drop cloth or cardboard
- Tape measure
- Cordless work light
- Masking tape
- Zip ties (for securing wires)
- Packing tape (for labeling)
Some ovens may need specialty bits or tools, especially if the screws are hidden. A voltage tester is essential for checking if the power is truly off—a step many beginners skip.
Step-by-step Guide To Removing A Wall Oven
Let’s break down the removal process. Go slowly, and don’t skip any steps. If you get stuck, stop and reassess rather than force anything.
Step 1: Turn Off Power Or Gas
Find your home’s main electrical panel. Locate the oven’s circuit breaker and switch it off. For gas ovens, find the shutoff valve behind or under the oven and turn it clockwise to close.
Use a voltage tester to check the power at the oven. If you see any lights or hear beeps, the power is not fully off.
Step 2: Clear The Surrounding Area
Remove any kitchen items near the oven. Take out pans, utensils, and food from nearby cabinets. Lay down a drop cloth or cardboard to protect the floor.
Open the oven door and remove racks or trays. These can be heavy and may fall during removal.
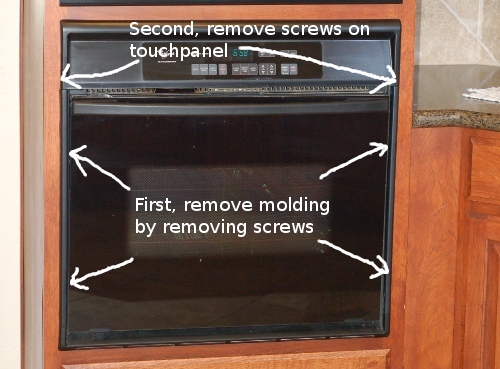
Step 3: Remove Trim And Mounting Screws
Wall ovens are held in place by screws or brackets, often covered by decorative trim.
- Use a flathead screwdriver to gently pry off the trim.
- Look for screws along the sides, top, or bottom of the oven. They may be hidden under rubber covers or metal plates.
- Remove the screws and set them aside. Keep all screws in a small container so you don’t lose them.
Some ovens have more than six mounting screws. Missing one can make the oven hard to pull out, so check carefully.
Step 4: Slide Out The Oven
Wall ovens are heavy and bulky. Stand on each side and gently pull the oven forward.
- If you feel resistance, check for missed screws or stuck wires.
- If your oven is too heavy, use a furniture dolly or get extra help.
- Pull the oven out slowly, making sure not to scratch the cabinets or floor.
Many people forget that wall ovens have sharp edges. Wearing gloves will protect your hands during this step.
Step 5: Disconnect Electrical Or Gas Connections
Once the oven is out far enough, you’ll see the wires or gas line at the back.
For electric ovens:
- Find the main wire connection. It may be inside a metal box.
- Open the box and note how the wires are connected. Take a picture if needed.
- Use a screwdriver to disconnect each wire. Secure loose wires with zip ties and tape.
For gas ovens:
- Find the flexible gas line and the shutoff valve.
- Use an adjustable wrench to loosen the connection.
- Cap the gas line with a safety plug if possible.
Never pull the oven away without disconnecting the wires or gas line first. This can cause damage or leaks.
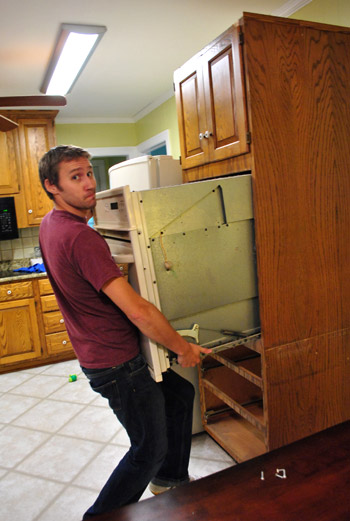
Step 6: Remove The Oven Completely
With all connections detached, lift the oven out of the cabinet. Use proper lifting techniques:
- Bend your knees, not your back.
- Work with a helper for heavy ovens.
- Move slowly and carefully.
Set the oven on a flat surface. If you plan to recycle or dispose of it, follow local guidelines.
Credit: www.younghouselove.com
Common Problems And Solutions
Removing a wall oven can sometimes lead to unexpected issues. Here are some common problems and how to solve them:
Problem 1: Oven Stuck In Cabinet
Sometimes the oven feels glued in place. This can happen if the cabinet swelled from moisture or paint. Use a utility knife to cut along the edges and free the oven. If you still cannot move it, check for missed screws.
Problem 2: Electrical Wires Too Short
If the wires are too short to reach, do not pull them. Use zip ties to secure the wires, and gently move the oven out just enough to access the connections. If you cannot reach, call an electrician.
Problem 3: Gas Smell
If you smell gas after disconnecting, leave the area and call your gas company. Gas leaks are dangerous. Never try to fix them yourself.
Problem 4: Damaged Cabinet
Small scratches and dents can happen. Use wood filler or touch-up paint to repair minor damage. For bigger problems, consult a carpenter.
Problem 5: Lost Screws
Keep all screws in a labeled bag or container. If you lose a screw, bring the old one to a hardware store to find a match.
How To Identify Your Oven Type
Knowing your oven’s type is essential for safe removal. Here are three main types:
| Oven Type | Power Source | Connection | Weight (avg) |
|---|---|---|---|
| Single Wall Oven | Electric | 3-wire terminal | 100 lbs |
| Double Wall Oven | Electric | 4-wire terminal | 180 lbs |
| Gas Wall Oven | Gas | Flexible gas line | 120 lbs |
Double ovens are much heavier. Gas ovens require extra caution. Always check the label on the oven door or inside the cabinet for model information.
What To Do After Removal
Once the oven is out, you need to decide what comes next. Here are important steps:
- Inspect the cabinet: Look for damage, mold, or loose fittings. Fix these before installing a new oven.
- Check wiring or gas line: If you plan to reuse, make sure everything is safe and up to code.
- Clean the area: Sweep out dust, old food, and debris.
- Dispose or recycle: Some cities have special recycling for appliances. Contact your local waste management.
- Seal connections: If not reinstalling soon, seal electrical wires with wire nuts and tape. For gas, use a safety plug.
Many homeowners forget to check the cabinet for mold or pests. Removing the oven is a great chance to inspect and clean.
Mistakes To Avoid When Removing A Wall Oven
Even experienced people make mistakes. Here are some common errors and how to avoid them:
1. Not Turning Off Power Or Gas
Always double-check. Use a voltage tester, and for gas, make sure the valve is fully closed.
2. Pulling Without Disconnecting
Never pull the oven out before disconnecting wires or gas. This can cause expensive repairs.
3. Using The Wrong Tools
A stripped screw can ruin your day. Use the correct screwdriver or bit, and don’t force anything.
4. Lifting Alone
Wall ovens are heavy. Lifting alone can cause injury or damage. Always get help.
5. Not Labeling Wires
If you plan to reinstall, label each wire as you disconnect. This saves confusion later.
6. Rushing The Process
Take your time. Rushing leads to mistakes and damage.

Credit: www.youtube.com
Comparison: Diy Vs Professional Removal
Many people wonder if they should remove their wall oven themselves or hire a professional. Here’s a simple comparison:
| Factor | DIY Removal | Professional Removal |
|---|---|---|
| Cost | $0–$150 (tools) | $200–$600 |
| Time | 2–4 hours | 1–2 hours |
| Safety | Risk if inexperienced | Safe (licensed) |
| Guarantee | No guarantee | Insured, guaranteed |
| Skill Needed | Medium–high | Low (they handle everything) |
DIY is cheaper but riskier. Professionals offer peace of mind, especially for gas ovens.
Practical Tips For A Smooth Removal
Here are some practical ideas that most beginners miss:
- Take photos: Before disconnecting anything, take clear pictures. They help when reinstalling or explaining problems to a technician.
- Label wires and connections: Use masking tape and a marker. This avoids confusion later.
- Check the cabinet depth: Some ovens are deeper than the cabinet. Measure before removing to ensure you have enough space.
- Have a disposal plan: Ovens are bulky. Arrange for recycling or donation ahead of time.
- Inspect for pests: Sometimes, insects or rodents hide behind appliances. Clean thoroughly after removal.
These small steps save time and trouble, especially when installing a new oven.
Preparing For New Oven Installation
If you plan to install a new oven, do these things after removal:
- Check measurements: Make sure your new oven will fit the cabinet space.
- Inspect wiring and gas lines: Upgrade or repair if needed.
- Clean and repair the cabinet: Fix holes, scratches, or loose shelves.
- Order new mounting hardware: Old screws may not fit new ovens.
- Read installation instructions: Every oven is different. Review the manual before starting.
Many homeowners forget to check the cabinet depth, leading to installation problems. Always measure carefully.
How To Dispose Of An Old Wall Oven
Wall ovens can’t be thrown in regular trash. Here’s how to dispose of them:
- Recycle: Many cities offer appliance recycling. Check online or call your local waste center.
- Donate: If the oven works, donate to a charity or neighbor.
- Sell: List the oven online for parts or reuse.
- Junk removal: Hire a junk removal service for old, broken ovens.
Some appliance stores offer removal when you buy a new oven. Ask about this service.
Special Cases: Removing Double Or Triple Wall Ovens
Double or triple wall ovens are much heavier and require extra steps:
- Use more helpers: Two or three people are recommended.
- Check for extra screws: Double ovens usually have more mounting points.
- Disconnect both sets of wires: Double ovens may have two sets of connections. Label each one.
- Move carefully: Double ovens can weigh over 200 pounds. Use a furniture dolly for safety.
Triple ovens are rare but follow the same steps. Always check the manual for specific instructions.
Cost Breakdown For Removing A Wall Oven
Let’s look at typical costs for removing a wall oven:
| Item | DIY Cost | Professional Cost |
|---|---|---|
| Tools | $50–$150 | Included |
| Safety Gear | $20–$50 | Included |
| Disposal Fees | $20–$60 | $20–$60 |
| Labor | $0 | $200–$600 |
| Repair Materials | $10–$40 | Included |
DIY is cheaper but requires more effort and risk. Professionals charge more but handle everything.
Real-life Example: Removing A Wall Oven
Let’s look at a real example.
Sarah wanted to upgrade her old electric wall oven. She read her oven’s manual, gathered tools, and asked her brother to help. They turned off the circuit breaker, tested the power, and removed the mounting screws. When sliding out the oven, they noticed a short wire, so they moved slowly and disconnected carefully.
Sarah labeled each wire, took photos, and cleaned the cabinet. She recycled the oven at her city’s appliance center. When installing the new oven, she used her photos and labels to connect everything correctly. The removal and installation took about 3 hours.
Most beginners forget to label wires or take photos. Sarah’s careful planning avoided mistakes and made the process smooth.
Frequently Asked Questions
How Long Does It Take To Remove A Wall Oven?
Most removals take 2–4 hours for a single oven. Double ovens may take longer, especially if you need to repair the cabinet or wiring. Professionals usually finish in 1–2 hours.
Can I Remove A Wall Oven Myself, Or Do I Need An Electrician?
You can remove an oven yourself if you feel comfortable with basic tools and safety steps. For gas ovens or complicated wiring, it’s safer to hire a licensed professional. Some areas require an electrician by law.
What Should I Do With The Electrical Wires After Removal?
After disconnecting, seal the wires with wire nuts and tape. Label each wire if you plan to install a new oven. If you are not reinstalling soon, secure wires in a safe place and keep the area dry.
How Do I Know If My Oven Is Electric Or Gas?
Check the oven’s label—usually inside the door or cabinet. Electric ovens have thick wires and no gas line. Gas ovens have a flexible gas tube and a shutoff valve. If unsure, look up your model online or ask a technician.
Is There A Risk Of Damaging My Kitchen Cabinets?
There is some risk, especially with older cabinets. Go slowly, use a utility knife to free stuck edges, and protect the area with drop cloths. Minor scratches are common, but major damage can be avoided with care.
Removing a wall oven is a big job, but with the right steps and careful planning, you can do it safely. Always protect yourself, double-check connections, and ask for help when needed. If you want more guidance, check out the official resources at Family Handyman for detailed instructions and tips.
Taking your time, using the right tools, and following each step will make the process much easier. Whether you’re upgrading your kitchen or fixing problems, you can remove your wall oven with confidence.