Sharpening a Japanese knife is more than just a kitchen task—it’s a craft that honors the skill of the blade maker and respects the ingredients you prepare. If you’ve ever used a truly sharp Japanese knife, you know the difference: precise cuts, less effort, and food that stays fresh longer. But keeping that edge requires the right approach. In this guide, you’ll discover how to sharpen Japanese knives the correct way, what tools to use, and the mistakes to avoid. You’ll also see clear steps, get practical tips, and learn why sharpening Japanese knives is different from sharpening Western blades. Whether you’re a home cook or a professional, mastering this skill will change how you cook, and how you care for your tools.
Why Japanese Knives Are Special
Japanese knives are known for their exceptional sharpness, lightweight feel, and fine craftsmanship. They are made with harder steel than most Western knives, which means they can hold a finer edge and slice with incredible precision. But this also means they need special care. The steel is often more brittle, and the blade is thinner, so improper sharpening can damage them.
Unlike Western knives, which often use a 20-degree edge, many Japanese knives are sharpened at 10 to 15 degrees per side. Some traditional Japanese knives are even single-beveled, meaning only one side is sharpened. This allows for cleaner, more accurate cuts, especially with delicate foods like sashimi or vegetables.
Tools Needed For Sharpening Japanese Knives
To sharpen a Japanese knife correctly, you need the right tools. Using the wrong equipment can ruin your blade quickly.
1. Whetstones (sharpening Stones)
The most important tool is a whetstone. These come in different grits, each serving a unique purpose:
- Coarse (200-800 grit): For repairing chips or very dull edges.
- Medium (1000-3000 grit): For regular sharpening and creating a new edge.
- Fine (4000-8000 grit): For polishing and refining the edge.
2. Honing Rods
A ceramic honing rod can help maintain the knife between sharpenings. Avoid steel honing rods, as they are often too rough for hard Japanese steel.
3. Flattening Stone
Over time, your whetstone will develop uneven spots. A flattening stone helps keep the surface level for consistent sharpening.
4. Water
Japanese whetstones require water, not oil. Soak your stone before use and keep it wet while sharpening.
5. Towel And Non-slip Mat
A damp towel or non-slip mat keeps your stone from moving as you work. Stability is critical for safety and accuracy.
6. Angle Guide (optional)
Beginners can use an angle guide to help maintain the correct sharpening angle. Once you gain experience, you’ll learn to control the angle by feel.
7. Magnifying Glass (optional)
A small magnifying glass lets you inspect the edge closely, ensuring you’re removing metal evenly and spotting tiny chips.

Credit: katto.shop
Understanding Knife Angles And Blade Types
Japanese knives aren’t all the same. Knowing your blade type and ideal angle is key to sharpening correctly.
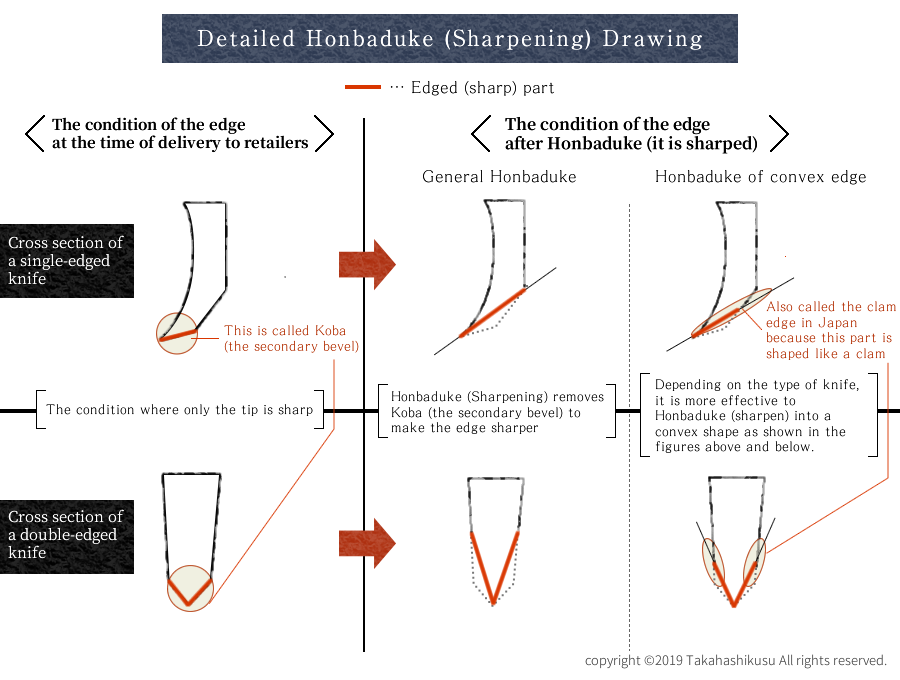
Double Bevel Vs. Single Bevel
Most common Japanese kitchen knives, like the Gyuto (chef’s knife), have a double bevel—sharpened on both sides. Traditional knives, such as the Yanagiba (sushi knife), have a single bevel, sharpened only on one side.
- Double bevel: Sharpen both sides equally, usually at 12-15 degrees per side.
- Single bevel: Sharpen the beveled side at the correct angle (often 15 degrees) and just remove burrs on the flat side.
Blade Shape And Steel
Japanese knives are made with different steels, such as VG-10, Blue Steel, and White Steel. Harder steels hold an edge longer but are more brittle. Softer steels are easier to sharpen but dull faster. Knowing your steel helps you choose the right grit and sharpening frequency.
Step-by-step: How To Sharpen A Japanese Knife
Let’s break down the process into clear, simple steps. This approach works for most double-bevel Japanese knives. For single-bevel knives, see the tips further below.
1. Prepare Your Stone
- Soak your whetstone in water for 10-15 minutes (unless it’s a “splash-and-go” stone).
- Place the stone on a damp towel or non-slip mat for stability.
2. Set The Correct Angle
- Hold the knife at a 10-15 degree angle to the stone. For most Japanese knives, 12 degrees is a good starting point.
- If unsure, use an angle guide.
3. Start With The Coarse Or Medium Grit
- Begin with the medium grit (1000-2000) if your knife is just dull, or coarse if it’s chipped.
- Place the heel of the blade on the stone, edge facing away from you.
- With light pressure, slide the knife across the stone from heel to tip, keeping the angle steady.
- Work in smooth, controlled strokes, covering the whole edge.
- Repeat 10-20 times, or until you feel a “burr” (a tiny raised edge) form on the other side.
4. Switch Sides
- Flip the knife and repeat the process on the other side.
- Try to keep the same number of strokes and pressure.
5. Move To Finer Grit
- Wash off the stone, then switch to a fine grit (4000-8000) for polishing.
- Repeat the same technique, using lighter pressure.
- This step refines the edge and removes scratches from the previous stone.
6. Deburr And Finish
- After both sides are sharp, do a few very light strokes on each side to remove any remaining burr.
- Wipe the blade clean and dry it completely.
7. Test The Edge
- The edge should cleanly slice a piece of paper or a ripe tomato without tearing.
- If it doesn’t, repeat the fine grit step.
Step-by-step Summary Table
Here’s a quick look at the sharpening workflow:
| Step | Action | Purpose |
|---|---|---|
| 1 | Soak Whetstone | Prepares stone for sharpening |
| 2 | Set Angle | Ensures correct edge geometry |
| 3 | Sharpen with Medium/Coarse Grit | Forms new edge or repairs blade |
| 4 | Sharpen Other Side | Balances edge, removes burr |
| 5 | Polish with Fine Grit | Refines and smooths edge |
| 6 | Deburr & Clean | Removes leftover metal, prevents dullness |
| 7 | Test Edge | Confirms sharpness |
How Often Should You Sharpen Japanese Knives?
How often you sharpen depends on how much you use your knife and what you cut. For most home cooks, sharpening every 3–6 months is enough. If you use your knife daily, you may need to sharpen every month.
However, regular honing with a ceramic rod can keep the edge aligned and sharp between full sharpenings. Honing is not sharpening—it realigns the edge but does not remove metal.
Common Mistakes To Avoid
Even experienced cooks sometimes make errors that can ruin a Japanese knife. Here’s what to watch out for:
- Using Oil Stones or Electric Sharpeners: Japanese knives should only be sharpened with water stones. Electric sharpeners are too aggressive.
- Wrong Angle: Sharpening at the wrong angle will make the knife dull faster or damage the blade.
- Too Much Pressure: Let the stone do the work. Pressing hard can chip the edge or unevenly grind the blade.
- Not Finishing with Fine Grit: Skipping the final polish step leaves the edge rough and weak.
- Neglecting to Flatten the Stone: A warped stone can create an uneven edge.
- Sharpening Only One Side: Double bevel knives need both sides sharpened for balance.
- Letting the Knife Stay Wet: Dry your knife completely after sharpening to prevent rust.
Japanese Knives Vs. Western Knives: Sharpening Differences
Japanese knives are made and sharpened differently from Western knives. Here’s a side-by-side comparison to help you understand the key differences:
| Feature | Japanese Knife | Western Knife |
|---|---|---|
| Edge Angle | 10-15 degrees | 20-22 degrees |
| Steel Hardness | HRC 58-66 (harder) | HRC 52-58 (softer) |
| Bevel Type | Often single or double | Usually double |
| Sharpening Tool | Whetstone (water stone) | Can use honing rod, pull-through sharpeners |
| Sharpening Frequency | Less frequent (holds edge longer) | More frequent |
Most beginners don’t realize that using a Western-style sharpener on a Japanese knife can destroy the fine edge. Always use the right method for your knife.
Special Tips For Single Bevel Knives
Single bevel knives, like Yanagiba, Deba, and Usuba, are traditional Japanese knives used for sushi and precise vegetable work. They need a slightly different approach:
- Sharpen only the beveled side at the correct angle (usually about 15 degrees).
- The flat side should only be lightly deburred with a few strokes to avoid rounding the edge.
- Use extra care not to over-sharpen the flat side, as this can ruin the knife’s geometry.
- Check for a consistent, straight line along the edge—uneven sharpening affects cutting performance.
Advanced Techniques: Polishing And Stropping
After sharpening, some chefs add extra steps for a super-fine edge.
- Polishing: Using a very fine stone (8000 grit or higher), polish the edge for a smooth, mirror-like finish. This reduces drag and helps with very delicate cuts.
- Stropping: Dragging the knife lightly across a leather strop with polishing compound can align the edge even further, removing any micro-burrs left by the stone.
These steps are not essential for everyday cooking but can make a real difference if you want a razor-sharp edge for sushi or sashimi.
When To Seek Professional Help
If your knife has large chips, a broken tip, or a very warped blade, it’s best to consult a professional sharpener. Attempting major repairs without experience can make the problem worse. High-end Japanese knives are an investment, so it’s worth protecting them.
How To Maintain Sharpness Longer
Proper cutting technique and care will keep your knife sharp longer:
- Use a wooden or plastic cutting board (never glass or stone).
- Wash by hand and dry immediately—don’t put your knife in the dishwasher.
- Store the knife safely in a sheath, knife block, or on a magnetic strip.
- Avoid cutting hard items like bones or frozen foods, which can chip the edge.
Many people overlook these basic habits, but they’re as important as sharpening itself.
Choosing The Right Whetstone: Grits Explained
Picking the right stone is crucial for good results. Here’s a quick guide to grit numbers and their uses:
| Grit Range | Use | Example |
|---|---|---|
| 200–800 | Repair, chip removal | Heavily damaged edge |
| 1000–2000 | Sharpening, edge forming | Regular dull knife |
| 3000–6000 | Honing, refining | Improving factory edge |
| 8000+ | Polishing | Razor-sharp finish |
A two-sided stone (e. g. , 1000/6000) is a good starting point for most home cooks.
Credit: takahashikusu.co.jp
How To Tell If Your Knife Needs Sharpening
It’s not always obvious when your knife is dull. Here are signs your Japanese knife needs attention:
- Difficulty slicing tomatoes or onions (should cut cleanly, not crush).
- Slipping off food instead of biting in.
- Increased effort needed during cutting.
- Edge reflects light—a sharp edge doesn’t shine.
- Paper test failure—can’t slice a sheet of paper smoothly.
If you notice these problems, it’s time to sharpen.
Sharpening Japanese Knives On The Go
If you travel or work in different kitchens, you might not always have your full sharpening setup. Compact pocket whetstones (1000–3000 grit) are available for touch-ups. They won’t replace full sharpening but can save the day in a pinch.
Environmental Care: Stone And Water Use
Sharpening with water stones is eco-friendly, but be mindful of water use. Don’t run the tap constantly. Soak stones in a basin and use a small cup of water for rinsing. After sharpening, clean stones thoroughly and let them air dry before storing.
Sharpening Myths: What Not To Believe
Many myths exist around knife sharpening:
- “Pull-through sharpeners are fine for any knife.” (False—these damage Japanese blades.)
- “Oil makes stones work better.” (False—Japanese stones use water.)
- “You must sharpen every week.” (Only if you use your knife very heavily.)
- “A sharper angle is always better.” (Go too low, and the edge chips easily.)
Getting advice from reliable sources is important. For more information, you can visit Wikipedia’s Japanese knife page.
Credit: www.reddit.com
Practical Insights Most Beginners Miss
Two less obvious insights can help you reach a professional level:
- Consistency beats speed. Many beginners rush, thinking faster sharpening gives better results. Slow, steady strokes with even pressure produce a sharper, longer-lasting edge.
- Edge geometry matters. Japanese knives have specific blade shapes for a reason. Don’t try to change the shape or angle—respect the original design for best results.
Frequently Asked Questions
How Do I Know If My Japanese Knife Is Single Or Double Bevel?
Look closely at the blade. If both sides are angled, it’s double bevel. If one side is flat and the other is sloped, it’s single bevel. Single bevels are common in sushi and specialty knives.
Can I Use A Western Sharpening Steel On My Japanese Knife?
No. Most Western steels are too rough and can damage the fine edge of Japanese knives. Use a ceramic honing rod or whetstone instead.
How Long Does It Take To Sharpen A Japanese Knife Properly?
For a regular touch-up, about 10–20 minutes. If the knife is very dull or damaged, it may take longer, especially if you need to start with a coarse stone.
What’s The Best Way To Store A Japanese Knife After Sharpening?
Dry it completely, then store it in a wooden sheath (saya), a knife block, or on a magnetic strip. Never leave it loose in a drawer where the edge can get damaged.
Do Japanese Knives Rust Easily?
Many Japanese knives use high-carbon steel, which can rust if not dried properly. Always hand wash and dry your knife immediately after use.
Caring for your Japanese knife is a journey, not a chore. With the right tools and knowledge, you can keep your knife razor-sharp for years, making every meal a pleasure to prepare. Remember: respect the blade, and it will serve you well.