
Every home’s plumbing system relies on proper airflow to keep water flowing and bad smells away. One small but powerful device that helps with this is the air admittance valve (AAV). These valves are hidden under sinks, behind walls, and in roofless venting systems. They open when wastewater flows, letting air in so your pipes don’t gurgle, slow, or smell. But when an AAV fails, you might not see the problem right away—until drains slow down or odors creep in.
Testing an AAV sounds tricky, but it’s actually a task many homeowners and professionals can handle with the right steps. Knowing how to test an air admittance valve can help you catch problems early, avoid expensive plumbing bills, and keep your home safe and comfortable. In this guide, you’ll learn the complete process of testing an AAV, signs of failure, common mistakes, and what to do if you find a problem. Whether you’re a DIY beginner or a seasoned plumber, you’ll find step-by-step instructions, expert tips, and real-world examples for every part of the process.
What Is An Air Admittance Valve?
Before testing an AAV, it’s important to understand what it does and why it’s used. An air admittance valve is a one-way valve installed on a plumbing vent. Its main job is to let air into the drainage system when water flows, preventing negative pressure (a vacuum) that can suck water out of traps. This keeps sewer gas from entering your home.
Most AAVs are used in places where running a vent pipe to the roof is hard or expensive. They are common under kitchen sinks, in island sinks, and sometimes in bathrooms. AAVs are built with a spring or gravity-operated seal that opens when air is needed, then closes to block smells.
Key Benefits Of Air Admittance Valves
- Save money and time by avoiding long vent pipes
- Allow flexible plumbing layouts
- Reduce roof penetrations, lowering leak risk
However, AAVs also need to be in good condition to work. If they get stuck or leak, you may notice slow drains, sewer gas smells, or even water in unwanted places.
Why Test An Air Admittance Valve?
Many people ignore their AAVs until something goes wrong. But regular testing is important because:
- Early detection: Spotting a faulty valve early can prevent bigger plumbing issues.
- Health and safety: Leaking sewer gases can be dangerous.
- Avoiding water damage: A failed AAV can cause overflows or water backups.
- Ensuring code compliance: Some building codes require functional air admittance valves.
Some signs that testing is needed include:
- Gurgling sounds from drains
- Sewer smells near sinks or inside cabinets
- Slow draining water
- Water backflow into sinks or tubs
If you notice any of these, it’s time to test your AAV.
Tools And Materials Needed
Testing an air admittance valve doesn’t require fancy tools, but having the right equipment makes the job easier and safer.
Basic tools:
- Adjustable wrench or pipe wrench
- Flathead and Phillips screwdrivers
- Bucket or shallow pan
- Flashlight
- Clean rags or towels
Testing equipment:
- Soapy water in a spray bottle
- Small mirror (helpful for hard-to-see spots)
- Pressure gauge (optional for advanced testing)
- Replacement AAV (if needed)
Safety gear:
- Gloves
- Safety glasses
- Mask (if you are sensitive to sewer gases)
Pro tip: Many professionals carry a smoke pencil or incense stick to check for leaks, but this is optional for most homeowners.
How To Locate Your Air Admittance Valve
Finding the AAV is your first step. Most homes with AAVs have them in one of these places:
- Under the kitchen or bathroom sink, near the drain trap
- Behind an access panel in a wall
- On a branch drain serving an island or remote fixture
- In a utility room, basement, or attic (less common)
Look for a short, vertical pipe with a cap or vent cover—often labeled with the valve type or brand. If you have trouble, use your flashlight and check beneath sinks or behind cabinets.
Non-obvious insight: Some homes may have more than one AAV, especially if there are multiple bathrooms or kitchen sinks on different floors. Always test each one.
Step-by-step: How To Test An Air Admittance Valve
Testing an AAV is a methodical process. Follow these detailed steps for accurate results.
1. Prepare The Area
Clear out anything stored under the sink or near the valve. Lay down rags to catch drips. Put on your gloves and safety glasses. If you expect a strong odor, use a mask.
2. Inspect The Valve Visually
Use your flashlight to check the valve’s outside. Look for:
- Cracks in the plastic
- Signs of water leaks (staining, mineral deposits)
- Loose fittings or connections
- Dust or debris blocking the vent
Hold a small mirror behind or under the valve to see hidden areas. A good valve should look clean and dry.
3. Listen And Smell
With the room quiet, run water down the connected drain (for example, turn on the sink faucet). Listen for:
- Hissing or whistling (could mean a stuck or damaged valve)
- Gurgling in other drains
- Sewer odors that appear when water flows
A properly working AAV should not allow any smells to escape and should operate silently.
4. Check For Air Movement
Run water quickly down the drain to trigger the valve. Hold your hand near the top of the valve (but not over the opening). You may feel a brief puff of air as the valve opens, but there should never be a continuous draft or airflow when water is not running.
5. Soap Bubble Test
Fill a spray bottle with a mix of water and dish soap. Spray a generous amount around the valve, especially at joints and seams. Then run water down the drain.
- If you see bubbles forming and growing, air is escaping, which means the valve or seal is leaking.
- No bubbles means a good seal.
This is a simple but powerful way to spot leaks that are hard to see.
6. Pressure/vacuum Test (advanced)
If you have a pressure gauge, you can do a more precise check:
- Remove the valve (unscrew or unclip, depending on the model).
- Attach the gauge to the pipe.
- Run water in a connected fixture.
- Watch the gauge: It should show a brief drop in pressure as water drains, then return to normal.
If the pressure stays low or drops slowly, the valve is probably not opening fully.
Note: For most homeowners, the visual and soap bubble tests are enough. The pressure test is more common for plumbers.
7. Check The Valve Mechanism
With the valve removed, gently shake it. You should hear the internal disc or spring moving freely. If it feels stuck, rattles oddly, or doesn’t move, it may need replacing.
Non-obvious insight: Some AAVs have a filter or screen inside. If yours does, clean it gently with water before reinstallation.
8. Reinstall And Retest
If you removed the valve, screw or clip it back in place. Repeat the soap bubble and listening tests to make sure the seal is tight.
Tip: Always check for leaks after reinstallation. Even small shifts can cause new problems.
Common Problems Found When Testing
Even a well-installed AAV can develop issues over time. Here are the most frequent problems:
- Stuck open or closed: The internal mechanism can stick due to debris or aging, causing poor venting or constant leaks.
- Cracked housing: Plastic AAVs can crack in cold weather or if overtightened.
- Worn seals: Rubber seals may dry out, shrink, or split, letting sewer gas escape.
- Incorrect installation: If the valve is too low, sideways, or lacks proper clearance, it won’t work well.
- Blocked vent: Dust, grease, or pests can block the air intake, stopping airflow.
If you find any of these, replacement is usually better than repair.
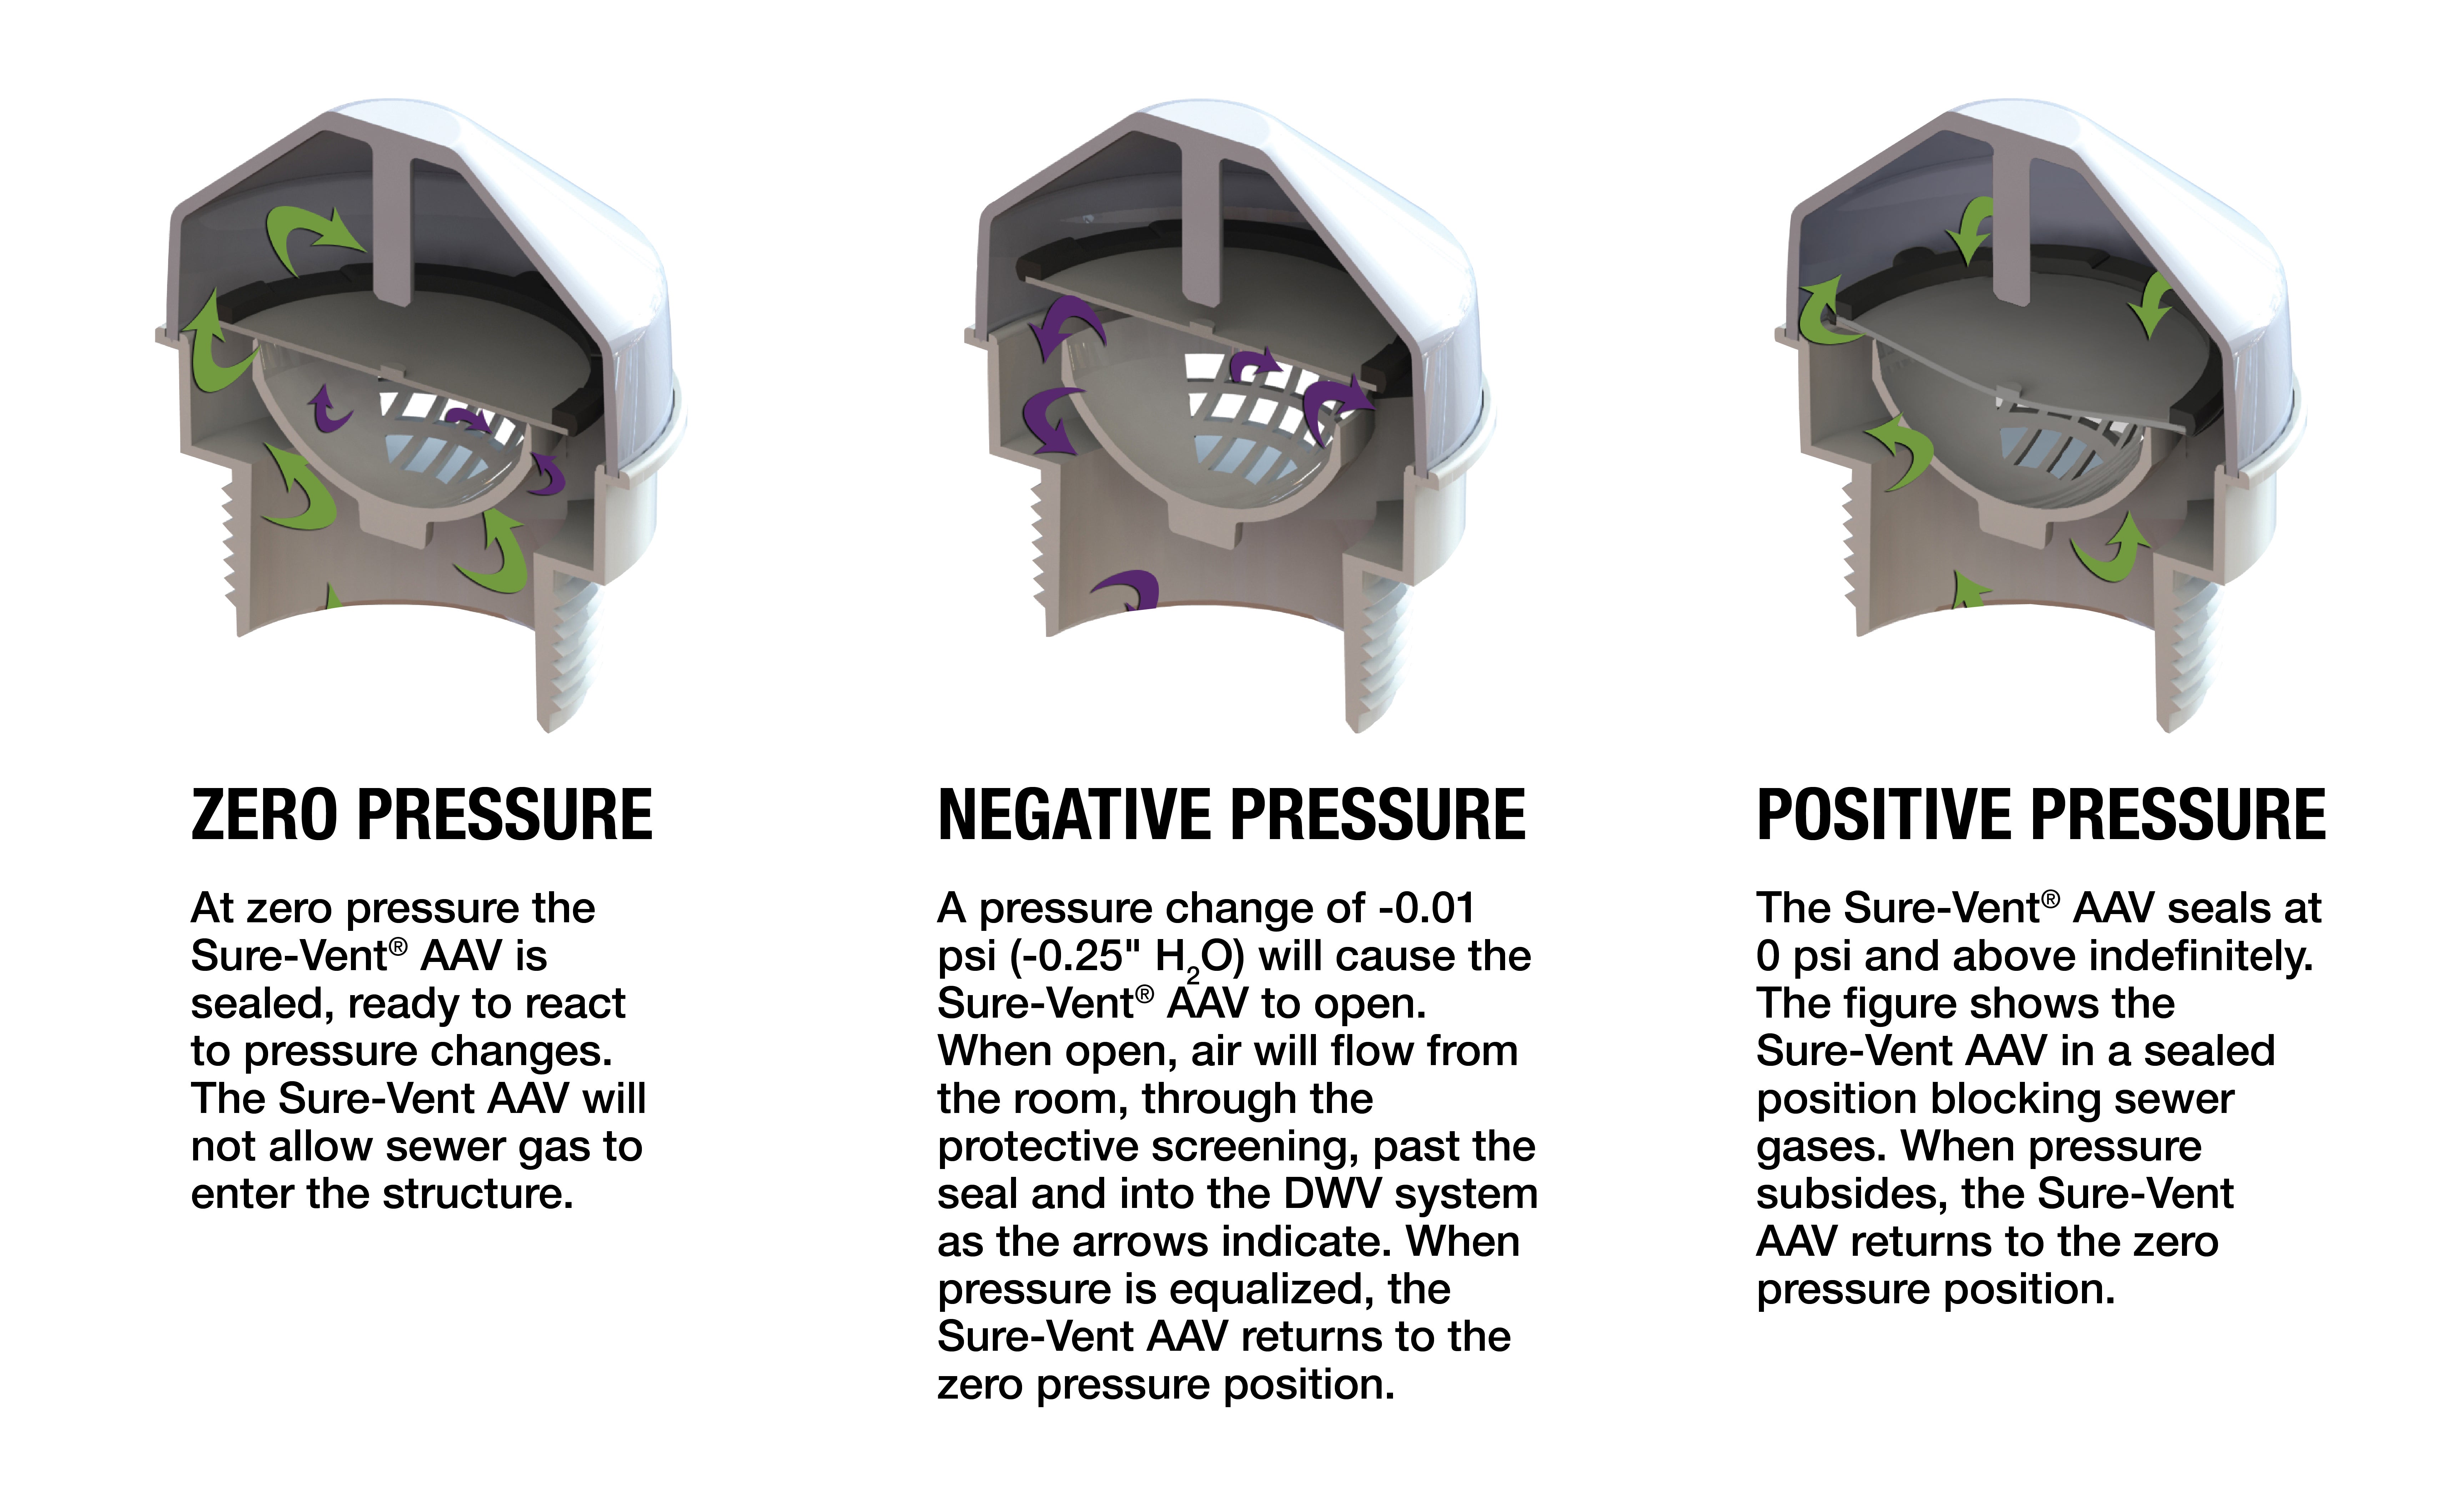
Credit: www.oatey.com
What To Do If Your Air Admittance Valve Fails
If your tests show the AAV is faulty, don’t ignore it. Here’s what to do:
- Turn off water to the affected sink or fixture until you replace the valve.
- Buy a replacement with the same size and flow rating.
- Install the new valve according to manufacturer instructions. Most screw on by hand and need only a snug fit.
- Retest using the steps above.
If you’re uncomfortable doing the work, call a licensed plumber. AAVs are inexpensive, but correct installation is key to safety.
Comparing Air Admittance Valves: Quality, Cost, And Lifespan
Not all AAVs are created equal. Here’s how some of the main brands and models compare in real-world use:
| Brand/Model | Material | Expected Lifespan | Average Cost (USD) | Warranty |
|---|---|---|---|---|
| Studor Mini-Vent | ABS Plastic | 20+ years | $20–$30 | Lifetime |
| Oatey Sure-Vent | Polypropylene | 10–20 years | $18–$28 | 10 years |
| Sioux Chief 203 Series | Polypropylene | 15–25 years | $22–$35 | Lifetime |
Pro insight: The quality of the valve’s internal seal matters more than the brand name. Always check for independent certifications like ASSE 1051 or 1050.

Credit: www.youtube.com
How Often Should You Test Your Air Admittance Valve?
How often you test depends on usage and local conditions. As a rule of thumb:
- For most homes: Once a year
- For rental properties or heavy use: Every 6 months
- After any major plumbing work
If you live in an area with hard water, rapid temperature swings, or pests, more frequent checks are smart.
Expert tip: Mark your calendar or set a phone reminder to test your AAVs. Preventative care is easier than emergency repairs.
Mistakes To Avoid When Testing
Many people make small errors that can lead to missed problems or damage. Avoid these common mistakes:
- Testing with the sink full: Always drain water before removing or inspecting the valve.
- Overtightening: AAVs need to be snug, not forced. Too much force can crack plastic threads.
- Ignoring small leaks: Even a faint sewer smell means something is wrong.
- Using harsh chemicals: Never spray bleach or strong cleaners on the valve—it can damage seals.
- Skipping the retest: Always check for leaks after reinstalling or replacing the valve.
Non-obvious tip: Never paint over an AAV or cover it with insulation. It needs to “breathe” freely to work.
Special Testing Situations
Some homes present unique challenges:
Island Sinks
Because these sinks are away from walls, their AAVs are often hidden in the cabinet base. Remove the cabinet’s bottom panel if needed to access the valve.
Multiple Fixtures On One Valve
If several sinks or drains use a single AAV, test each fixture separately and together. A valve that works for one may not handle higher flows.
Cold Or Outdoor Installations
AAVs in unheated spaces can freeze. If you suspect freezing, check the valve’s movement and look for condensation or ice.
Mobile Homes And Rvs
These often use smaller, specialized AAVs. Make sure you buy the correct size and test more often, as vibrations can loosen fittings.
Diy Vs. Hiring A Professional
Testing and replacing an AAV is a project most handy homeowners can handle. But professional help may be needed if:
- The valve is behind a wall with no access panel
- There are signs of water damage or mold
- Multiple fixtures are affected and you can’t find the problem
- You smell gas but cannot locate the source
A plumber can use tools like smoke machines or advanced pressure gauges for a more thorough test.
Fact: Professional AAV testing usually costs $75–$200, including replacement if needed.
Safety Risks And How To Prevent Them
A malfunctioning AAV is more than just an inconvenience. The main risks are:
- Sewer gas exposure: Can cause headaches, nausea, or worse if not fixed
- Water damage: Leaks or overflows can ruin cabinets or floors
- Plumbing code violations: May affect insurance or home sale
To minimize risks, always:
- Test valves regularly
- Replace at the first sign of trouble
- Never bypass or block the valve
Real-world Example: Troubleshooting A Slow Kitchen Sink
Let’s walk through a real case. Suppose your kitchen sink drains slowly and you notice a faint sewer smell under the cabinet.
- You remove items from under the sink, put on gloves, and check the AAV.
- The outside looks fine, but you hear a slight hiss when running water.
- You spray soapy water and see bubbles at the valve seam.
- Removing the valve, you find the internal seal is stiff and doesn’t move freely.
- Replacing the valve with a new, certified model and reinstalling solves both the slow drain and smell.
This simple process can save you a plumber visit and prevent water damage.
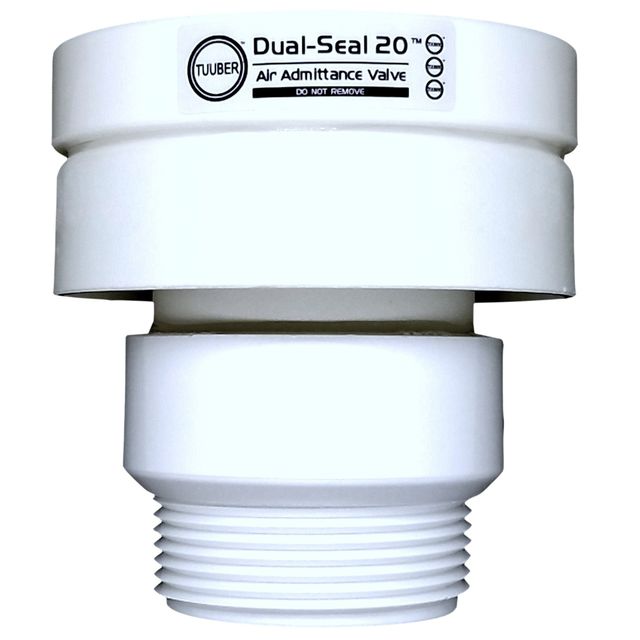
Credit: www.nycc-mag.com
Comparing Air Admittance Valve Testing With Traditional Roof Vents
Some people wonder how AAV testing compares to old-fashioned vent stacks.
| Feature | Air Admittance Valve | Traditional Roof Vent |
|---|---|---|
| Testing Difficulty | Easy, inside home | Hard, often requires roof access |
| Maintenance Frequency | Annual checkup | Rare, unless blocked by debris or ice |
| Common Failures | Stuck or leaking valve | Bird or leaf blockages, ice dams |
| DIY-Friendly | Yes | No (roof work is dangerous) |
| Replacement Cost | Low ($20–$40) | High (hundreds for major work) |
Key takeaway: Testing an AAV is faster, easier, and safer for most homeowners than checking a roof vent.
How Building Codes Affect Testing
Air admittance valves are approved in most U.S. states, Canada, and Europe, but always check your local codes. Some areas require:
- AAVs to be installed above the trap arm (usually 4 inches or more)
- Access panels for concealed valves
- Use of valves with specific certifications
If you live in an older home, you may find unapproved or homemade valves—these should always be replaced.
For more information on plumbing codes, visit the official International Code Council site.
When Is It Time To Replace Your Air Admittance Valve?
Even the best AAV won’t last forever. Replace your valve if:
- It’s more than 15–20 years old
- You see cracks, leaks, or damage
- The valve mechanism feels stuck or loose
- There’s frequent sewer odor even after cleaning
Insider tip: Always keep a spare AAV on hand if you rely on them in multiple locations.
Environmental Factors That Affect Aav Performance
AAVs are tough, but some conditions can shorten their life:
- Hard water: Leaves mineral deposits, jamming the valve
- Extreme temperatures: Cold can stiffen seals, heat can dry them out
- High humidity: Promotes mold or corrosion on metal parts
- Pests: Small insects or rodents can crawl into uncovered valves
If your home faces any of these, check the valves more often and consider upgrading to a heavy-duty model.
Upgrades And Alternatives
If you find yourself replacing AAVs often, consider:
- High-flow AAVs: Handle more fixtures, better for large homes
- Stainless steel models: Resist corrosion, last longer in damp areas
- Adding access panels: Makes future testing and replacement easier
Remember, AAVs are not for every situation. Some plumbing codes require at least one traditional vent stack per system.
Frequently Asked Questions
How Do I Know If My Air Admittance Valve Is Working?
A working valve will not let odors escape, and water will drain smoothly. When you run water, the valve opens silently, and there’s no gurgling or slow drainage.
Can I Test An Air Admittance Valve Without Removing It?
Yes. Most tests, like listening for sounds, checking for smells, and using soapy water, can be done with the valve in place. Removal is only needed for advanced inspection.
What Happens If I Ignore A Failing Aav?
You may experience slow drains, sewer gas smells, and even water backups. Over time, this can damage cabinets, floors, or walls, and create health risks.
How Long Do Air Admittance Valves Last?
Most quality AAVs last 10 to 25 years. Factors like water quality, temperature, and installation affect lifespan. Inspect annually for the best results.
Are Air Admittance Valves Legal In All Areas?
No. Most places allow them, but some local plumbing codes have restrictions. Always check with your building department before installing or replacing an AAV.
—
Knowing how to test an air admittance valve is an essential skill for any homeowner or building manager. With clear steps, the right tools, and regular checks, you can keep your plumbing system healthy, prevent bad odors, and avoid costly repairs.
Always use certified valves, follow safety tips, and don’t hesitate to call a professional if you’re unsure. By staying proactive, you’ll enjoy clean, odor-free drains and peace of mind for years to come.