
Updating arched kitchen cabinets can completely change the look and feel of your kitchen. Many homes built in the 1980s and 1990s feature these curved cabinet designs. While they were popular for decades, today they can make a kitchen look old-fashioned. The good news is, you don’t have to replace them to get a fresh style. With the right approach, you can modernize arched cabinets and create a kitchen that feels new, inviting, and truly yours.
This guide offers a full roadmap to updating arched kitchen cabinets, whether you want a simple refresh or a dramatic transformation. You’ll learn how to assess your cabinets, choose the right update method, and avoid common mistakes. With step-by-step instructions, material suggestions, and expert insights, you’ll be ready to start your project with confidence.
Understanding Arched Kitchen Cabinets
Before you start, it helps to know what sets arched kitchen cabinets apart. These cabinets feature a curved or rounded design at the top of the door, creating a soft arch. This style was once a symbol of elegance but is now often seen as dated.
Arched cabinets are typically made from solid wood, veneer, or MDF (medium-density fiberboard). The arch can be shallow or deep, and sometimes includes decorative details like raised panels or molding.
The main challenge with updating arched cabinets is working with the curved shape. Many modern kitchen styles use straight lines and flat panels, so you may need creative solutions to blend the old with the new.
Assessing Your Cabinets
Start by taking a good look at your current cabinets. Not all arched cabinets are the same, and the update method depends on:
- Material: Are your cabinets solid wood, veneer, or MDF? Solid wood offers the most options, while veneer and MDF need more care.
- Condition: Check for cracks, peeling, water damage, or loose hardware. Cabinets in good condition are easier (and cheaper) to update.
- Layout: Look at how your cabinets are arranged. Do you want to keep the same setup, or change it for better function?
- Budget: Small changes can cost as little as $100, while major updates (like refacing) can cost $2,000 or more.
- Skill Level: Some projects are DIY-friendly, while others need professional help.
Take clear photos from different angles. Measure your cabinets, including the arch height and width. This information will help you choose the best update method.
Update Options For Arched Kitchen Cabinets
There are several ways to update your cabinets, from quick fixes to full transformations. Here’s a detailed look at the most popular options:
1. Painting
Painting is one of the easiest and most affordable ways to refresh arched cabinets.
- Preparation: Clean cabinets with a degreaser. Remove hardware and doors. Sand the surface lightly to help the paint stick.
- Primer: Use a bonding primer, especially on veneer or MDF.
- Paint Type: Choose alkyd, acrylic, or cabinet-specific paint for durability.
- Application: Use a brush for detailed areas and a roller for flat surfaces. Spray painting gives a smooth finish but requires masking and ventilation.
Non-obvious tip: Use a small artist’s brush to paint the inside curve of the arch. This avoids drips and uneven coverage.
Painting can hide the arch’s age but won’t change the shape. For a modern look, use light colors like white, soft gray, or even matte black.
2. Staining Or Restaining
If your cabinets are solid wood, staining can enhance the grain and give a new color.
- Sanding: Remove old finish completely. Pay extra attention to curved areas.
- Wood Conditioner: Apply before stain if your wood is soft (like pine or alder).
- Stain Application: Use a cloth for flat areas and a small brush for arches.
- Topcoat: Seal with polyurethane or lacquer.
Staining keeps the wood’s character but can still look traditional. Choose a neutral or gray-toned stain for a more modern style.
3. Refacing
Refacing means replacing the cabinet doors and drawer fronts, while keeping the original boxes.
- New Doors: Choose flat panel, shaker, or slab doors for a modern look.
- Veneer: Cover the cabinet frames with matching veneer.
- Hardware: Update handles and hinges at the same time.
Refacing costs more than painting but less than full replacement. It’s a smart choice if your cabinet boxes are sturdy.
Pro tip: You can order custom doors without arches to completely remove the old look.
4. Adding Molding Or Trim
Creative molding can hide or soften the arch.
- Straight Trim: Attach flat trim above or below the arch to create a squared effect.
- Crown Molding: Adds height and detail to upper cabinets.
- Beadboard or Panels: Attach to the center panel for a cottage or farmhouse style.
Use wood glue and finishing nails for a strong hold. Fill gaps with caulk before painting.
Beginner insight: Adding trim is more forgiving than replacing the whole door, and mistakes are easy to fix with wood filler.
5. Removing The Arch
If you want a totally flat look, you can remove the arch from solid wood doors.
- Cutting: Use a jigsaw or circular saw to carefully trim the arch.
- Sanding: Smooth the cut edge with a block sander.
- Veneer Patch: Cover the cut area with thin wood veneer for a seamless finish.
This method only works with thick, solid doors. Veneer or MDF doors may not survive the cut.
Important: Always wear eye and ear protection when using power tools.
6. Replacing The Doors Only
Sometimes, the fastest way to update is to buy new doors.
- Standard Sizes: Measure carefully—most cabinet makers offer doors in common widths and heights.
- Custom Options: For unusual sizes or shapes, order custom replacements.
- Style Choices: Flat panel, shaker, and slab are the most popular for modern kitchens.
Replacing just the doors costs less than full cabinets and gives maximum style change.
7. Updating Hardware
Swapping out knobs, pulls, and hinges can instantly modernize cabinets.
- Finish: Choose matte black, brushed nickel, or brass for a current look.
- Size: Larger, linear pulls work well on flat doors; round knobs suit classic kitchens.
- Layout: Move hardware to a new spot for a fresh feel—just fill old holes with wood filler.
This is a small change, but it makes a big difference, especially when combined with paint or refacing.
8. Open Shelving
Removing a few upper cabinet doors creates open shelves for display.
- How-To: Unscrew the doors and hinges. Fill holes with wood filler, then sand and paint the inside.
- Styling: Display dishes, glassware, or cookbooks.
- Lighting: Add LED strip lights for extra effect.
Open shelving adds airiness, but keep in mind it needs regular cleaning and tidy organization.
9. Glass Inserts
Replacing the center panel with glass gives a lighter, more custom look.
- Glass Type: Clear, frosted, seeded, or textured glass all work well.
- Installation: Cut out the center panel, add a groove, and secure glass with silicone or clips.
- Lighting: Consider inside-cabinet lights to highlight glassware.
Glass inserts are a good compromise between open shelving and closed doors.
10. Decorative Back Panels
For a unique update, add wallpaper, beadboard, or paint to the back of glass-front or open cabinets.
- Peel-and-Stick Wallpaper: Easy to apply and remove.
- Paint: Choose a contrasting color for a bold effect.
- Beadboard: Adds texture and farmhouse style.
This is a low-cost way to add personality to your kitchen.
11. Two-tone Cabinets
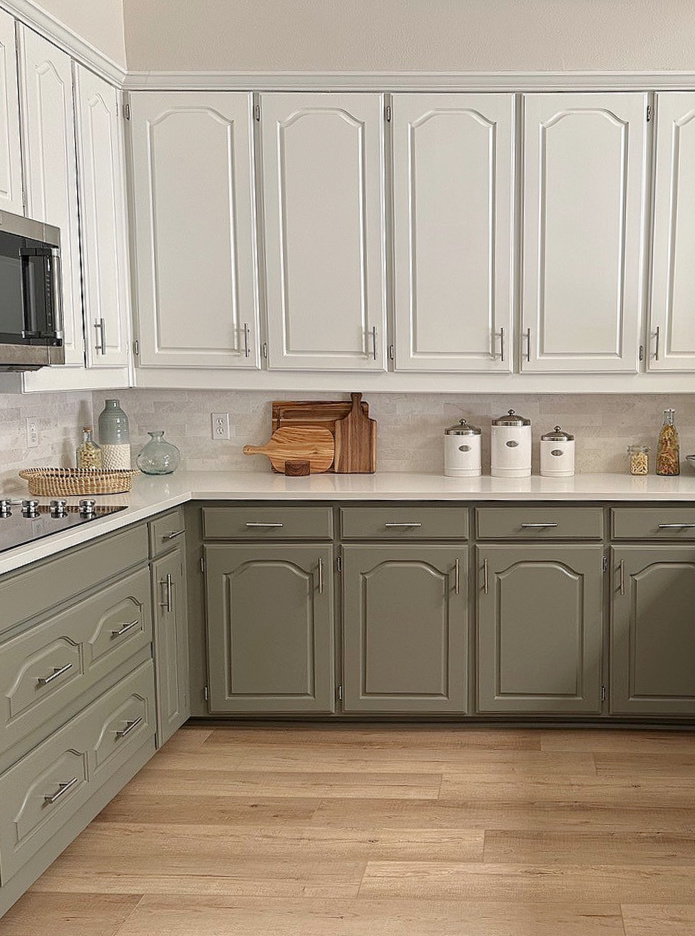
Using two colors—one for uppers, one for lowers—is a strong trend.
- Classic Pairings: White uppers with navy or gray lowers; wood lowers with painted uppers.
- Visual Effect: Makes kitchens feel more spacious and modern.
You can paint, stain, or even mix materials (like wood and paint).
12. Lighting Updates
Adding under-cabinet or in-cabinet lighting can highlight your new look.
- LED Strips: Easy to install and energy-efficient.
- Puck Lights: Great for spot lighting.
- Smart Controls: Some lights connect to apps for dimming and color changes.
Lighting makes cabinets look more expensive—even if you’re on a budget.
13. Adding Feet Or Legs
Install decorative feet under lower cabinets for a furniture-style look.
- Materials: Wood, metal, or plastic.
- Installation: Attach with screws or glue. Some feet are adjustable for uneven floors.
This works best with freestanding islands or exposed cabinet bases.
14. Paneling The Ends
Don’t forget the cabinet sides! Add panels for a built-in appearance.
- Materials: Matching wood, beadboard, or shiplap.
- Attachment: Use construction adhesive and finish nails.
End panels are a small detail that makes a big difference.
15. Updating Countertops
New countertops can make old cabinets look new.
- Laminate: Budget-friendly and comes in many colors.
- Quartz or Granite: More expensive, but very durable and stylish.
- Butcher Block: Adds warmth and works well with painted cabinets.
Coordinate your countertop with your updated cabinet color for a cohesive look.
16. Removing Cabinet Doors For A Partial Open Look
Leave only some doors off for a mix of open and closed storage.
- Balance: Remove doors from one or two sections only.
- Style: Works well on either side of a range hood or window.
This gives a modern feel without losing all your hidden storage.
17. Adding New Shelves Inside
Upgrade cabinet interiors with adjustable or pull-out shelves.
- Wire Racks: Easy to install and great for pans or spices.
- Wooden Pull-Outs: More expensive, but maximize deep cabinet space.
- Lazy Susans: Perfect for corner cabinets.
Better organization makes your kitchen more usable, not just more stylish.
18. Upgrading The Backsplash
A new backsplash can draw attention away from arched cabinet details.
- Tile: Subway, mosaic, or large format tiles all work.
- Peel-and-Stick: Fast and DIY-friendly.
- Stone Slabs: For a high-end look.
Choose a simple design if your cabinets are a bold color.
19. Adding Decorative Grilles
Install wire or metal grilles instead of glass in upper cabinet doors.
- Styles: Brass, stainless, or oil-rubbed bronze.
- Installation: Cut out the panel and staple or glue grille in place.
Grilles add texture and interest without full visibility.
20. Full Cabinet Replacement
If your cabinet boxes are damaged, or you want a totally new layout, replacement is the final step.
- Options: Stock, semi-custom, or custom cabinets.
- Cost: Starts around $5,000 for a small kitchen and goes up.
Full replacement is expensive, but sometimes the only way to get the kitchen you truly want.
Choosing The Right Update For Your Kitchen
Every kitchen is unique, so how do you choose the best method? Consider these factors:
| Update Method | Cost (Estimate) | DIY-Friendly | Time Needed |
|---|---|---|---|
| Painting | $100–$500 | Yes | 2–5 days |
| Refacing | $1,000–$4,000 | Partial | 3–7 days |
| Replacing Doors | $500–$2,000 | Yes | 2–4 days |
| Full Replacement | $5,000+ | No | 1–3 weeks |
- Budget: If you want a big change for little money, painting is best.
- Cabinet Condition: Refacing works if your boxes are solid.
- Style Goals: For maximum modernization, removing arches or replacing doors is most effective.
- DIY Skills: Painting and hardware updates are easy for beginners.

Credit: www.reddit.com
Step-by-step Guide: How To Paint Arched Kitchen Cabinets
One of the most popular updates is painting. Here’s a clear, step-by-step approach:
1. Gather Materials
- Degreaser or mild soap
- Screwdriver
- Sandpaper (120 and 220 grit)
- Tack cloth
- Painter’s tape
- Drop cloths
- High-quality primer (bonding type for laminate or veneer)
- Cabinet paint (alkyd or acrylic)
- Paintbrushes (angled and fine-tip)
- Roller (foam type for cabinets)
- New hardware (optional)
2. Prepare The Cabinets
- Remove all doors, drawers, and hardware.
- Clean surfaces with degreaser. Dry well.
- Lightly sand all surfaces, focusing on the arch detail.
- Wipe dust with a tack cloth.
- Tape off walls, floors, and any areas you don’t want painted.
- Lay drop cloths to protect counters and floors.
3. Prime
- Apply a thin, even coat of primer with a brush (for arches) and roller (for flats).
- Let dry completely (follow label instructions).
- Lightly sand with 220 grit for a smooth finish.
4. Paint
- Use a fine-tip brush for the arch curves and details.
- Roll paint on flat areas.
- Apply two thin coats, letting each dry fully.
- Inspect for drips or missed spots, especially in the arch.
- Let dry for at least 24 hours before handling.
5. Reassemble
- Reinstall doors and hardware.
- Touch up any small chips or marks.
- Consider new hardware for extra impact.
Expert tip: Allow paint to cure for 7 days before heavy use to prevent scratches.
Common Mistakes To Avoid
Many DIYers make the same errors. Watch out for:
- Skipping Surface Prep: Paint won’t stick to grease or gloss. Clean and sand first.
- Ignoring the Arch: Rushing the curve leads to drips and uneven finish.
- Using the Wrong Paint: Wall paint is too soft. Use cabinet or enamel paint.
- Forgetting Hardware Holes: If you change handle style, fill old holes before painting.
- Not Letting Paint Cure: Don’t rush to reinstall doors. Let everything dry for best results.
Non-obvious insight: If you use spray paint, practice on cardboard first to avoid over-spray and runs.
Credit: www.kylieminteriors.ca
Comparing Popular Update Methods
To help you choose, here’s a comparison of the most-used update options:
| Feature | Painting | Refacing | Replacing Doors | New Hardware |
|---|---|---|---|---|
| Cost | Low | Medium | Medium | Low |
| Impact | Moderate | High | High | Low |
| DIY Level | Easy | Medium | Medium | Easy |
| Time | Short | Medium | Medium | Short |
| Removes Arch | No | Yes | Yes | No |
Real-life Examples
- Sarah’s Kitchen: Sarah had golden oak arched cabinets. She painted them white, swapped in black bar pulls, and added a subway tile backsplash. The kitchen now looks bright and modern—total cost under $300.
- The Kim Family: The Kims refaced their cabinets with shaker-style doors, replacing all arches. They chose new quartz countertops. Their kitchen looks brand new and increased their home value by $10,000.
- Carlos’s Rental: Carlos couldn’t change cabinets in his rental, but he removed a few doors for open shelving and used peel-and-stick wallpaper on the back panels. The result: a custom look with almost no budget.

Credit: normandyremodeling.com
Expert Insights For A Successful Update
- Test Colors First: Paint or stain a small door and live with it for a few days before committing.
- Order Extra Materials: Always buy more paint, hardware, or veneer than you think you’ll need to cover mistakes or touch-ups.
- Keep Safety First: Wear a mask when sanding or painting, and open windows for ventilation.
- Document Progress: Take before, during, and after photos. This helps track changes and can boost your confidence if you get stuck.
Little-known tip: If you’re hiring help, ask for references and photos of past arched cabinet updates. Not all pros have the same experience with curved designs.
Long-term Maintenance
After updating your cabinets, keep them looking fresh by:
- Wiping spills quickly to avoid stains.
- Using gentle cleaners—harsh chemicals can damage paint or veneer.
- Tightening hardware every few months.
- Touching up chips with leftover paint or stain.
With care, your updated cabinets can look great for years.
When To Call A Professional
Some updates are best left to the pros:
- Major refacing or door replacement (especially with custom sizes)
- Removing arches from veneer or MDF doors
- Installing new countertops
- Full cabinet replacement
A professional can ensure a seamless finish and save time, especially if you have a large kitchen or limited DIY skills.
Sustainability Tips
If you remove old doors or hardware, donate them to a local reuse center or charity. Many organizations accept cabinet parts for recycling or resale.
You can also look for eco-friendly paints and stains with low VOCs (volatile organic compounds) for better indoor air quality.
Where To Get Inspiration
For more ideas, visit sites like Houzz to see real kitchens with updated arched cabinets. Save photos that match your style and use them as a guide.
Frequently Asked Questions
How Do I Know If My Arched Cabinets Are Solid Wood Or Veneer?
Look at the door edges and back. Solid wood has a consistent grain on all sides. Veneer is a thin wood layer over a different core—often MDF or particleboard. Veneer may chip at the edges, while solid wood does not.
Can I Paint Over Stained Cabinets Without Sanding?
Sanding is strongly recommended. Even if you use “no-sand” primer, a light sanding helps paint stick better and last longer. Skipping this step can lead to peeling or chipping paint.
What Colors Are Best For Updating Arched Cabinets?
Light neutrals like white, gray, or greige are most popular for a modern look. Navy, black, or deep green are trendy choices if you want bold style. Always test colors in your space before painting all cabinets.
Is It Cheaper To Reface Or Replace Cabinets?
Refacing is usually much cheaper—often half the cost of full replacement. If your cabinet boxes are in good shape, refacing gives you a “like new” appearance at a lower price.
Can I Remove Just The Arch And Keep The Rest Of The Door?
Yes, if your doors are solid wood. Carefully cut away the arch, sand smooth, and finish with paint or stain. Veneer or MDF doors may not survive this process, so consider replacing the doors instead.
—
With smart planning, patience, and the right materials, you can update arched kitchen cabinets to match any style. Whether you choose a simple paint job, new hardware, or a full door swap, your kitchen will feel refreshed and more inviting. Take your time, avoid common mistakes, and enjoy the transformation—your kitchen deserves it.