
Welcoming a new baby is a joyful and sometimes overwhelming experience. Parents often want every detail to be perfect, especially when it comes to feeding. If you use bottles, the temperature of milk or formula can make a big difference to your baby’s comfort. That’s why many families choose the Philips Avent Bottle Warmer. This device promises to quickly and evenly warm milk, making feeding time smoother for both you and your baby. But how do you get the most from it? And how can you avoid common mistakes? This guide will walk you through everything you need to know about using the Philips Avent Bottle Warmer, from setup to cleaning and troubleshooting. Whether you’re a first-time parent or looking for tips to make feeding easier, you’ll find clear, helpful advice here.
Understanding The Philips Avent Bottle Warmer
The Philips Avent Bottle Warmer is designed to warm baby bottles and baby food safely and efficiently. It uses gentle heating to preserve nutrients in breast milk and formula. Compared to microwaves, which can cause hot spots and damage milk, bottle warmers heat evenly, making them a preferred choice for many parents.
Key Features
- Even heating: The device circulates water around the bottle for uniform warmth.
- Quick warming: Most bottles warm in 3 to 5 minutes, depending on size and starting temperature.
- Easy controls: Simple dial or button-based operation.
- Automatic shut-off: Prevents overheating and saves energy.
- Compatibility: Fits most bottle sizes, including Philips Avent and other major brands.
Types Of Philips Avent Bottle Warmers
There are several models available, with small differences:
- Classic Bottle Warmer: Basic model, manual timer.
- Fast Bottle Warmer: Warms bottles faster, automatic shut-off.
- Premium Bottle Warmer: Features smart temperature control, defrost function, and more.
Each model is designed to make warming bottles easier but may have unique buttons or settings.
Setting Up Your Philips Avent Bottle Warmer
Before you use the bottle warmer, it’s important to set it up correctly.
Unboxing And Checking Parts
When you open the box, you should find:
- The bottle warmer unit
- Power cord
- Instruction manual
Check that all parts are present and not damaged. If anything is missing, contact the retailer or Philips customer support.
Placing The Warmer
Choose a flat, stable surface near an electrical outlet. Keep the warmer away from sinks, stovetops, or water sources to avoid accidents. Make sure the cord doesn’t dangle over the counter where it can be pulled by children.
Cleaning Before First Use
Wipe the inside and outside with a damp cloth. Do not immerse the unit in water. Fill the warmer with clean water and run one warming cycle without a bottle to remove any dust from manufacturing or shipping.
Step-by-step Guide: How To Use The Philips Avent Bottle Warmer
Warming bottles sounds simple, but there are important steps to follow for safety and effectiveness. Below you’ll find detailed instructions.
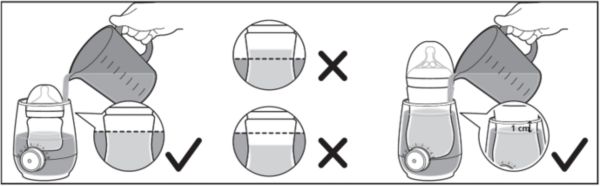
1. Add Water To The Warmer
The Philips Avent Bottle Warmer uses water to heat bottles. The amount you need depends on the size of the bottle and the amount of milk or formula.
- For most models, fill the warmer with room-temperature water up to the indicated line inside the device.
- Some models have a guide that shows how much water to use for different bottle sizes. Always check your instruction manual for specifics.
Pro Tip: Use filtered water if you live in an area with hard water to reduce mineral buildup.
2. Place The Bottle Or Food Jar
- Remove the bottle cap, sealing disc, or any plastic cover.
- Insert the bottle or baby food jar into the warmer.
- Make sure the bottle sits upright and is not tilted, so the heat circulates evenly.
3. Select The Appropriate Setting
Most Philips Avent Bottle Warmers have a dial or button to choose the warming mode:
- Milk warming: For bottles of breast milk or formula.
- Food warming: For jars of baby food.
- Defrost: For frozen milk or food (Premium models).
- Keep warm: Maintains temperature for up to 60 minutes.
Set the dial or press the button for the type and size of the bottle. Check the chart in your manual or on the device for guidance.
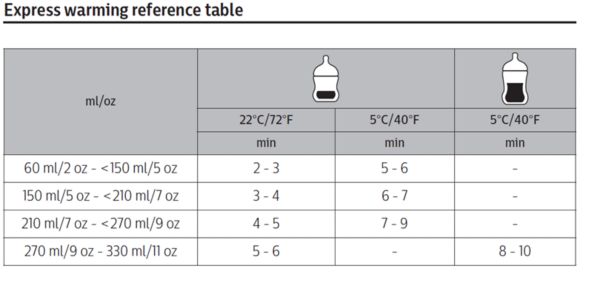
Sample Warming Times
Here’s an example for a typical 4 oz (125 ml) bottle taken from the refrigerator:
- Classic Warmer: 3–4 minutes
- Fast Warmer: 2–3 minutes
- Premium Warmer: 2–3 minutes
Larger bottles will take longer.
4. Start The Warming Cycle
- Press the start button or turn the dial.
- The device will begin heating. Some models have indicator lights or a beep when done.
- Do not open the lid or remove the bottle during warming.
Insight: If your warmer does not have an auto shut-off, set a timer on your phone to avoid overheating.
5. Check The Milk Temperature
- Shake the bottle gently to ensure even heat.
- Test a few drops on the inside of your wrist. The milk should feel warm, not hot.
- If it’s too cool, reheat in short bursts (30 seconds), testing each time.
- Never microwave the bottle after using the warmer.
6. Feed Your Baby
Once the milk is at the right temperature, feed your baby promptly. Do not let the warmed milk sit for more than one hour, as bacteria can grow.
Using The Defrost Function (premium Model)
Some Philips Avent models have a defrost function for frozen breast milk or baby food.
- Place the frozen bottle or jar in the warmer.
- Select the defrost mode.
- The device will use a gentler heat to thaw, then warm the milk.
- Stir or shake the bottle when finished to ensure even temperature.
Defrosting in the warmer is safer than using a microwave, which can damage nutrients.

Credit: www.youtube.com
Warming Baby Food
You can use the Philips Avent Bottle Warmer for baby food jars or containers.
- Place the jar in the warmer.
- Add water as directed.
- Select the “food” setting.
- Stir the food halfway through if possible.
- Test the temperature before feeding.
Non-obvious tip: Use only glass or BPA-free containers in the warmer.
How To Use The Keep Warm Feature
Many parents like the keep warm function. It maintains milk at the right temperature for up to 60 minutes (model-dependent).
- After warming, switch to “keep warm.”
- Do not leave milk in the warmer for more than 60 minutes to prevent bacteria growth.
- Always test the temperature before feeding.
Cleaning And Maintenance
A clean bottle warmer is essential for safe feeding.
Daily Cleaning
- Unplug and allow the device to cool.
- Pour out any remaining water.
- Wipe the inside and outside with a damp cloth.
- Dry with a clean towel.
Deep Cleaning
- Once a week, fill the warmer with water and a little vinegar (1: 2 ratio).
- Let it soak for 30 minutes.
- Rinse thoroughly and wipe dry.
This removes mineral deposits and keeps the warmer working efficiently.
Descaling
If you notice white buildup (limescale), descale the unit:
- Mix equal parts white vinegar and water.
- Fill the warmer, let sit for 30–60 minutes.
- Empty, rinse thoroughly, and wipe dry.
Descale every 4 weeks, or more often in hard water areas.
Safety Precautions
Your baby’s safety comes first. Follow these tips:
- Always check the milk temperature before feeding.
- Do not overfill the warmer with water.
- Never immerse the unit in water or place in a dishwasher.
- Keep the device away from children when in use.
- Use only as directed for bottles and baby food; do not use for other items.
Common Mistakes And How To Avoid Them
Parents sometimes run into trouble with bottle warmers. Here are mistakes to watch for:
- Overheating milk: This can destroy nutrients and burn your baby’s mouth. Always test before feeding.
- Using too little water: The bottle won’t warm evenly or may take longer.
- Forgetting to clean: Bacteria or limescale can build up, affecting performance.
- Using the wrong setting: Double-check the dial or button each time.
- Leaving milk too long: Warm milk should not stand for more than one hour.
Non-obvious insight: If you use breast milk bags, always place them inside a clean bottle before warming. Warming bags directly can cause leaks or uneven heating.
Philips Avent Bottle Warmer Vs. Other Warming Methods
Parents may wonder if a bottle warmer is better than other methods. Here’s a comparison:
| Method | Time to Warm (4oz) | Even Heating | Safety | Preserves Nutrients |
|---|---|---|---|---|
| Philips Avent Bottle Warmer | 3–5 min | Yes | High | Yes |
| Microwave | 1–2 min | No (hot spots) | Low | No |
| Hot Water Bath | 5–10 min | Yes (with stirring) | Medium | Yes |
| Running Tap Water | 5–8 min | Yes | Medium | Yes |
The bottle warmer is one of the safest and most convenient options, especially for nighttime feedings.
Choosing The Right Philips Avent Model
If you are buying a new bottle warmer, consider your needs:
| Model | Warming Speed | Features | Price Range | Best For |
|---|---|---|---|---|
| Classic | Medium | Simple controls | Low | Budget buyers |
| Fast | Fastest | Auto shut-off | Mid | Busy parents |
| Premium | Fast | Defrost, keep warm, smart temp | High | Multiple feeds, breast milk |
Tip: If you plan to warm both bottles and baby food, choose the Premium model for more flexibility.
Real-world Tips For Better Results
- Pre-fill the warmer at night: Save time by adding water before bedtime for quick night feedings.
- Label your bottles: If you prepare multiple bottles, label them with the date and time.
- Test with water first: If you’re unsure about warming times, test with water in a bottle before using milk.
- Keep a spare bottle: In case one is warming, you have a backup ready.
- Travel tip: Some Philips Avent models work with car adapters for on-the-go warming.
Credit: www.usa.philips.com
Troubleshooting: Fixing Common Issues
Bottle Not Warming
- Check power connection.
- Ensure correct water level.
- Confirm the bottle is the right size for the warmer.
Device Not Turning On
- Plug into a working outlet.
- Check for visible damage to the cord.
- Contact Philips support if the problem continues.
White Buildup Inside
- Descale as described earlier.
- Use filtered water to prevent recurrence.
Bottle Too Hot Or Cold
- Adjust the warming time.
- Use the correct setting for the bottle size and starting temperature.
Non-obvious insight: If warming is uneven, make sure the bottle is upright and not leaning to one side.
Storing And Transporting The Warmer
If you need to move the warmer:
- Make sure it is unplugged and completely cool.
- Empty any water.
- Wipe dry to prevent mold.
- Store in a dry place, away from direct sunlight.
For travel, use the original box or a padded bag to avoid damage.
When To Replace Your Philips Avent Bottle Warmer
A well-maintained bottle warmer can last for years, but consider replacing if:
- It no longer heats properly.
- There are cracks or damaged parts.
- The cord is frayed or the device will not turn on.
- There is persistent buildup that cannot be removed.
Always follow the warranty and safety guidelines from Philips.
Environmental Impact And Energy Use
The Philips Avent Bottle Warmer is more energy-efficient than boiling water or microwaving. It uses low power and has an auto shut-off to save energy. Descale regularly to keep it efficient. At the end of its life, dispose of the warmer according to local electronic waste rules.
Additional Resources
To learn more about safe bottle warming and feeding, visit the official Philips Avent page at Philips Avent Official Site.
Frequently Asked Questions
How Long Does It Take To Warm A Bottle With The Philips Avent Bottle Warmer?
Warming time depends on the bottle size and starting temperature. For a 4 oz (125 ml) bottle from the fridge, it usually takes about 3–4 minutes in the Classic or Fast Warmer. Larger bottles or bottles starting at room temperature will take less time.
Can I Use The Philips Avent Bottle Warmer With Other Bottle Brands?
Yes, the warmer is designed to fit most major bottle brands, including Dr. Brown’s, Tommee Tippee, and Medela. Always check that the bottle sits upright and does not tilt to ensure safe, even heating.
Is It Safe To Warm Breast Milk In The Philips Avent Bottle Warmer?
Yes, the gentle heating method preserves most of the nutrients in breast milk. Always use the correct setting and test the temperature before feeding. Avoid overheating, as this can damage the milk.
How Often Should I Descale The Bottle Warmer?
Descale every 4 weeks, or more often if you notice white mineral buildup inside the device. Use equal parts white vinegar and water, let it soak, then rinse well. Regular descaling keeps the warmer working properly.
Can I Leave Milk In The Warmer For Later Use?
Do not leave milk in the warmer for more than 60 minutes. Bacteria can grow in warm milk, which is unsafe for your baby. Discard any milk that has been warmed and not used within one hour.
Parents want the best for their children, and feeding time is a special moment. The Philips Avent Bottle Warmer can make life easier if you use it correctly. With these tips, practical advice, and troubleshooting steps, you can confidently warm bottles and baby food every day.
Safe, simple, and reliable—feeding your baby just got smoother.
Credit: www.usa.philips.com