
Installing a shower in a basement can transform a plain lower level into a comfortable living space or a convenient guest suite. But before you enjoy a hot shower downstairs, you have to take care of one of the most critical steps: roughing in the shower drain. This part of the plumbing process is not only about connecting pipes. It’s also about making sure water flows correctly, the drainage is safe, and your installation passes inspection. Many homeowners and even some contractors find this step tricky, especially because basements often come with unique challenges like concrete floors, limited access, and gravity issues.
In this guide, you’ll learn everything you need to know about roughing in a shower drain in the basement. We’ll cover how basement drains are different, the tools and materials you need, step-by-step instructions, common mistakes, code requirements, and advanced tips.
Whether you’re a DIY enthusiast or just want to understand what your plumber is doing, this article will help you make informed decisions and avoid costly problems.
Understanding Shower Drain Rough-in
The term rough-in refers to the stage where the basic plumbing lines are installed, but the final fixtures (like the shower pan or enclosure) are not yet attached. For a shower drain, rough-in means placing the drain pipe and fitting in the right spot, at the right depth, with the correct slope, and connecting it to your home’s main drain system.
Why is this step so important? If your rough-in is off by even a few inches, your shower pan might not fit. If the slope is wrong, water can back up or drain too slowly, leading to mold and damage.
In basements, these mistakes are even harder to fix because the pipes are under or inside concrete.
Basement Vs. Above-grade Shower Drains
Basements have special challenges:
- The main drain line is often deeper underground.
- You may have to break concrete to access or install pipes.
- Gravity drainage might be harder if your sewer line is higher than your basement floor.
- Moisture and radon issues are more common in basements.
So, you can’t always use the same methods as you would for a shower on the main floor.
Planning Your Basement Shower Drain
Smart planning is the foundation for a successful rough-in. Here are the core steps:
1. Assess Your Drainage System
Check where your main stack (vertical drain pipe) runs. Find out if your basement has a rough-in already. Some newer homes have a capped-off pipe for future bathrooms.
2. Measure Carefully
The standard distance from the framed shower wall to the drain center is usually 12 inches (for most pre-made shower pans), but always check the specs for your specific shower base.
3. Choose The Right Location
Pick a spot with enough headroom, where the drain can be sloped properly, and which matches your bathroom layout. Avoid placing the drain where it will be hard to reach for repairs.
4. Check Local Building Codes
Local codes will tell you the minimum pipe size (usually 2 inches for showers), required slope (typically 1/4 inch per foot), and venting rules.
5. Plan For Venting
Every drain needs a vent to prevent suction and sewer gas from entering your house. Plan where your vent pipe will connect—often to an existing vent stack.
Example Layout
Suppose you want your shower in the corner of your basement bathroom. The wall studs are up, and you have a 36”x36” shower base. You’ll need to:
- Mark the shower outline on the floor.
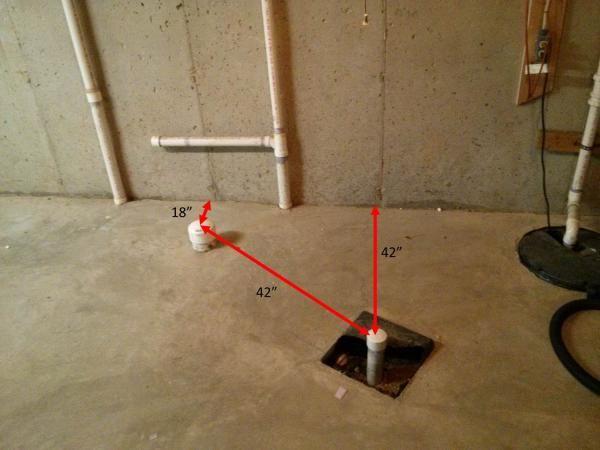
- Mark the drain center (usually 18” from each wall for a centered drain).
- Check for nearby pipes or obstructions under the slab.
Tools And Materials Needed
Having the right tools and supplies will save hours of frustration. Here’s a list:
Essential Tools:
- Hammer drill or rotary hammer (for concrete)
- Chisel
- Reciprocating saw or pipe cutter
- Tape measure and marker
- Level
- Pipe wrenches
- Bucket and shop vacuum
Materials:
- PVC or ABS drain pipe (2-inch diameter is standard)
- Shower drain assembly (with clamping ring and gasket)
- P-trap (matching pipe material)
- Pipe fittings (elbows, couplings, adapters)
- Pipe cement and primer (for PVC/ABS)
- Sand or gravel (for bedding the pipe)
- Concrete mix (for patching floor)
- Pipe insulation (optional, for noise/moisture control)
Pro tip: Always buy a bit more pipe and a few extra fittings. Mistakes and small adjustments are common.
Breaking Through Concrete
Most basements have concrete slab floors. To rough in a shower drain, you’ll probably need to cut or break a section of this slab.
Steps For Breaking Concrete:
1. Mark The Area
Draw a rectangle around the planned drain location, allowing extra space for working.
2. Cut The Slab
Use a hammer drill or rotary hammer with a masonry bit to score the outline. For larger jobs, a concrete saw may be needed.
3. Break And Remove
Use a sledgehammer and chisel to break up the concrete. Remove chunks with a bucket or shovel.
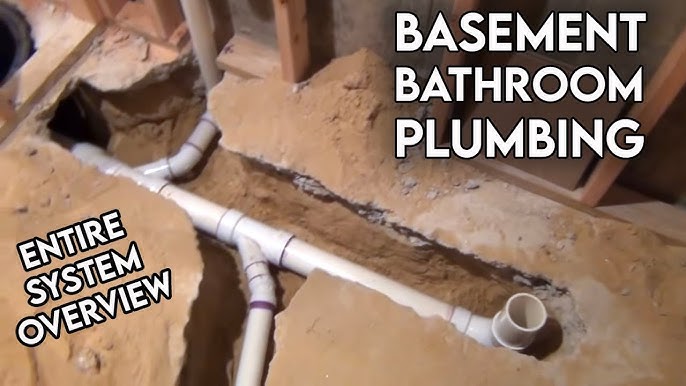
4. Dig A Trench
Dig down to expose the gravel bed and soil below. Make your trench wide enough for the pipe and P-trap.
Safety tips: Wear safety goggles, a dust mask, ear protection, and sturdy gloves. Concrete work is noisy and messy.
Installing The Shower Drain Pipe
Now you’re ready for the core plumbing work. This is the heart of the rough-in process.
Step-by-step Pipe Installation
1. Set The Drain Location
Place the shower base or a template on the floor. Mark the exact center for the drain opening.
2. Dry Fit The P-trap
Assemble the P-trap and pipe fittings without glue first. The P-trap must be directly under the shower drain, not offset.
3. Check Pipe Slope
The horizontal drain pipe should slope downward toward the main drain at 1/4 inch per foot. Use a level to check.
4. Connect To Main Drain
Attach your new shower drain line to the main drain or branch line. Use the right fittings and pipe cement.
5. Install The Drain Assembly
Secure the drain fitting to the pipe stub. If using a pan, make sure the drain height matches the pan’s requirements.
6. Test For Leaks
Pour water into the pipe. Check all joints for leaks before covering with concrete.
7. Backfill And Patch Concrete
Fill the trench with sand or gravel around the pipe. Then pour new concrete and smooth it level with the old floor.
Non-obvious insight: If your main drain is too high for gravity drainage, you may need a shower pump or an upflush system. These systems move water up to the sewer line but require careful planning and electrical power.
Venting The Basement Shower Drain
Proper venting is easy to overlook in the basement, but it’s critical for health and code compliance.
Why Venting Matters
- Prevents water in the P-trap from being sucked out.
- Stops sewer gases from entering your bathroom.
- Ensures smooth drainage.
Common Basement Venting Methods
1. Connecting To Existing Vent Stack
If there’s a vent stack nearby, connect your shower drain’s vent pipe to it. This is often the simplest method.
2. Individual Vent (dry Vent)
Run a new vent pipe from the shower drain (before the P-trap) up through the wall and connect to the main vent above the flood level.
3. Air Admittance Valve (aav)
In some areas, you can use a mechanical valve that lets air in but not gases out. Check your local code before using this.
Pro tip: The vent pipe is usually 1.5 inches or larger. Never skip venting, even if it seems to “work” without it.

Credit: www.personecomunita.it
Code Requirements And Inspections
Every town or city has its own plumbing code, often based on the International Residential Code (IRC) or Uniform Plumbing Code (UPC). Basement shower drains must meet these rules.
Key Code Points
- Pipe Size: Minimum 2-inch pipe for shower drains.
- Trap Distance: The P-trap must be close to the drain (no more than 24 inches away).
- Slope: 1/4 inch per foot for proper flow.
- Cleanout: There should be access to a cleanout near the drain.
Inspection Tips
- Call for inspection before you cover the pipes with concrete.
- Have your plans or layout ready for the inspector.
- Be ready to explain venting and drainage routes.
Non-obvious insight: Some inspectors will require a water test. This means plugging the pipe and filling it with water to check for leaks. Be prepared with test plugs.
Shower Drain Rough-in For Different Types Of Showers
Not all showers are the same. Your rough-in needs to match your shower style.
Prefabricated Shower Pans
These are plastic or fiberglass pans with a built-in drain hole.
- The drain must line up exactly with the pan.
- Check the manufacturer’s specs for the exact rough-in measurement.
- The height of the pipe stub should allow for the drain assembly and gasket.
Custom Tiled Showers
These use a mortar bed and tile.
- The drain fitting (usually called a clamping drain) must be set flush with the finished mortar.
- Allow for the thickness of both the mortar and tile when setting pipe height.
Curbless Or Barrier-free Showers
These are popular for accessibility.
- The drain may be linear or center style.
- The floor must slope toward the drain, so the rough-in pipe might be set lower than for a standard shower.
- Waterproofing is especially important.
Steam Showers
If you’re building a steam shower, drainage is similar, but plan for extra moisture and consider using mold-resistant materials.
Common Mistakes To Avoid
Even experienced DIYers can make costly errors during the rough-in. Here’s what to watch out for:
1. Incorrect Slope
Too little slope means slow drainage; too much can cause water to outrun debris, leading to clogs.
2. Off-center Drain
If the drain is not perfectly lined up, the shower base won’t fit, and leaks may develop at the gasket.
3. Poor Venting
Skipping the vent or making the vent pipe too small will cause drainage problems and sewer smells.
4. Improper Pipe Support
Pipes must be supported and bedded in sand or gravel, not just hanging in air pockets under the slab.
5. Mixing Pipe Materials Wrongly
If your existing pipes are ABS and you use PVC, you need a special transition cement.
6. Forgetting The Cleanout
Always install a cleanout access in case you need to clear a clog later.
Pro tip: Take photos of your rough-in before covering it. Future repairs will be much easier.
Advanced Tips For A Perfect Rough-in
If you want a truly professional result, consider these advanced suggestions:
- Use a laser level to mark slopes and heights accurately, especially for long drain runs.
- If you’re planning radiant floor heating, coordinate your piping layout to avoid conflicts.
- For high-moisture basements, wrap pipes with closed-cell foam insulation to reduce condensation.
- Mark all pipe locations on the concrete before you pour, so you don’t hit them later when drilling.
- When patching concrete, use a bonding agent on old edges to prevent cracks.
Cost Considerations And Time Estimates
Roughing in a shower drain in the basement can range from a simple weekend project to a big renovation job.
Diy Vs. Professional Cost
- DIY: Materials for a basic rough-in (pipe, fittings, concrete) typically cost $150–$300.
- Professional plumber: Labor can range from $500–$2,000, depending on concrete work and complexity.
- Special systems: Upflush or pump systems start at $800 for materials alone.
Time Frame
- Simple rough-in: 4–8 hours (with the right tools)
- With concrete cutting: Add 2–4 hours
- With pump system: Add 2–3 hours for installation and wiring
Remember, local codes may require a licensed plumber for certain parts of the job.
Example: Comparing Drain Placement Options
Below is a comparison of common shower drain placements to help you decide:
| Drain Placement | Pros | Cons | Best For |
|---|---|---|---|
| Centered | Even drainage, fits most pans | May limit layout options | Standard showers |
| Offset | Works around joists, obstacles | Custom pan needed, tricky alignment | Remodels, tight spaces |
| Linear (side) | Modern look, barrier-free | More expensive, special install | Curbless/accessible showers |
Example: Comparing Pipe Materials
Choosing between PVC and ABS is common for basement drains. Here’s a quick comparison:
| Material | Cost | Durability | Ease of Use | Color |
|---|---|---|---|---|
| PVC | Low | Very good | Easy to cut and glue | White |
| ABS | Low | Good | Simple glue, but only with ABS cement | Black |
Pro tip: Never mix PVC and ABS without the correct transition fittings and glue. Some codes don’t allow mixing them at all.
Example: Slope Calculation Table
Correct slope is key for drainage. Below are sample measurements:
| Drain Run (feet) | Required Drop (inches) | Total Slope (1/4” per foot) |
|---|---|---|
| 2 | 0.5 | 1/2 inch |
| 4 | 1 | 1 inch |
| 8 | 2 | 2 inches |
| 12 | 3 | 3 inches |
Note: Always measure the total run from the shower drain to the main stack.
Credit: www.youtube.com
When To Call A Professional
While many homeowners can handle roughing in a shower drain with care and research, there are times when hiring a pro is wise:
- If you’re unsure about venting or code compliance.
- If your sewer line is above the basement floor (needs a pump).
- If you hit unexpected obstacles, like old pipes, rocks, or wiring.
- For large or complex basement remodels.
A professional can also help get permits and pass inspection on the first try.
After The Rough-in: What Comes Next?
Once your rough-in passes inspection and the concrete is patched, you can move on to the next steps:
- Install the shower pan or build the mortar base for a tile shower.
- Hook up the water supply lines.
- Finish the bathroom walls and floor.
- Install the final drain assembly and test for leaks.
Credit: www.doityourself.com
Extra Resources
Basement plumbing can be complex. For more technical details, check out the Plumbing Codes Council for up-to-date code info and best practices.
Frequently Asked Questions
How Deep Should The Shower Drain Be In A Basement?
The shower drain pipe should be deep enough to allow the P-trap to sit directly under the drain opening, usually with the top of the trap about 2–3 inches below the finished floor. The exact depth depends on your shower base and the thickness of your concrete slab.
Can You Put A Shower In A Basement Without Breaking Concrete?
It’s possible if your home was built with a pre-installed rough-in, or if you use a shower pump or upflush system that sits above the floor. However, for most standard drains, you’ll need to break concrete to set the P-trap and drain line correctly.
What’s The Minimum Pipe Size For A Basement Shower Drain?
Most plumbing codes require a 2-inch pipe for shower drains. Some older homes may have 1.5-inch drains, but upgrading is strongly recommended for better flow and to meet modern codes.
How Do You Vent A Basement Shower Drain?
You can vent by connecting a vent pipe from the drain line (before the P-trap) to an existing vent stack, running a new vent through the walls, or using an air admittance valve (AAV) if allowed by your local code.
What If My Sewer Line Is Higher Than My Basement Shower Drain?
If your basement drain is lower than the main sewer, you’ll need a lift pump or upflush system. This device pumps waste water up to the main drain line. These systems require careful installation and a power source.
—
Roughing in a shower drain in your basement may seem like a big job, but with the right knowledge, tools, and preparation, you can create a bathroom space that’s comfortable, safe, and built to last. Take your time, double-check your measurements and slopes, and don’t hesitate to seek help when you need it.
Your efforts will pay off every time you step into a clean, dry, and properly drained basement shower.